<?xml version="1.0" encoding="utf-8"?><feed xmlns="http://www.w3.org/2005/Atom"><title>干徒的博客</title><link href="https://ganto.me"/><id>https://ganto.me</id><link rel="self" href="https://ganto.me/static/atom.xml"/>
<updated>2026-01-29T00:00:00+08:00</updated>
<author><name>干徒</name></author>
<generator uri="https://ganto.me">website-rs</generator>
<entry>
  <title>人工智能（AI）基础解析</title>
  <link href="https://ganto.me/post/20260129"/>
  <id>https://ganto.me/post/20260129</id>
  <updated>2026-01-29T00:00:00+08:00</updated>
  <published>2026-01-29T00:00:00+08:00</published>
  <author><name>干徒</name></author>
  <summary><![CDATA[人工智能（AI）已经越来越融入我们的生活，从智能助手到智能机器人，从智能交通到智能医疗，AI正在改变我们的世界。]]></summary>
  <content type="html"><![CDATA[<h2>一、AI的定义</h2>
<p>人工智能（Artificial Intelligence，简称AI）是一门研究、开发用于<strong>模拟、延伸和扩展人类智能</strong>的理论、方法、技术及应用系统的技术科学，核心目标是让机器具备类似人类的感知、推理、学习、决策、创造等智能行为，能够自主处理问题并适应不同场景。</p>
<p>AI并非单一技术，而是一门交叉学科，融合了计算机科学、数学、统计学、神经科学、语言学、心理学等多个领域的知识，是现代科技发展的核心方向之一。</p>
<h2>二、AI的核心特征</h2>
<ol>
<li><strong>感知能力</strong>：机器通过传感器、算法识别和接收外界信息，如视觉（图像识别、计算机视觉）、听觉（语音识别）、触觉（传感器感知）等，模拟人类的五官感知。</li>
<li><strong>学习能力</strong>：机器从数据、经验中自动总结规律，优化自身性能，无需人工手动修改代码，是AI的核心能力之一，也是实现智能的基础。</li>
<li><strong>推理与决策能力</strong>：机器根据已学知识和感知到的信息，进行逻辑分析、归纳演绎，进而做出判断和决策，解决实际问题。</li>
<li><strong>自适应能力</strong>：面对不同的输入、环境变化，机器能调整自身的算法和策略，保持处理问题的有效性，如智能机器人适应不同的行走场景。</li>
<li><strong>交互能力</strong>：通过自然语言处理、情感识别等技术，实现机器与人类、机器与机器之间的高效沟通，如智能音箱、聊天机器人。</li>
</ol>
<h2>三、AI的主要分类</h2>
<p>从<strong>智能程度</strong>和<strong>应用场景</strong>出发，AI可分为三大类，也是行业内公认的分类方式，三者代表了AI发展的不同阶段：</p>
<h3>1. 弱人工智能（Narrow AI）</h3>
<p>也叫<strong>专用人工智能</strong>，是目前技术发展的主流，指仅能在<strong>特定领域</strong>完成单一任务的AI，其智能局限于预设的场景和任务范围，不具备通用的自主思考能力。<br />
<strong>典型应用</strong>：人脸识别、语音助手（Siri、小爱同学）、推荐算法（电商/视频平台）、自动驾驶（L2-L4级）、ChatGPT等大语言模型、图像生成工具（Midjourney、Stable Diffusion）。</p>
<h3>2. 强人工智能（General AI）</h3>
<p>也叫<strong>通用人工智能</strong>，是理想中的AI形态，指具备与<strong>人类同等水平</strong>的通用智能，能够理解、学习人类可掌握的任何知识和技能，在任意领域完成复杂任务，拥有自主意识、情感和独立思考能力，能像人类一样适应不同的未知场景。<br />
目前强人工智能仍处于理论研究阶段，尚未实现。</p>
<h3>3. 超人工智能（Super AI）</h3>
<p>指在<strong>所有领域</strong>的智能表现都远超人类的AI，不仅具备人类的智能和意识，还能在科学研究、创造、决策等方面做出超越人类极限的判断和成果。<br />
超人工智能属于未来的假想形态，其发展可能性和潜在影响仍是学术界的探讨话题。</p>
<h2>四、AI的核心技术领域</h2>
<p>AI的实现依赖于多个核心技术的协同发展，主要关键领域包括：</p>
<ol>
<li><strong>机器学习（Machine Learning, ML）</strong>：AI的核心技术，让机器通过数据自动学习规律，无需人工编程设定规则。下分监督学习、无监督学习、强化学习等主流方法，是后续各类AI技术的基础。</li>
<li><strong>深度学习（Deep Learning, DL）</strong>：机器学习的一个分支，基于多层神经网络模拟人类大脑的神经元连接方式，处理复杂的海量数据，是推动现代AI爆发式发展的核心，广泛应用于图像、语音、自然语言处理。</li>
<li><strong>自然语言处理（Natural Language Processing, NLP）</strong>：让机器理解、处理、生成人类的自然语言，实现人机语言交互，核心应用包括机器翻译、聊天机器人、文本摘要、情感分析等，大语言模型（LLM）是其现阶段的高级形态。</li>
<li><strong>计算机视觉（Computer Vision, CV）</strong>：让机器“看懂”图像和视频，实现对视觉信息的识别、检测、分割、生成，应用包括人脸识别、车牌识别、图像分类、目标检测、自动驾驶视觉感知等。</li>
<li><strong>语音识别与合成</strong>：属于NLP和CV的交叉领域，实现语音到文字的转换（识别）和文字到语音的转换（合成），应用包括语音助手、实时语音翻译、有声书生成等。</li>
<li><strong>强化学习（Reinforcement Learning, RL）</strong>：让机器通过“试错”学习，在与环境的交互中通过奖励和惩罚优化行为策略，广泛应用于智能机器人、游戏AI、自动驾驶决策等场景。</li>
<li><strong>知识图谱</strong>：以图形化结构描述事物之间的关联关系，让机器具备“知识储备”，提升推理和决策的准确性，应用于智能搜索、推荐系统、金融风控等。</li>
</ol>
<h2>五、AI的主要应用场景</h2>
<p>如今AI已渗透到社会生产和生活的各个领域，成为推动产业升级和生活便捷化的重要力量，核心应用场景包括：</p>
<h3>1. 日常生活</h3>
<p>智能语音助手、智能家电、人脸识别解锁、短视频/电商推荐算法、聊天机器人、地图导航的路径规划等。</p>
<h3>2. 工业与制造业</h3>
<p>工业机器人（焊接、装配、分拣）、智能制造的质量检测、生产流程优化、预测性维护（通过数据预判设备故障）等。</p>
<h3>3. 金融领域</h3>
<p>智能风控（识别欺诈交易）、算法交易、智能投顾、信用评级、客服机器人等。</p>
<h3>4. 医疗健康</h3>
<p>医学影像诊断（AI识别肿瘤、病灶）、辅助临床决策、药物研发（加速分子筛选）、个性化诊疗方案制定、智能养老设备等。</p>
<h3>5. 交通出行</h3>
<p>自动驾驶、智能交通调度（红绿灯优化、拥堵疏导）、网约车智能派单、物流路径优化等。</p>
<h3>6. 教育领域</h3>
<p>个性化学习（根据学生情况推送学习内容）、AI作业批改、智能答疑机器人、教育大数据分析等。</p>
<h3>7. 文创与娱乐</h3>
<p>AI绘画、AI生成文案/音乐/视频、游戏AI（智能NPC）、影视特效制作优化等。</p>
<h3>8. 公共安全与政务</h3>
<p>人脸识别安防、视频监控智能分析、疫情防控数据统计、政务智能审批、智能客服等。</p>
<h2>六、AI的发展历程</h2>
<p>AI的发展并非一帆风顺，经历了多次起伏，至今已有70余年的历史，核心阶段可概括为：</p>
<ol>
<li><strong>诞生期（1950s）</strong>：1950年，图灵发表《计算机器与智能》，提出“图灵测试”，成为AI的理论基础；1956年，达特茅斯会议召开，正式提出“人工智能”概念，AI作为一门学科诞生。</li>
<li><strong>第一次繁荣期（1956-1970s）</strong>：早期AI算法取得突破，实现了简单的定理证明、语言翻译，人们对AI充满期待，政府和企业加大投入。</li>
<li><strong>第一次寒冬（1970s-1980s）</strong>：受限于计算机算力和数据量，早期AI无法实现复杂任务，理论和技术遇到瓶颈，资金投入大幅减少。</li>
<li><strong>第二次繁荣期（1980s-1990s）</strong>：专家系统、机器学习算法发展，AI在商业领域开始应用，同时神经网络技术初步探索。</li>
<li><strong>第二次寒冬（1990s-2000s）</strong>：专家系统维护成本高、通用性差，神经网络技术发展缓慢，AI再次陷入低谷。</li>
<li><strong>现代AI爆发期（2010s至今）</strong>：随着大数据、云计算、算力的爆发式增长，深度学习算法取得重大突破，AlphaGo（2016）击败人类围棋冠军，大语言模型（ChatGPT2022）、多模态AI相继出现，AI进入工业化应用阶段，渗透到各个领域。</li>
</ol>
<h2>七、AI的争议与挑战</h2>
<p>AI在推动科技和社会发展的同时，也带来了一系列伦理、社会和技术层面的挑战，成为全球关注的焦点：</p>
<ol>
<li><strong>就业结构调整</strong>：部分重复性、标准化的工作（如流水线工人、传统客服、数据录入员）可能被AI替代，导致相关岗位人员失业，需要社会进行就业转型和技能培训。</li>
<li><strong>伦理与道德问题</strong>：AI的决策黑箱（无法解释决策原因）、算法偏见（如人脸识别对特定人群的误判）、隐私泄露（AI收集和分析海量个人数据）、深度伪造（AI生成虚假图像/视频/语音）带来的信息造假问题。</li>
<li><strong>技术安全风险</strong>：AI系统的漏洞可能被恶意利用，如自动驾驶被黑客攻击、军用AI武器的潜在风险，以及强人工智能实现后的失控风险。</li>
<li><strong>人类能力退化</strong>：过度依赖AI的辅助功能（如导航、翻译、计算），可能导致人类自身的记忆、推理、动手能力逐渐退化。</li>
<li><strong>全球发展不平衡</strong>：发达国家掌握AI核心技术和算力资源，发展中国家可能面临“数字鸿沟”，加剧全球科技和经济发展的不平衡。</li>
</ol>
<h2>八、AI的未来发展趋势</h2>
<ol>
<li><strong>多模态AI成为主流</strong>：从单一的文本/图像/语音AI，向融合文本、图像、语音、视频、触觉的多模态AI发展，实现更自然的人机交互。</li>
<li><strong>大模型向轻量化、定制化发展</strong>：通用大模型的算力成本高，未来将向轻量化的端侧AI（运行在手机、机器人等终端设备）、针对特定行业的定制化大模型发展。</li>
<li><strong>AI与实体经济深度融合</strong>：AI将不再是独立的技术工具，而是与制造业、农业、医疗、金融等实体经济深度结合，推动产业数字化、智能化升级。</li>
<li><strong>AI治理体系逐步完善</strong>：全球各国将加强AI的立法和监管，建立统一的AI伦理和安全标准，规范AI的研发和应用，防范技术风险。</li>
<li><strong>脑科学与AI的交叉融合</strong>：通过研究人类大脑的工作机制，推动类脑智能的发展，让AI更接近人类的自然智能，而非单纯的算法模拟。</li>
<li><strong>人机协同成为常态</strong>：AI并非替代人类，而是成为人类的“智能助手”，实现人类与AI的优势互补，如医生+AI影像诊断、设计师+AI创意生成。</li>
</ol>
<h2>九、总结</h2>
<p>人工智能是人类科技发展的重要里程碑，其本质是用机器模拟人类智能，解决人类难以完成的复杂任务，推动社会生产效率的提升和生活方式的变革。</p>
<p>目前的AI仍处于<strong>弱人工智能阶段</strong>，虽已实现诸多领域的应用，但远未达到具备自主意识的强人工智能。未来，AI的发展将是技术突破、产业应用和治理体系完善的协同过程，如何在利用AI推动发展的同时，规避其潜在风险，实现AI与人类社会的和谐共生，是全球需要共同面对的课题。</p>
<p>AI的核心价值并非替代人类，而是<strong>延伸人类的能力边界</strong>，让人类从重复性的工作中解放出来，专注于创意、创新、情感交流等人类独有的领域。</p>
]]></content>
  <category term="Artificial Intelligence"/>
</entry>
<entry>
  <title>Dioxus基于Rust的多平台开发框架</title>
  <link href="https://ganto.me/post/20250609"/>
  <id>https://ganto.me/post/20250609</id>
  <updated>2025-06-09T00:00:00+08:00</updated>
  <published>2025-06-09T00:00:00+08:00</published>
  <author><name>干徒</name></author>
  <summary><![CDATA[官网：https://dioxuslabs.com/ Dioxus 是用于构建全栈 Web、桌面和移动应用程序的 Rust 框架。使用实时热重载进行迭代，添加服务器函数，并在创纪录的时间内进行部署。]]></summary>
  <content type="html"><![CDATA[<p>官网：<a href="https://dioxuslabs.com/">https://dioxuslabs.com/</a></p>
<p>Dioxus 是用于构建全栈 Web、桌面和移动应用程序的 Rust 框架。使用实时热重载进行迭代，添加服务器函数，并在创纪录的时间内进行部署。</p>
]]></content>
  <category term="Rust"/>
  <category term="Dioxus"/>
</entry>
<entry>
  <title>Rust 案例 - 计算器</title>
  <link href="https://ganto.me/post/20250410"/>
  <id>https://ganto.me/post/20250410</id>
  <updated>2025-04-10T00:00:00+08:00</updated>
  <published>2025-04-10T00:00:00+08:00</published>
  <author><name>干徒</name></author>
  <summary><![CDATA[use std::io; use std::io::Write; fn main() { let mut user_typer = UserTyper::new(CommandLineComputer); user_typer.type_expr(); println!(&quot;Result: {}&quot;, user_typer.compute()); } trait Computer { fn compute(&amp;self, expr: &amp;str) -&gt; i32; } struct CommandLineComputer; impl Computer for CommandLineComputer { fn compute(&amp;self, expr: &amp;str) -&gt; i32 { let mut num1 = String::new(); let mut num2 = String::new(); let mut op: Option&lt;char&gt; = None; for c in expr.trim().chars() {]]></summary>
  <content type="html"><![CDATA[<pre><code class="language-rust">use std::io;
use std::io::Write;

fn main() {
    let mut user_typer = UserTyper::new(CommandLineComputer);
    user_typer.type_expr();
    println!(&quot;Result: {}&quot;, user_typer.compute());
}

trait Computer {
    fn compute(&amp;self, expr: &amp;str) -&gt; i32;
}

struct CommandLineComputer;

impl Computer for CommandLineComputer {
    fn compute(&amp;self, expr: &amp;str) -&gt; i32 {
        let mut num1 = String::new();
        let mut num2 = String::new();
        let mut op: Option&lt;char&gt; = None;

        for c in expr.trim().chars() {
            if c.is_digit(10) {
                if op.is_none() {
                    num1.push(c);
                } else {
                    num2.push(c);
                }
                continue;
            }
            match c {
                '+' | '-' | '*' | '/' if op.is_none() =&gt; op = Some(c),
                _ if c.is_whitespace() =&gt; continue,
                _ =&gt; panic!(&quot;Invalid character: {}&quot;, c),
            }
        }

        if num1.is_empty() || num2.is_empty() || op.is_none() {
            panic!(&quot;Invalid expression: {}&quot;, expr);
        }

        let num1 = num1.parse::&lt;i32&gt;().unwrap();
        let num2: i32 = num2.parse().unwrap();
        let op = op.unwrap();

        match op {
            '+' =&gt; num1 + num2,
            '-' =&gt; num1 - num2,
            '*' =&gt; num1 * num2,
            '/' =&gt; num1 / num2,
            _ =&gt; unreachable!(),
        }
    }
}

struct UserTyper&lt;T: Computer&gt; {
    computer: T,
    expr: String,
}

impl&lt;T: Computer&gt; UserTyper&lt;T&gt; {
    fn new(computer: T) -&gt; Self {
        Self { computer, expr: String::new() }
    }

    fn type_expr(&amp;mut self) {
        println!(&quot;Please type an expression: {}&quot;, self.expr);
        io::stdout().flush().expect(&quot;Unable to flush stdout&quot;);
        io::stdin().read_line(&amp;mut self.expr).unwrap();
    }

    fn compute(&amp;self) -&gt; i32 {
        self.computer.compute(&amp;self.expr)
    }
}

</code></pre>
]]></content>
  <category term="Rust"/>
  <category term="技术"/>
</entry>
<entry>
  <title>Rust镜像源</title>
  <link href="https://ganto.me/post/20250313"/>
  <id>https://ganto.me/post/20250313</id>
  <updated>2025-03-13T00:00:00+08:00</updated>
  <published>2025-03-13T00:00:00+08:00</published>
  <author><name>干徒</name></author>
  <summary><![CDATA[配置Rust镜像源 配置文件位置 ~/.cargo/config.toml 修改 config.toml [source.crates-io] replace-with = 'aliyun' [source.aliyun] registry = &quot;sparse+https://mirrors.aliyun.com/crates.io-index/&quot;]]></summary>
  <content type="html"><![CDATA[<h2>配置Rust镜像源</h2>
<p>配置文件位置<br />
<code>~/.cargo/config.toml</code></p>
<p>修改 config.toml</p>
<pre><code class="language-toml">[source.crates-io]
replace-with = 'aliyun'
[source.aliyun]
registry = &quot;sparse+https://mirrors.aliyun.com/crates.io-index/&quot;
</code></pre>
]]></content>
  <category term="Rust"/>
  <category term="技术"/>
</entry>
<entry>
  <title>Rust所有权</title>
  <link href="https://ganto.me/post/20250220"/>
  <id>https://ganto.me/post/20250220</id>
  <updated>2025-02-20T00:00:00+08:00</updated>
  <published>2025-02-20T00:00:00+08:00</published>
  <author><name>干徒</name></author>
  <summary><![CDATA[所有权系统是Rust中的一大特点 今日靓仔我啊，就来体验一番 我们先来看一段代码 fn main() { let s1 = String::from(&quot;hello&quot;); let s2 = s1; // s1 的所有权转移给了 s2 println!(&quot;s1: {}, s2: {}&quot;, s1, s2); // 报错，s1 已经被移动了 } 你可能不了解rust代码，那么按照你熟悉的语言去理解他，大同小异 代码中先定义了一个String字符串类型的变量 s1 然后紧接着定义了一个变量 s2，此时需要注意，s2 的值是由 s1 赋值所得（可以先简单理解为赋值） 然后打印出 s1，s2 发现报错了 问题就出现在 let s2 = s1; 这段代码，这里其实发生了所有权转移，也就是 s1 的所有权发生了向 s2 转移 那么 s1 变量在所有权发生转移后，再进行访问，那么在rust中将是不合法的访问 如果不需要所有权转移，而只是简单的拷贝，则可以使用clone函数 fn main() { let mut s1 = String::from(&quot;hel]]></summary>
  <content type="html"><![CDATA[<p>所有权系统是Rust中的一大特点<br />
今日靓仔我啊，就来体验一番</p>
<p>我们先来看一段代码</p>
<pre><code class="language-rust">fn main() {
    let s1 = String::from(&quot;hello&quot;);
    let s2 = s1; // s1 的所有权转移给了 s2
    println!(&quot;s1: {}, s2: {}&quot;, s1, s2); // 报错，s1 已经被移动了
}

</code></pre>
<p><em><strong>你可能不了解rust代码，那么按照你熟悉的语言去理解他，大同小异</strong></em></p>
<p>代码中先定义了一个String字符串类型的变量 <code>s1</code></p>
<p>然后紧接着定义了一个变量 <code>s2</code>，此时需要注意，<code>s2</code> 的值是由 <code>s1</code> 赋值所得（可以先简单理解为赋值）<br />
然后打印出 <code>s1</code>，<code>s2</code> 发现报错了</p>
<p>问题就出现在 <code>let s2 = s1;</code> 这段代码，这里其实发生了所有权转移，也就是 <code>s1</code> 的所有权发生了向 <code>s2</code> 转移</p>
<p>那么 <code>s1</code> 变量在所有权发生转移后，再进行访问，那么在rust中将是不合法的访问</p>
<p>如果不需要所有权转移，而只是简单的拷贝，则可以使用clone函数</p>
<pre><code class="language-rust">fn main() {
    let mut s1 = String::from(&quot;hello&quot;);
    let s2 = s1.clone(); // 深拷贝
    println!(&quot;s1: {}, s2: {}&quot;, s1, s2);
    s1.push_str(&quot; world&quot;); // 修改 s1
    println!(&quot;s1: {}, s2: {}&quot;, s1, s2); // s2 的值没有改变，说明是深拷贝
}

</code></pre>
<p>以上代码，通过对 <code>s1</code> 进行修改，会发现 <code>s2</code> 没有被一同修改，说明 <code>clone()</code> 函数是深拷贝</p>
<p>体验了rust中的所有权，很奇妙，像进了米奇妙妙屋...</p>
]]></content>
  <category term="Rust"/>
  <category term="后端"/>
  <category term="技术"/>
</entry>
<entry>
  <title>JavaScript 高阶函数之 reduce</title>
  <link href="https://ganto.me/post/20250220-2"/>
  <id>https://ganto.me/post/20250220-2</id>
  <updated>2025-02-20T00:00:00+08:00</updated>
  <published>2025-02-20T00:00:00+08:00</published>
  <author><name>干徒</name></author>
  <summary><![CDATA[MDN：https://developer.mozilla.org/zh-CN/docs/Web/JavaScript/Reference/Global_Objects/Array/reduce 关于reduce函数，我们再熟悉不过了，我们通常用他对数据进行求和，也被称为累加器 reduce常见用例如下： let goods = [ { name: &quot;T恤&quot;, price: 99, count: 2 }, { name: &quot;polo衫&quot;, price: 120, count: 1 }, { name: &quot;牛仔裤&quot;, price: 197, count: 11 } ] const goodsSum = goods.reduce((sum, item) =&gt; { return sum + item.price * item.count; }, initSum = 0) console.log(goodsSum) // 2485 以上代码，我相信对于你那真是信手捏来... 但是还是需要解释一下，reduce就是对goods数组]]></summary>
  <content type="html"><![CDATA[<blockquote>
<p>MDN：<a href="https://developer.mozilla.org/zh-CN/docs/Web/JavaScript/Reference/Global_Objects/Array/reduce">https://developer.mozilla.org/zh-CN/docs/Web/JavaScript/Reference/Global_Objects/Array/reduce</a></p>
</blockquote>
<p>关于reduce函数，我们再熟悉不过了，我们通常用他对数据进行求和，也被称为<strong>累加器</strong></p>
<p>reduce常见用例如下：</p>
<pre><code class="language-js">let goods = [
  { name: &quot;T恤&quot;, price: 99, count: 2 },
  { name: &quot;polo衫&quot;, price: 120, count: 1 },
  { name: &quot;牛仔裤&quot;, price: 197, count: 11 }
]

const goodsSum = goods.reduce((sum, item) =&gt; {
  return sum + item.price * item.count;
}, initSum = 0)

console.log(goodsSum) // 2485

</code></pre>
<p>以上代码，我相信对于你那真是信手捏来...</p>
<blockquote>
<p>但是还是需要解释一下，reduce就是对goods数组中的每项的价格进行相加<br />
reduce传递两个参数，第一个参数是一个回调函数，第二个参数是一个用于统计累加结果的初始值<br />
reduce函数的第一个回调函数又有两个参数，第一个参数<code>sum</code>的初始状态等于reduce第二个参数<code>initSum</code>，在reduce执行完一次，第一个参数<code>sum</code>会变成reduce执行完返回的内容<br />
reduce函数的第一个回调函数的第二个参数也就是goods数组中的每项<br />
reduce执行次数与数组的长度有关</p>
</blockquote>
<p>在阅读vue官方文档的时候，发现了一段有趣的代码</p>
<pre><code class="language-js">// plugins/i18n.js
export default {
  install: (app, options) =&gt; {
    // 注入一个全局可用的 $translate() 方法
    app.config.globalProperties.$translate = (key) =&gt; {
      // 获取 `options` 对象的深层属性
      // 使用 `key` 作为索引
      return key.split('.').reduce((o, i) =&gt; {
        if (o) return o[i]
      }, options)
    }
  }
}

</code></pre>
<p>以上代码是vue中定义一个插件的代码，有趣的是其中的reduce函数</p>
<p>我们将代码进行精简</p>
<pre><code class="language-js">let obj = {
  greetings: {
    hello: &quot;你好&quot;
  }
}

const ret = &quot;greetings.hello&quot;.split('.').reduce((o, i) =&gt; {
  if (o) {
    return o[i]
  }
}, obj)

console.log(ret)

</code></pre>
<p>以上代码是通过&quot;greetings.hello&quot;这段字符串，进而获取obj对象中的值</p>
<p>以上代码<code>&quot;greetings.hello&quot;.split('.')</code> 就是数组 <code>[&quot;greetings&quot;, &quot;hello&quot;]</code></p>
<p>reduce函数中的第一个回调函数中的第一个参数也就是<code>o</code>等于<code>obj</code>对象，第二个参数<code>i</code>变成了 <code>[&quot;greetings&quot;, &quot;hello&quot;]</code> 数组中的每项</p>
<p>第一次执行 <code>o 是 {greetings: {hello: &quot;你好&quot;}}</code> <code>i 是 &quot;greetings&quot;</code> ，返回 <code>o[i] 也就是 {hello: &quot;你好&quot;}</code> 此时 <code>o 变成 {hello: &quot;你好&quot;}</code></p>
<p>进入下一次reduce回调</p>
<p>第二次执行 <code>o 是 {hello: &quot;你好&quot;}</code> <code>i 是 &quot;hello&quot;</code> ，返回 <code>o[i] 也就是 &quot;你好&quot;</code></p>
<p>结束reduce</p>
<p>返回 <code>&quot;你好&quot;</code></p>
<p>啊？reduce函数还能这么用！</p>
]]></content>
  <category term="JavaScript"/>
  <category term="Vue"/>
  <category term="前端"/>
  <category term="技术"/>
</entry>
<entry>
  <title>JavaScript中的&quot;事件冒泡&quot;与&quot;事件捕获&quot;</title>
  <link href="https://ganto.me/post/20241220"/>
  <id>https://ganto.me/post/20241220</id>
  <updated>2024-12-20T00:00:00+08:00</updated>
  <published>2024-12-20T00:00:00+08:00</published>
  <author><name>干徒</name></author>
  <summary><![CDATA[前言 Capture：事件捕获 Bubble：事件冒泡 如图所示，大致展示了事件冒泡和事件捕获的流程 可能还有点迷惑，无妨，继续往下看 事件冒泡展示 我们先创建一个嵌套的HTML结构 &lt;div class=&quot;div1&quot;&gt; &lt;p&gt;div1&lt;/p&gt; &lt;div class=&quot;div2&quot;&gt; &lt;p&gt;div2&lt;/p&gt; &lt;button&gt;CLICK ME!&lt;/button&gt; &lt;/div&gt; &lt;/div&gt; 并且为他们各自添加点击事件，并给window和document也添加上点击事件 window.addEventListener(&quot;click&quot;, () =&gt; { console.log('Window'); }); document.addEventListener(&quot;click&quot;, () =&gt; { console.log('Document'); }); document.querySelec]]></summary>
  <content type="html"><![CDATA[<h2>前言</h2>
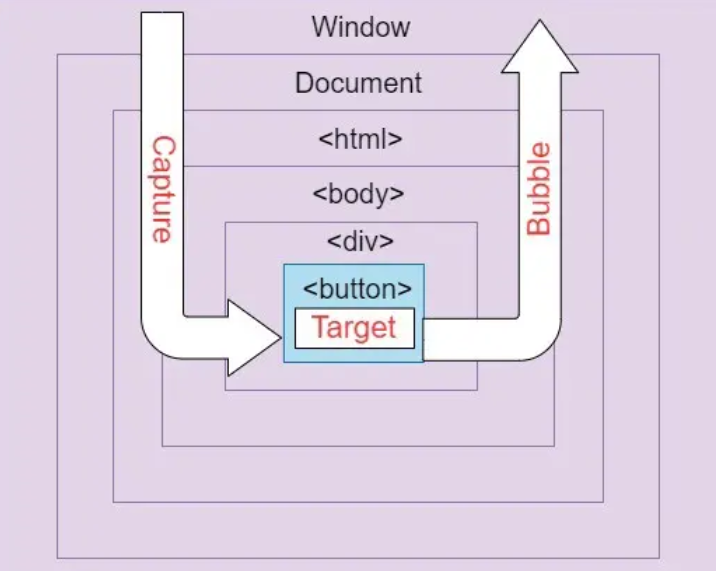
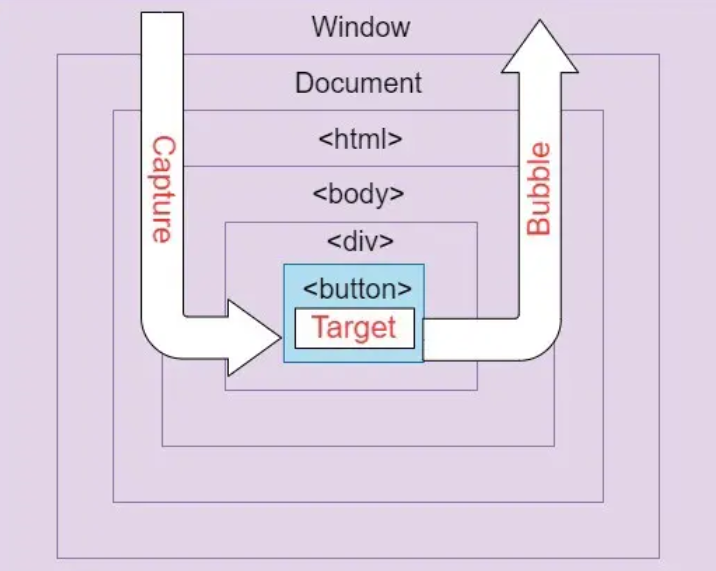
<p>Capture：事件捕获<br />
Bubble：事件冒泡</p>
<p><img src="https://img2024.cnblogs.com/blog/2229842/202412/2229842-20241220165118171-411205481.png" alt="" /><br />
如图所示，大致展示了事件冒泡和事件捕获的流程</p>
<p>可能还有点迷惑，无妨，继续往下看</p>
<h2>事件冒泡展示</h2>
<p>我们先创建一个嵌套的HTML结构</p>
<pre><code class="language-html">&lt;div class=&quot;div1&quot;&gt;
    &lt;p&gt;div1&lt;/p&gt;
    &lt;div class=&quot;div2&quot;&gt;
        &lt;p&gt;div2&lt;/p&gt;
        &lt;button&gt;CLICK ME!&lt;/button&gt;
    &lt;/div&gt;
&lt;/div&gt;

</code></pre>
<p>并且为他们各自添加点击事件，并给window和document也添加上点击事件</p>
<pre><code class="language-js">window.addEventListener(&quot;click&quot;, () =&gt; {
  console.log('Window');
});
document.addEventListener(&quot;click&quot;, () =&gt; {
  console.log('Document');
});
document.querySelector(&quot;.div1&quot;).addEventListener(&quot;click&quot;, () =&gt; {
  console.log('DIV 1');
});
document.querySelector(&quot;.div2&quot;).addEventListener(&quot;click&quot;, () =&gt; { 
  console.log('DIV 2');
});
document.querySelector(&quot;button&quot;).addEventListener(&quot;click&quot;, () =&gt; {
  console.log('CLICK ME!');
});

</code></pre>
<p>完整代码</p>
<pre><code class="language-html">&lt;!DOCTYPE html&gt;
&lt;html lang=&quot;en&quot;&gt;
&lt;head&gt;
  &lt;meta charset=&quot;UTF-8&quot;&gt;
  &lt;meta name=&quot;viewport&quot; content=&quot;width=device-width, initial-scale=1.0&quot;&gt;
  &lt;title&gt;Document&lt;/title&gt;
&lt;/head&gt;
&lt;body&gt;
  &lt;div class=&quot;div1&quot;&gt;
    &lt;p&gt;div1&lt;/p&gt;
    &lt;div class=&quot;div2&quot;&gt;
        &lt;p&gt;div2&lt;/p&gt;
        &lt;button&gt;CLICK ME!&lt;/button&gt;
    &lt;/div&gt;
  &lt;/div&gt;
  &lt;script&gt;
    window.addEventListener(&quot;click&quot;, () =&gt; {
      console.log('Window');
    });
    document.addEventListener(&quot;click&quot;, () =&gt; {
      console.log('Document');
    });
    document.querySelector(&quot;.div1&quot;).addEventListener(&quot;click&quot;, () =&gt; {
      console.log('DIV 1');
    });
    document.querySelector(&quot;.div2&quot;).addEventListener(&quot;click&quot;, () =&gt; { 
      console.log('DIV 2');
    });
    document.querySelector(&quot;button&quot;).addEventListener(&quot;click&quot;, () =&gt; {
      console.log('CLICK ME!');
    });
  &lt;/script&gt;
&lt;/body&gt;
&lt;/html&gt;

</code></pre>
<p>在点击<code>CLICK ME!</code>按钮的时候，可以在控制台看到打印结果</p>
<pre><code class="language-css">CLICK ME!
DIV 2
DIV 1
Document
Window

</code></pre>
<p>以上代码所绑定的所有点击事件，默认都是事件冒泡，所以事件触发会由内往外扩展</p>
<h2>事件捕获展示</h2>
<p>如上代码可知，默认绑定的事件会默认开始事件冒泡，如果想要开始事件捕获，可以通过事件绑定的第三个参数进行设置</p>
<pre><code class="language-js">document.querySelector(&quot;button&quot;).addEventListener(&quot;click&quot;, () =&gt; {
  console.log('CLICK ME!');
}, true);

</code></pre>
<p>因为第三个参数如果不进行传入，则默认为false，也就是事件冒泡模式</p>
<p>现在我们重新修改代码</p>
<pre><code class="language-js">window.addEventListener(&quot;click&quot;, () =&gt; {
  console.log('Window');
}, true);
document.addEventListener(&quot;click&quot;, () =&gt; {
  console.log('Document');
}, true);
document.querySelector(&quot;.div1&quot;).addEventListener(&quot;click&quot;, () =&gt; {
  console.log('DIV 1');
}, true);
document.querySelector(&quot;.div2&quot;).addEventListener(&quot;click&quot;, () =&gt; { 
  console.log('DIV 2');
}, true);
document.querySelector(&quot;button&quot;).addEventListener(&quot;click&quot;, () =&gt; {
  console.log('CLICK ME!');
}, true);

</code></pre>
<p>完整代码</p>
<pre><code class="language-html">&lt;!DOCTYPE html&gt;
&lt;html lang=&quot;en&quot;&gt;
&lt;head&gt;
  &lt;meta charset=&quot;UTF-8&quot;&gt;
  &lt;meta name=&quot;viewport&quot; content=&quot;width=device-width, initial-scale=1.0&quot;&gt;
  &lt;title&gt;Document&lt;/title&gt;
&lt;/head&gt;
&lt;body&gt;
  &lt;div class=&quot;div1&quot;&gt;
    &lt;p&gt;div1&lt;/p&gt;
    &lt;div class=&quot;div2&quot;&gt;
        &lt;p&gt;div2&lt;/p&gt;
        &lt;button&gt;CLICK ME!&lt;/button&gt;
    &lt;/div&gt;
  &lt;/div&gt;
  &lt;script&gt;
    window.addEventListener(&quot;click&quot;, () =&gt; {
      console.log('Window');
    }, true);
    document.addEventListener(&quot;click&quot;, () =&gt; {
      console.log('Document');
    }, true);
    document.querySelector(&quot;.div1&quot;).addEventListener(&quot;click&quot;, () =&gt; {
      console.log('DIV 1');
    }, true);
    document.querySelector(&quot;.div2&quot;).addEventListener(&quot;click&quot;, () =&gt; { 
      console.log('DIV 2');
    }, true);
    document.querySelector(&quot;button&quot;).addEventListener(&quot;click&quot;, () =&gt; {
      console.log('CLICK ME!');
    }, true);
  &lt;/script&gt;
&lt;/body&gt;
&lt;/html&gt;

</code></pre>
<p>打印结果</p>
<pre><code class="language-css">Window
Document
DIV 1
DIV 2
CLICK ME!

</code></pre>
<p>这时再次触发<code>CLICK ME!</code>按钮的点击事件，发现打印结果反过来了</p>
<p>因为这时已经是通过事件捕获进行了依次触发</p>
<h2>事件冒泡和事件捕获混用</h2>
<p>如果将两者混用会发生什么？<br />
依然会遵循两者的执行顺序</p>
<pre><code class="language-js">window.addEventListener(&quot;click&quot;, () =&gt; {
  console.log('Window');
}, true);
document.addEventListener(&quot;click&quot;, () =&gt; {
  console.log('Document');
}, true);
document.querySelector(&quot;.div1&quot;).addEventListener(&quot;click&quot;, () =&gt; {
  console.log('DIV 1');
}, false);
document.querySelector(&quot;.div2&quot;).addEventListener(&quot;click&quot;, () =&gt; { 
  console.log('DIV 2');
}, false);
document.querySelector(&quot;button&quot;).addEventListener(&quot;click&quot;, () =&gt; {
  console.log('CLICK ME!');
}, true);

</code></pre>
<p>完整代码</p>
<pre><code class="language-html">&lt;!DOCTYPE html&gt;
&lt;html lang=&quot;en&quot;&gt;
&lt;head&gt;
  &lt;meta charset=&quot;UTF-8&quot;&gt;
  &lt;meta name=&quot;viewport&quot; content=&quot;width=device-width, initial-scale=1.0&quot;&gt;
  &lt;title&gt;Document&lt;/title&gt;
&lt;/head&gt;
&lt;body&gt;
  &lt;div class=&quot;div1&quot;&gt;
    &lt;p&gt;div1&lt;/p&gt;
    &lt;div class=&quot;div2&quot;&gt;
        &lt;p&gt;div2&lt;/p&gt;
        &lt;button&gt;CLICK ME!&lt;/button&gt;
    &lt;/div&gt;
  &lt;/div&gt;
  &lt;script&gt;
    window.addEventListener(&quot;click&quot;, () =&gt; {
      console.log('Window');
    }, true);
    document.addEventListener(&quot;click&quot;, () =&gt; {
      console.log('Document');
    }, true);
    document.querySelector(&quot;.div1&quot;).addEventListener(&quot;click&quot;, () =&gt; {
      console.log('DIV 1');
    }, false);
    document.querySelector(&quot;.div2&quot;).addEventListener(&quot;click&quot;, () =&gt; { 
      console.log('DIV 2');
    }, false);
    document.querySelector(&quot;button&quot;).addEventListener(&quot;click&quot;, () =&gt; {
      console.log('CLICK ME!');
    }, true);
  &lt;/script&gt;
&lt;/body&gt;
&lt;/html&gt;

</code></pre>
<p>打印结果</p>
<pre><code class="language-css">Window
Document
CLICK ME!
DIV 2
DIV 1

</code></pre>
<p>优先依次执行事件捕获，再从最内部开始依次事件冒泡</p>
]]></content>
  <category term="JavaScript"/>
  <category term="技术"/>
</entry>
<entry>
  <title>今天，学习Web Component</title>
  <link href="https://ganto.me/post/20240511"/>
  <id>https://ganto.me/post/20240511</id>
  <updated>2024-05-11T00:00:00+08:00</updated>
  <published>2024-05-11T00:00:00+08:00</published>
  <author><name>干徒</name></author>
  <summary><![CDATA[Web Component MDN 阮一峰 web components 例子1： &lt;!DOCTYPE html&gt; &lt;html lang=&quot;en&quot;&gt; &lt;head&gt; &lt;meta charset=&quot;UTF-8&quot;&gt; &lt;meta name=&quot;viewport&quot; content=&quot;width=device-width, initial-scale=1.0&quot;&gt; &lt;title&gt;Document&lt;/title&gt; &lt;/head&gt; &lt;body&gt; &lt;popup-info text=&quot;web components&quot; style=&quot;background-color: 50px;&quot;/&gt; &lt;script&gt; // Create a class for the element class PopUpInfo extends HTMLElement { constructo]]></summary>
  <content type="html"><![CDATA[<p><a href="https://developer.mozilla.org/zh-CN/docs/Web/API/Web_components">Web Component MDN</a><br />
<a href="https://www.ruanyifeng.com/blog/2019/08/web_components.html">阮一峰 web components</a></p>
<h2>例子1：</h2>
<pre><code class="language-html">&lt;!DOCTYPE html&gt;
&lt;html lang=&quot;en&quot;&gt;
&lt;head&gt;
  &lt;meta charset=&quot;UTF-8&quot;&gt;
  &lt;meta name=&quot;viewport&quot; content=&quot;width=device-width, initial-scale=1.0&quot;&gt;
  &lt;title&gt;Document&lt;/title&gt;
&lt;/head&gt;
&lt;body&gt;
  &lt;popup-info text=&quot;web components&quot; style=&quot;background-color: 50px;&quot;/&gt;

  &lt;script&gt;
    // Create a class for the element
    class PopUpInfo extends HTMLElement {
      constructor() {
        // Always call super first in constructor
        super();

        // Create a shadow root
        var shadow = this.attachShadow({ mode: &quot;open&quot; });

        // Create spans
        var wrapper = document.createElement(&quot;span&quot;);
        wrapper.setAttribute(&quot;class&quot;, &quot;wrapper&quot;);
        var icon = document.createElement(&quot;span&quot;);
        icon.setAttribute(&quot;class&quot;, &quot;icon&quot;);
        icon.setAttribute(&quot;tabindex&quot;, &quot;0&quot;);
        var info = document.createElement(&quot;span&quot;);
        info.setAttribute(&quot;class&quot;, &quot;info&quot;);

        // Take attribute content and put it inside the info span
        var text = this.getAttribute(&quot;text&quot;);
        info.textContent = text;

        // Insert icon
        var imgUrl;
        if (this.hasAttribute(&quot;img&quot;)) {
          imgUrl = this.getAttribute(&quot;img&quot;);
        } else {
          imgUrl = &quot;https://baidu.com/favicon.ico&quot;;
        }
        var img = document.createElement(&quot;img&quot;);
        img.style = `
          width: 50px;
          height: 50px;
          border: 2px solid #f0f;
          border-radius: 10px;
        `
        img.src = imgUrl;
        icon.appendChild(img);

        // Create some CSS to apply to the shadow dom
        var style = document.createElement(&quot;style&quot;);

        style.textContent = `
          .wrapper {
            position: relative;
          }
          
          .info {
            font-size: 0.8rem;
            width: 200px;
            display: inline-block;
            border: 1px solid black;
            padding: 10px;
            background: white;
            border-radius: 10px;
            opacity: 0;
            transition: 0.6s all;
            position: absolute;
            top: 20px;
            left: 10px;
            z-index: 3;
          }
          
          img {
            width: 20.2rem;
          }
          
          .icon:hover + .info, .icon:focus + .info {
            opacity: 1;
          }
        `;

        // attach the created elements to the shadow dom

        shadow.appendChild(style);
        shadow.appendChild(wrapper);
        wrapper.appendChild(icon);
        wrapper.appendChild(info);
      }
    }

    customElements.define(&quot;popup-info&quot;, PopUpInfo);
  &lt;/script&gt;
&lt;/body&gt;
&lt;/html&gt;

</code></pre>
<h2>例子2：</h2>
<p>这个例子使用了template标签的形式描述html结构，而不是如例子1那样，用纯js来描述html结构<br />
index.html</p>
<pre><code class="language-html">&lt;!DOCTYPE html&gt;
&lt;html&gt;

&lt;head&gt;
  &lt;meta charset=&quot;utf-8&quot;&gt;
  &lt;meta name=&quot;viewport&quot; content=&quot;width=device-width&quot;&gt;
  &lt;title&gt;JS Bin&lt;/title&gt;
&lt;/head&gt;

&lt;body&gt;
  &lt;user-card image=&quot;https://semantic-ui.com/images/avatar2/large/kristy.png&quot; name=&quot;User Name&quot;
    email=&quot;yourmail@some-email.com&quot;&gt;&lt;/user-card&gt;

  &lt;template id=&quot;userCardTemplate&quot;&gt;
    &lt;style&gt;
      :host {
        display: flex;
        align-items: center;
        width: 450px;
        height: 180px;
        background-color: #d4d4d4;
        border: 1px solid #d5d5d5;
        box-shadow: 1px 1px 5px rgba(0, 0, 0, 0.1);
        border-radius: 3px;
        overflow: hidden;
        padding: 10px;
        box-sizing: border-box;
        font-family: 'Poppins', sans-serif;
      }

      .image {
        flex: 0 0 auto;
        width: 160px;
        height: 160px;
        vertical-align: middle;
        border-radius: 5px;
      }

      .container {
        box-sizing: border-box;
        padding: 20px;
        height: 160px;
      }

      .container&gt;.name {
        font-size: 20px;
        font-weight: 600;
        line-height: 1;
        margin: 0;
        margin-bottom: 5px;
      }

      .container&gt;.email {
        font-size: 12px;
        opacity: 0.75;
        line-height: 1;
        margin: 0;
        margin-bottom: 15px;
      }

      .container&gt;.button {
        padding: 10px 25px;
        font-size: 12px;
        border-radius: 5px;
        text-transform: uppercase;
      }
    &lt;/style&gt;

    &lt;img class=&quot;image&quot;&gt;
    &lt;div class=&quot;container&quot;&gt;
      &lt;p class=&quot;name&quot;&gt;&lt;/p&gt;
      &lt;p class=&quot;email&quot;&gt;&lt;/p&gt;
      &lt;button class=&quot;button&quot;&gt;Follow John&lt;/button&gt;
    &lt;/div&gt;
  &lt;/template&gt;

  &lt;script src=&quot;./index.js&quot;&gt;&lt;/script&gt;
&lt;/body&gt;

&lt;/html&gt;

</code></pre>
<p>index.js</p>
<pre><code class="language-js">class UserCard extends HTMLElement {
  constructor() {
    super();
    var shadow = this.attachShadow( { mode: 'closed' } );
    
    var templateElem = document.getElementById('userCardTemplate');
    var content = templateElem.content.cloneNode(true); // 这里克隆一个新的结构，而不是在原template节点上操作，因为确保原template不会变化，从而可以复用
    content.querySelector('img').setAttribute('src', this.getAttribute('image'));
    content.querySelector('.container&gt;.name').innerText = this.getAttribute('name');
    content.querySelector('.container&gt;.email').innerText = this.getAttribute('email');

    shadow.appendChild(content);
  }
}
window.customElements.define('user-card', UserCard);

</code></pre>
<h2>说明</h2>
<p><code>this.attachShadow( { mode: 'closed' } );</code> 这段代码是创建一个自定义元素<br />
<code>mode: 'closed'</code>表示自定义组件对外部不可见，即不能通过JavaScript访问，也不能通过外部CSS样式表来直接修改其内部元素的样式<br />
可选项为 <code>open</code>、<code>closed</code>，mode属性必须写</p>
<h2>生命周期</h2>
<table>
<thead>
<tr>
<th>函数</th>
<th>说明</th>
</tr>
</thead>
<tbody>
<tr>
<td>connectedCallback</td>
<td>自定义元素添加至页面。</td>
</tr>
<tr>
<td>disconnectedCallback</td>
<td>自定义元素从页面中移除。</td>
</tr>
<tr>
<td>adoptedCallback</td>
<td>自定义元素移动至新页面。</td>
</tr>
<tr>
<td>attributeChangedCallback</td>
<td>属性改变</td>
</tr>
</tbody>
</table>
<pre><code class="language-html">&lt;!DOCTYPE html&gt;
&lt;html&gt;

&lt;head&gt;
  &lt;meta charset=&quot;utf-8&quot;&gt;
  &lt;meta name=&quot;viewport&quot; content=&quot;width=device-width&quot;&gt;
  &lt;title&gt;Web Component&lt;/title&gt;
&lt;/head&gt;

&lt;body&gt;
  &lt;iframe id=&quot;iframe&quot; style=&quot;display: none;&quot; frameborder=&quot;0&quot;&gt;&lt;/iframe&gt;

  &lt;my-com class=&quot;my-com&quot; data=&quot;123&quot;&gt;&lt;/my-com&gt;
  &lt;button onclick=&quot;document.querySelector('.my-com').remove()&quot;&amp;gt;移除组件&lt;/button&gt;
  &lt;button onclick=&quot;move()&quot;&amp;gt;移动到新页面&lt;/button&gt;
  &lt;button onclick=&quot;document.querySelector('.my-com').setAttribute('data', '456')&quot;&amp;gt;变更属性&lt;/button&gt;

  &lt;script&gt;
    function move() {
      const iframeNode = document.querySelector('#iframe').contentDocument
      console.dir(iframeNode, '===');
      const myComNode = document.querySelector('.my-com')
      iframeNode.body.appendChild(myComNode.cloneNode(true))

      // document.querySelector('.my-com').remove()
    }
  &lt;/script&gt;
  &lt;script src=&quot;./MyCom.js&quot;&gt;&lt;/script&gt;
&lt;/body&gt;

&lt;/html&gt;

</code></pre>
<pre><code class="language-js">class MyCom extends HTMLElement {
  constructor() {
    super();
    var shadow = this.attachShadow({ mode: &quot;open&quot; });

    const div = document.createElement(&quot;div&quot;)
    div.innerHTML = &quot;123&quot;

    shadow.appendChild(div)
  }

  static get observedAttributes() {
    return ['data'];
  }

  connectedCallback() {
    console.log(&quot;自定义元素添加至页面。&quot;);
  }

  disconnectedCallback() {
    console.log(&quot;自定义元素从页面中移除。&quot;);
  }

  adoptedCallback() {
    console.log(&quot;自定义元素移动至新页面。&quot;);
  }

  attributeChangedCallback(name, oldValue, newValue) {
    console.log(`属性 ${name} 已变更。 变更前 ${oldValue}, 变更后 ${newValue} 。`);
  }
}

customElements.define(&quot;my-com&quot;, MyCom);

</code></pre>
]]></content>
  <category term="JavaScript"/>
  <category term="技术"/>
</entry>
<entry>
  <title>Gin中间件上下文中的Set、Get函数的用法</title>
  <link href="https://ganto.me/post/20240415"/>
  <id>https://ganto.me/post/20240415</id>
  <updated>2024-04-15T00:00:00+08:00</updated>
  <published>2024-04-15T00:00:00+08:00</published>
  <author><name>干徒</name></author>
  <summary><![CDATA[Code 如下代码所示，中间件middlewareA内部通过c.Set(&quot;middlewareA_key&quot;, str)将参数设置到上下文中 所以中间件middlewareB可以通过c.Get(&quot;middlewareA_key&quot;)获取到上下文中传递的值，并将值进行了修改，然后继续通过上下文进行了传递 然后在控制器函数中可以通过上下文c.Keys[&quot;middlewareB_key&quot;]的方式获取 package main import ( &quot;fmt&quot; &quot;github.com/gin-gonic/gin&quot; ) func main() { router := gin.Default() router.Use(middlewareA(&quot;中间件A传递的值&quot;), middlewareB()) router.GET(&quot;/&quot;, func(c *gin.Context) { valueA := c.Keys[&quot;middlewareA_key&quot;] va]]></summary>
  <content type="html"><![CDATA[<h2>Code</h2>
<p>如下代码所示，中间件<code>middlewareA</code>内部通过<code>c.Set(&quot;middlewareA_key&quot;, str)</code>将参数设置到上下文中<br />
所以中间件<code>middlewareB</code>可以通过<code>c.Get(&quot;middlewareA_key&quot;)</code>获取到上下文中传递的值，并将值进行了修改，然后继续通过上下文进行了传递<br />
然后在控制器函数中可以通过上下文<code>c.Keys[&quot;middlewareB_key&quot;]</code>的方式获取</p>
<pre><code class="language-go">package main

import (
	&quot;fmt&quot;
	&quot;github.com/gin-gonic/gin&quot;
)

func main() {
	router := gin.Default()

	router.Use(middlewareA(&quot;中间件A传递的值&quot;), middlewareB())
	router.GET(&quot;/&quot;, func(c *gin.Context) {
		valueA := c.Keys[&quot;middlewareA_key&quot;]
		valueB := c.Keys[&quot;middlewareB_key&quot;]
		c.JSON(200, gin.H{
			&quot;data&quot;: map[string]any{
				&quot;middlewareA&quot;: valueA,
				&quot;middlewareB&quot;: valueB,
			},
		})
	})

	if err := router.Run(&quot;:8090&quot;); err != nil {
		fmt.Printf(&quot;run server error: %v&quot;, err)
		panic(err)
	}
}

func middlewareA(str string) gin.HandlerFunc {
	return func(c *gin.Context) {
		c.Set(&quot;middlewareA_key&quot;, str)
		c.Next()
	}
}

func middlewareB() gin.HandlerFunc {
	return func(c *gin.Context) {
		middlewareAKey, _ := c.Get(&quot;middlewareA_key&quot;)
		c.Set(&quot;middlewareB_key&quot;, middlewareAKey.(string)+&quot; *** 我是中间件B&quot;)
		c.Next()
	}
}

</code></pre>
<p>需要注意的是，中间件设置的数据，会同时存在在控制器函数的上下文中，均可以获取</p>
<h2>Return</h2>
<p>请求：<a href="http://localhost:8090">http://localhost:8090</a></p>
<pre><code class="language-json">{
    &quot;data&quot;: {
        &quot;middlewareA&quot;: &quot;中间件A传递的值&quot;,
        &quot;middlewareB&quot;: &quot;中间件A传递的值 *** 我是中间件B&quot;
    }
}

</code></pre>
]]></content>
  <category term="Golang"/>
  <category term="后端"/>
  <category term="技术"/>
</entry>
<entry>
  <title>React中forwardRef的用法</title>
  <link href="https://ganto.me/post/20240412"/>
  <id>https://ganto.me/post/20240412</id>
  <updated>2024-04-12T00:00:00+08:00</updated>
  <published>2024-04-12T00:00:00+08:00</published>
  <author><name>干徒</name></author>
  <summary><![CDATA[官网文档：https://zh-hans.react.dev/reference/react/forwardRef 今天我们就一起学习一下React中的ref怎么获取组件实例，只讨论函数式组件中的ref 如下代码，我们直接在App根组件中，意图只使用ref就获取Footer组件实例 细心的同学可能已经发现控制台报错了，提示我们应该使用forwardRef，并且编辑器也提示ref={footRef}类型不对 这是因为React不会默认暴露组件中的东西，如果开发者想要从组件中暴露出来东西，需要手动挡进行操作，这也是为了组件数据安全的考量 App.tsx import { useRef } from 'react' import { Footer } from '@/components/footer' const App = () =&gt; { const footRef = useRef(null) const getFootRef = () =&gt; { console.log(footRef.current) } return ( &lt;div className='app'&]]></summary>
  <content type="html"><![CDATA[<blockquote>
<p>官网文档：<a href="https://zh-hans.react.dev/reference/react/forwardRef">https://zh-hans.react.dev/reference/react/forwardRef</a></p>
</blockquote>
<p>今天我们就一起学习一下React中的ref怎么获取组件实例，只讨论函数式组件中的ref</p>
<p>如下代码，我们直接在App根组件中，意图只使用ref就获取Footer组件实例</p>
<p>细心的同学可能已经发现控制台报错了，提示我们应该使用forwardRef，并且编辑器也提示<code>ref={footRef}</code>类型不对</p>
<p>这是因为React不会默认暴露组件中的东西，如果开发者想要从组件中暴露出来东西，需要手动挡进行操作，这也是为了组件数据安全的考量</p>
<p>App.tsx</p>
<pre><code class="language-tsx">import { useRef } from 'react'
import { Footer } from '@/components/footer'

const App = () =&gt; {
  const footRef = useRef(null)
  const getFootRef = () =&gt; {
    console.log(footRef.current)
  }
  return (
    &lt;div className='app'&gt;
      &lt;h1&gt;App&lt;/h1&gt;
      &lt;button onClick={getFootRef}&gt;Show footRef&lt;/button&gt;
      &lt;Footer ref={footRef}&gt;&lt;/Footer&gt;
    &lt;/div&gt;
  )
}

export default App

</code></pre>
<p>components/Footer/index.tsx</p>
<pre><code class="language-tsx">import { useState } from 'react'

export const Footer = () =&gt; {
  const [count, setCount] = useState(0)
  return (
    &lt;div className=&quot;footer&quot;&gt;
      &lt;h1&gt;Footer&lt;/h1&gt;
      &lt;p&gt;{ count }&lt;/p&gt;
      &lt;button onClick={() =&gt; setCount(count + 1)}&gt;Click Me&lt;/button&gt;
    &lt;/div&gt;
  )
}

</code></pre>
<p>那么我们如何获取组件实例呢</p>
<p>直接请出forwardRef来对Footer组件进行改造</p>
<p>App.tsx 不变</p>
<p>Footer组件改造如下</p>
<p>components/Footer/index.tsx</p>
<pre><code class="language-tsx">import { useState, forwardRef } from 'react'

export const Footer = forwardRef&lt;HTMLDivElement&gt;((props, ref) =&gt; {
  console.log(props)
  const [count, setCount] = useState(0)
  return (
    &lt;div className=&quot;footer&quot;&gt;
      &lt;h1&gt;Footer&lt;/h1&gt;
      &lt;p ref={ref}&gt;{ count }&lt;/p&gt;
      &lt;button onClick={() =&gt; setCount(count + 1)}&gt;Click Me&lt;/button&gt;
    &lt;/div&gt;
  )
})

</code></pre>
<p>可以看出已经能打印出来p标签了，等等...为什么ref绑定在了p标签上，是的没错，想将哪个标签暴露给父组件，就绑定给谁身上</p>
<p>forwardRef的用法就是直接套在组件函数外部，此时组件函数入参的第一个参数依然是props，第二个参数就是ref</p>
<p>此时更应该注意的是，forwardRef需要编写泛型，该泛型就是需要暴露出去的东东的类型，如上代码，我们将p标签暴露出去了</p>
<p>如想将组件状态数据暴露出去，需要使用一个Hook，那就是<code>useImperativeHandle</code></p>
<p>使用方法见以下代码</p>
<p>App.tsx不变</p>
<p>Footer组件改造为以下</p>
<p>components/Footer/index.tsx</p>
<pre><code class="language-tsx">import { useState, useRef, forwardRef, useImperativeHandle } from 'react'

export const Footer = forwardRef&lt;object&gt;((props, ref) =&gt; {
  console.log(props)
  const [count, setCount] = useState(0)
  const pRef = useRef&lt;HTMLParagraphElement&gt;(null)

  useImperativeHandle(ref, () =&gt; {
    return {
      count,
      pRef
    }
  })

  return (
    &lt;div className=&quot;footer&quot;&gt;
      &lt;h1&gt;Footer&lt;/h1&gt;
      &lt;p ref={pRef}&gt;{ count }&lt;/p&gt;
      &lt;button onClick={() =&gt; setCount(count + 1)}&gt;Click Me&lt;/button&gt;
    &lt;/div&gt;
  )
})

</code></pre>
<p>很明显的问题，p标签如要一同暴露，不能直接使用<code>ref={ref}</code>进行暴露，需要将p标签设置一个useRef，然后将同其他状态数据一起暴露</p>
<h2>React19</h2>
<p>在React19中，forwardRef将不再必须使用，未来版本会删除forwardRef</p>
<p>components/Footer/index.tsx</p>
<pre><code class="language-tsx">import { useState } from 'react'

export const Footer = ({props, ref}) =&gt; {
  console.log(props)
  const [count, setCount] = useState(0)
  return (
    &lt;div className=&quot;footer&quot;&gt;
      &lt;h1&gt;Footer&lt;/h1&gt;
      &lt;p ref={ref}&gt;{ count }&lt;/p&gt;
      &lt;button onClick={() =&gt; setCount(count + 1)}&gt;Click Me&lt;/button&gt;
    &lt;/div&gt;
  )
}

</code></pre>
<p>React19 发布之后，我们不应该继续使用forwardRef，应该使用最新的写法</p>
]]></content>
  <category term="JavaScript"/>
  <category term="React"/>
  <category term="TypeScript"/>
  <category term="前端"/>
  <category term="技术"/>
</entry>
<entry>
  <title>5分钟快速入门Taro</title>
  <link href="https://ganto.me/post/20240402"/>
  <id>https://ganto.me/post/20240402</id>
  <updated>2024-04-02T00:00:00+08:00</updated>
  <published>2024-04-02T00:00:00+08:00</published>
  <author><name>干徒</name></author>
  <summary><![CDATA[Taro介绍 Taro是由凹凸实验室开发的一个开放式跨端跨框架，支持使用 React/Vue/Nerv 等框架来开发 微信 / 京东 / 百度 / 支付宝 / 字节跳动 / QQ / 飞书 小程序 / H5 / RN 等应用 Taro类似于uniapp，都是跨端框架，一次开发多端部署 这是Taro官方文档，可以结合官方文档食用更佳 准备 你需要了解最基本的 HTML + CSS + JS ，俗称前端三件套 最好会使用Vue React node环境（&gt;=16.20.0） 安装Taro CLI工具 安装 npm install -g @tarojs/cli 查看是否安装成功 npm info @tarojs/cli 初始化项目 taro init myApp 进入到项目根目录，安装依赖 cd myApp pnpm i 启动项目 开发 pnpm dev:weapp 打包 pnpm build:weapp 项目启动之后，在微信开发者工具中打开该项目根目录，即可预览项目 这样Taro项目就启动起来了]]></summary>
  <content type="html"><![CDATA[<h2>Taro介绍</h2>
<p>Taro是由凹凸实验室开发的一个开放式跨端跨框架，支持使用 React/Vue/Nerv 等框架来开发 <a href="https://mp.weixin.qq.com/">微信</a> / <a href="https://mp.jd.com/?entrance=taro">京东</a> / <a href="https://smartprogram.baidu.com/">百度</a> / <a href="https://mini.open.alipay.com/">支付宝</a> / <a href="https://developer.open-douyin.com/">字节跳动</a> / <a href="https://q.qq.com/">QQ</a> / <a href="https://open.feishu.cn/document/uYjL24iN/ucDOzYjL3gzM24yN4MjN">飞书</a> 小程序 / H5 / RN 等应用</p>
<p>Taro类似于uniapp，都是跨端框架，一次开发多端部署</p>
<p>这是<a href="https://taro-docs.jd.com/">Taro官方文档</a>，可以结合官方文档食用更佳</p>
<h2>准备</h2>
<p>你需要了解最基本的 HTML + CSS + JS ，俗称前端三件套</p>
<p>最好会使用Vue React</p>
<p>node环境（&gt;=16.20.0）</p>
<h2>安装Taro CLI工具</h2>
<p>安装</p>
<pre><code class="language-sh">npm install -g @tarojs/cli

</code></pre>
<p>查看是否安装成功</p>
<pre><code class="language-sh">npm info @tarojs/cli

</code></pre>
<h2>初始化项目</h2>
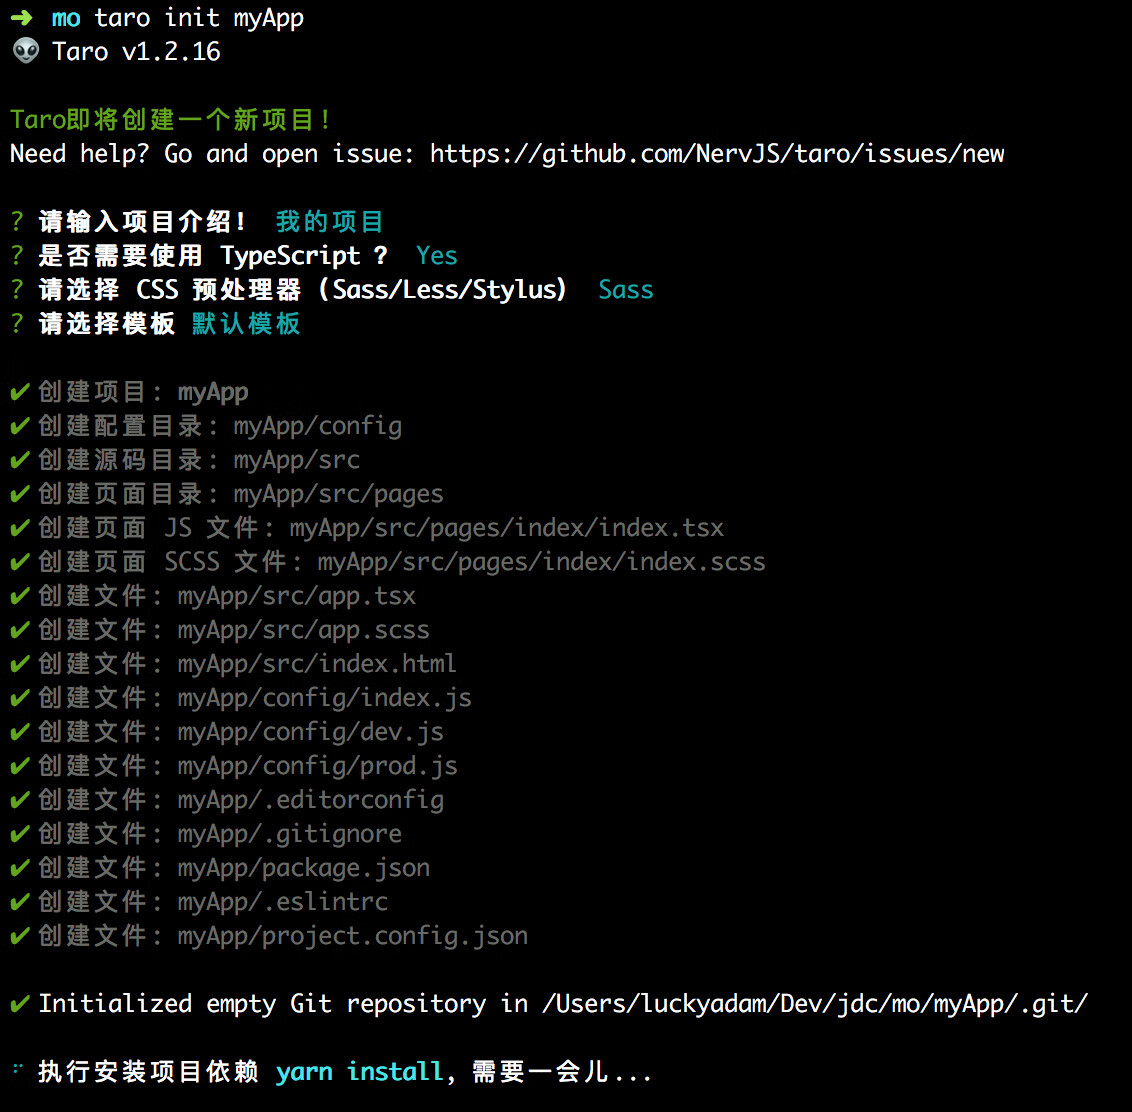
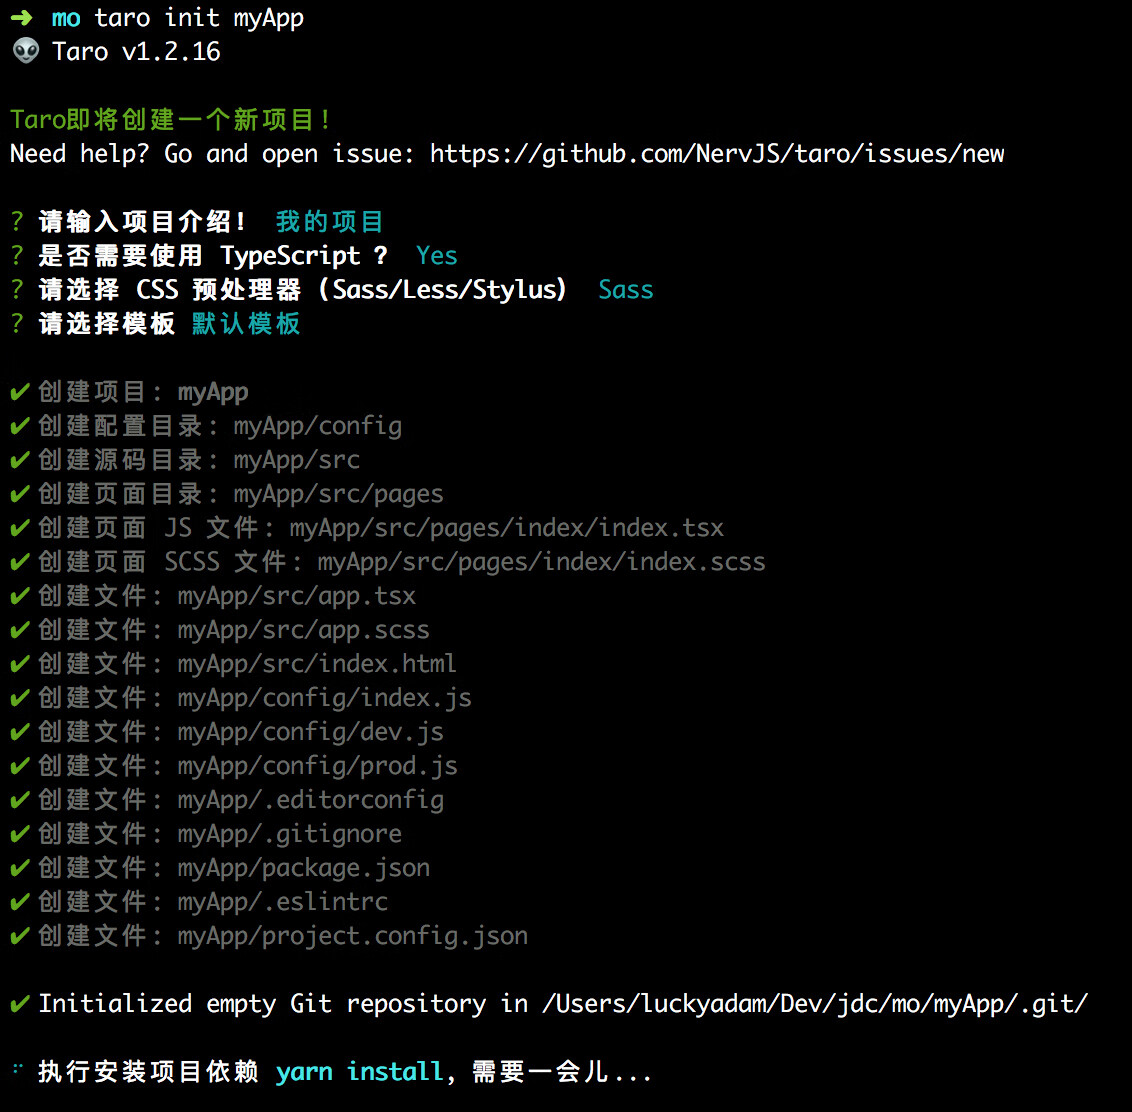
<pre><code class="language-sh">taro init myApp

</code></pre>
<p><img src="https://img30.360buyimg.com/ling/jfs/t1/121270/15/15083/672721/5f89357dEf36b7fe2/ecb98df1436cd3d5.jpg" alt="taro init myApp command screenshot" /></p>
<p>进入到项目根目录，安装依赖</p>
<pre><code class="language-sh">cd myApp

pnpm i

</code></pre>
<h2>启动项目</h2>
<p>开发</p>
<pre><code class="language-sh">pnpm dev:weapp

</code></pre>
<p>打包</p>
<pre><code class="language-sh">pnpm build:weapp

</code></pre>
<p>项目启动之后，在微信开发者工具中打开该项目根目录，即可预览项目</p>
<p>这样Taro项目就启动起来了</p>
]]></content>
  <category term="JavaScript"/>
  <category term="React"/>
  <category term="TypeScript"/>
  <category term="Vue"/>
  <category term="前端"/>
  <category term="技术"/>
</entry>
<entry>
  <title>React中使用Immer编写简洁的更新逻辑</title>
  <link href="https://ganto.me/post/20240328"/>
  <id>https://ganto.me/post/20240328</id>
  <updated>2024-03-28T00:00:00+08:00</updated>
  <published>2024-03-28T00:00:00+08:00</published>
  <author><name>干徒</name></author>
  <summary><![CDATA[在 浅谈React中的mutation 一文中，突出表达了对象和数组类型的state，不宜直接修改原对象和数组，直接修改会制造一个mutation，并且无法触发React的重新渲染 在官方文档中提到一个库 Immer ，Immer 可以让我们直接修改对象和数组。 useImmer 需要先安装use-immer库 pnpm add use-immer -D import { useImmer } from 'use-immer'; export default function App() { const [state, setState] = useImmer({ count: 0, name: 'Joe' }) const handleClick = () =&gt; { setState(draft =&gt; { draft.count += 1 }) console.log(state) } return ( &lt;div className=&quot;app&quot;&gt; &lt;h1&gt;{state.count}&lt;/h1&gt; &lt;h2&gt;{s]]></summary>
  <content type="html"><![CDATA[<p>在 <a href="https://www.cnblogs.com/ganto/articles/18098638">浅谈React中的mutation</a> 一文中，突出表达了对象和数组类型的state，不宜直接修改原对象和数组，直接修改会制造一个mutation，并且无法触发React的重新渲染</p>
<p>在官方文档中提到一个库 <a href="https://github.com/immerjs/use-immer">Immer</a> ，Immer 可以让我们直接修改对象和数组。</p>
<h2>useImmer</h2>
<p>需要先安装use-immer库</p>
<pre><code class="language-sh">pnpm add use-immer -D

</code></pre>
<pre><code class="language-jsx">import { useImmer } from 'use-immer';

export default function App() {
  const [state, setState] = useImmer({
    count: 0,
    name: 'Joe'
  })

  const handleClick = () =&gt; {
    setState(draft =&gt; {
      draft.count += 1
    })
    console.log(state)
  }

  return (
    &lt;div className=&quot;app&quot;&gt;
      &lt;h1&gt;{state.count}&lt;/h1&gt;
      &lt;h2&gt;{state.name}&lt;/h2&gt;
      &lt;button onClick={handleClick}&gt;CLICK ME&lt;/button&gt;
    &lt;/div&gt;
  )
}

</code></pre>
<h2>useState</h2>
<pre><code class="language-jsx">import { useState } from 'react';

export default function App() {
  const [state, setState] = useState({
    count: 0,
    name: 'Joe'
  })

  const handleClick = () =&gt; {
    setState(obj =&gt; {
      obj.count += 1
      return obj // setState的参数-匿名函数需要有返回值
    })
    console.log(state) // 此处的打印结果并非最新的state，但是依然能反应出state已被修改
  }

  return (
    &lt;div className=&quot;app&quot;&gt;
      &lt;h1&gt;{state.count}&lt;/h1&gt;
      &lt;h2&gt;{state.name}&lt;/h2&gt;
      &lt;button onClick={handleClick}&gt;CLICK ME&lt;/button&gt;
    &lt;/div&gt;
  )
}

</code></pre>
]]></content>
  <category term="JavaScript"/>
  <category term="React"/>
  <category term="前端"/>
  <category term="技术"/>
</entry>
<entry>
  <title>浅谈React中的mutation</title>
  <link href="https://ganto.me/post/20240327"/>
  <id>https://ganto.me/post/20240327</id>
  <updated>2024-03-27T00:00:00+08:00</updated>
  <published>2024-03-27T00:00:00+08:00</published>
  <author><name>干徒</name></author>
  <summary><![CDATA[官方文档：保持组件纯粹、更新 state 中的对象、更新 state 中的数组 保持组件纯粹 这里说的纯粹也就是JS中的纯函数 那么，什么是纯函数？ 纯函数 通常具有如下特征（摘自React官网）： **只负责自己的任务。**它不会更改在该函数调用前就已存在的对象或变量。 **输入相同，则输出相同。**给定相同的输入，纯函数应总是返回相同的结果。 只负责自己的任务 简单点说就是不应该有任何副作用； 输入相同，则输出相同 就是字面意思，函数输入的参数相同的情况下，输出的内容一定是相同的； 函数满足以上两点，那么该函数就可以被成为纯函数。 就如以下代码（官网示例进行简化）： function Recipe({ drinkers }) { return ( &lt;ol&gt; &lt;li&gt;drinkers: {drinkers}&lt;/li&gt; &lt;li&gt;drinkers: {drinkers}; 0.5 * drinkers: {0.5 * drinkers}&lt;/li&gt; &lt;li&gt;0.5 * drinkers: {0.5 * drinkers]]></summary>
  <content type="html"><![CDATA[<blockquote>
<p>官方文档：<a href="https://zh-hans.react.dev/learn/keeping-components-pure">保持组件纯粹</a>、<a href="https://zh-hans.react.dev/learn/updating-objects-in-state">更新 state 中的对象</a>、<a href="https://zh-hans.react.dev/learn/updating-arrays-in-state">更新 state 中的数组</a></p>
</blockquote>
<h1>保持组件纯粹</h1>
<p>这里说的纯粹也就是JS中的纯函数</p>
<p>那么，什么是纯函数？</p>
<p>纯函数 通常具有如下特征（摘自React官网）：</p>
<ul>
<li>**只负责自己的任务。**它不会更改在该函数调用前就已存在的对象或变量。</li>
<li>**输入相同，则输出相同。**给定相同的输入，纯函数应总是返回相同的结果。</li>
</ul>
<p><em><strong>只负责自己的任务</strong></em> 简单点说就是不应该有任何副作用；<br />
<em><strong>输入相同，则输出相同</strong></em> 就是字面意思，函数输入的参数相同的情况下，输出的内容一定是相同的；<br />
函数满足以上两点，那么该函数就可以被成为<em><strong>纯函数</strong></em>。</p>
<p>就如以下代码（官网示例进行简化）：</p>
<pre><code class="language-jsx">function Recipe({ drinkers }) {
  return (
    &lt;ol&gt;    
      &lt;li&gt;drinkers: {drinkers}&lt;/li&gt;
      &lt;li&gt;drinkers: {drinkers}; 0.5 * drinkers: {0.5 * drinkers}&lt;/li&gt;
      &lt;li&gt;0.5 * drinkers: {0.5 * drinkers}&lt;/li&gt;
    &lt;/ol&gt;
  );
}

export default function App() {
  return (
    &lt;section&gt;
      &lt;Recipe drinkers={2} /&gt;
      &lt;Recipe drinkers={4} /&gt;
    &lt;/section&gt;
  );
}

</code></pre>
<p>以上代码中的<code>Recipe</code>组件就是一个纯粹的组件，因为<code>Recipe</code>函数是一个纯函数，在参数<code>drinkers</code>的值固定的情况下，那么<code>{drinkers}</code> <code>{0.5 * drinkers}</code>将永恒不变</p>
<p>官网有这么一段话，强调组件应当保持纯粹：React 的渲染过程必须自始至终是纯粹的。组件应该只 返回 它们的 JSX，而不 改变 在渲染前，就已存在的任何对象或变量 — 这将会使它们变得不纯粹！<br />
并且给出了反例：</p>
<pre><code class="language-jsx">let guest = 0;

function Cup() {
  // Bad：正在更改预先存在的变量！
  guest = guest + 1;
  return &lt;h2&gt;Tea cup for guest #{guest}&lt;/h2&gt;;
}

export default function TeaSet() {
  return (
    &lt;&gt;
      &lt;Cup /&gt;
      &lt;Cup /&gt;
      &lt;Cup /&gt;
    &lt;/&gt;
  );
}

</code></pre>
<p><code>Cup</code>组件正在读写其外部声明的 guest 变量，多次调用该组件会产生不同的结果，而<code>Cup</code>组件的结果将变的无法预测</p>
<p>React官网将这种 <code>组件改变了 预先存在的 变量的值</code> 的现象称为 突变（mutation）</p>
<h1>更新 state 中的对象</h1>
<p>在state中可以存放JavaScript中的任何值，这些值应该是不可变的（immutable），它们不能被改变或是只读的。</p>
<p>如以下代码:</p>
<pre><code class="language-jsx">const [count, setCount] = useState(0)
setCount(1)

</code></pre>
<p>count从0到1，其本质是新创建了一个数字1覆盖掉了数字0，0本身并没有改变<br />
如果你了解JS中的辟栈内，那么你应该了解，0和1并非是同一个变量，而是存在栈内存中的两个不相关的内存空间</p>
<p>如果你了解了上面的内容，你大致也能猜到JS中的对象应该如何更新状态</p>
<pre><code class="language-jsx">const [obj, setObj] = useState({name: &quot;张三&quot;, age: 19})
const changeObj = () =&gt; {
  obj.name = &quot;李四&quot;
  setObj(obj)
}

</code></pre>
<p>以上的代码对吗？很显然不对，在一开始就已经说过 在state中可以存放JavaScript中的任何值，这些值应该是不可变的（immutable），它们不能被改变或是只读的。</p>
<p><code>obj.name = &quot;李四&quot;</code>这段代码就会制造一个<strong>mutation</strong></p>
<p>如果运行以上代码，显然不会触发重新渲染，可以将其修改为以下代码</p>
<pre><code class="language-jsx">const [obj, setObj] = useState({name: &quot;张三&quot;, age: 19})
const changeObj = () =&gt; {
  setObj({...obj, name: &quot;李四&quot;})
}

</code></pre>
<p>现在一切完美</p>
<h1>更新 state 中的数组</h1>
<p>数组是特殊的对象，我们依然要在没有 mutation 的前提下更新数组<br />
我们应该遵循一个原则，不改变原数组，要利用原数组产生一个新数组，进而利用新数组去修改状态</p>
<table>
<thead>
<tr>
<th></th>
<th>避免使用 (会改变原始数组)</th>
<th>推荐使用 (会返回一个新数组）</th>
</tr>
</thead>
<tbody>
<tr>
<td>添加元素</td>
<td>push，unshift</td>
<td>concat，[...arr] 展开语法（<a href="https://zh-hans.react.dev/learn/updating-arrays-in-state#adding-to-an-array">例子</a>）</td>
</tr>
<tr>
<td>删除元素</td>
<td>pop，shift，splice</td>
<td>filter，slice（<a href="https://zh-hans.react.dev/learn/updating-arrays-in-state#removing-from-an-array">例子</a>）</td>
</tr>
<tr>
<td>替换元素</td>
<td>splice，arr[i] = ... 赋值</td>
<td>map（<a href="https://zh-hans.react.dev/learn/updating-arrays-in-state#replacing-items-in-an-array">例子</a>）</td>
</tr>
<tr>
<td>排序</td>
<td>reverse，sort</td>
<td>先将数组复制一份（<a href="https://zh-hans.react.dev/learn/updating-arrays-in-state#making-other-changes-to-an-array">例子</a>）</td>
</tr>
</tbody>
</table>
]]></content>
  <category term="JavaScript"/>
  <category term="React"/>
  <category term="技术"/>
</entry>
<entry>
  <title>Go语言高并发编程初探</title>
  <link href="https://ganto.me/post/20240326"/>
  <id>https://ganto.me/post/20240326</id>
  <updated>2024-03-26T00:00:00+08:00</updated>
  <published>2024-03-26T00:00:00+08:00</published>
  <author><name>干徒</name></author>
  <summary><![CDATA[在当今这个数据爆炸的时代，高并发编程已成为开发者们必须掌握的技能之一。Go语言，由于其出色的并发支持和简洁的语法，正逐渐成为高并发编程领域的热门选择。本文将带您走进Go语言高并发编程的世界，探索其中的奥秘。 一、Go语言的并发模型 Go语言采用了CSP（Communicating Sequential Processes）并发模型，即通过通道（channel）在协程（goroutine）之间进行通信。协程是Go语言实现并发的基本单位，它们比线程更轻量级，可以创建成千上万个而不会给系统带来太大负担。通道则用于协程之间的数据传递，使得并发编程更加安全、高效。 二、创建与管理协程 在Go语言中，使用go关键字可以轻松地创建协程。例如： package main import &quot;fmt&quot; func main() { go sayHello() // 创建协程执行sayHello函数 fmt.Println(&quot;Main function continues...&quot;) } func sayHello() { fmt.Println(&quot;Hello f]]></summary>
  <content type="html"><![CDATA[<p>在当今这个数据爆炸的时代，高并发编程已成为开发者们必须掌握的技能之一。Go语言，由于其出色的并发支持和简洁的语法，正逐渐成为高并发编程领域的热门选择。本文将带您走进Go语言高并发编程的世界，探索其中的奥秘。</p>
<p><strong>一、Go语言的并发模型</strong></p>
<p>Go语言采用了CSP（Communicating Sequential Processes）并发模型，即通过通道（channel）在协程（goroutine）之间进行通信。协程是Go语言实现并发的基本单位，它们比线程更轻量级，可以创建成千上万个而不会给系统带来太大负担。通道则用于协程之间的数据传递，使得并发编程更加安全、高效。</p>
<p><strong>二、创建与管理协程</strong></p>
<p>在Go语言中，使用<code>go</code>关键字可以轻松地创建协程。例如：</p>
<pre><code class="language-go">package main

import &quot;fmt&quot;

func main() {
    go sayHello() // 创建协程执行sayHello函数
    fmt.Println(&quot;Main function continues...&quot;)
}

func sayHello() {
    fmt.Println(&quot;Hello from goroutine!&quot;)
}

</code></pre>
<p>在上面的代码中，我们创建了一个协程来执行<code>sayHello</code>函数。需要注意的是，由于协程是异步执行的，因此主函数可能会先于协程完成。如果需要等待协程执行完成，可以使用<code>sync.WaitGroup</code>或其他同步机制。</p>
<p><strong>三、通道的使用</strong></p>
<p>通道是Go语言并发编程中的核心概念。它用于协程之间的数据传递和同步。通道是有类型的，可以传递指定类型的值。通道的创建可以使用<code>make</code>函数，并通过<code>&lt;-</code>操作符进行发送和接收操作。</p>
<p>下面是一个简单的示例，演示了如何使用通道进行协程间的数据传递：</p>
<pre><code class="language-go">package main

import &quot;fmt&quot;

func main() {
    ch := make(chan string) // 创建一个字符串类型的通道
    go func() {
        ch &lt;- &quot;Hello from goroutine!&quot; // 向通道发送数据
    }()
    msg := &lt;-ch // 从通道接收数据
    fmt.Println(msg) // 输出：Hello from goroutine!
}

</code></pre>
<p>在上面的代码中，我们创建了一个字符串类型的通道<code>ch</code>，并在协程中向该通道发送了一条消息。然后，主函数从通道中接收并打印了这条消息。通过这种方式，我们实现了协程之间的数据传递。</p>
<p><strong>四、处理并发冲突</strong></p>
<p>在高并发编程中，经常会出现多个协程同时访问共享资源的情况，这可能导致数据不一致或其他并发冲突。为了解决这个问题，Go语言提供了互斥锁（mutex）和原子操作等机制。</p>
<p>互斥锁用于保护共享资源，确保同一时间只有一个协程可以访问该资源。例如：</p>
<pre><code class="language-go">import (
    &quot;fmt&quot;
    &quot;sync&quot;
)

var (
    counter int
    mutex   sync.Mutex
)

func increment() {
    mutex.Lock() // 加锁
    defer mutex.Unlock() // 延迟解锁，确保在函数返回前释放锁
    counter++
}

func main() {
    // 启动多个协程执行increment函数
    for i := 0; i &lt; 1000; i++ {
        go increment()
    }
    // 等待所有协程执行完毕
    // ...（省略等待逻辑）
    fmt.Println(&quot;Final counter:&quot;, counter) // 输出最终的计数器值
}

</code></pre>
<p>在上面的代码中，我们使用<code>sync.Mutex</code>来保护<code>counter</code>变量，确保在增加计数时不会出现并发冲突。</p>
<p><strong>五、总结</strong></p>
<p>Go语言以其简洁的语法和强大的并发支持，成为高并发编程领域的佼佼者。通过掌握Go语言的并发模型和通道机制，我们可以轻松地编写出高效、安全的并发程序。当然，高并发编程是一个复杂的领域，还需要结合具体的业务场景和需求进行深入的探索和实践。希望本文能为您在Go语言高并发编程的道路上提供一些启示和帮助。</p>
]]></content>
  <category term="AI"/>
  <category term="Golang"/>
  <category term="后端"/>
  <category term="高并发"/>
  <category term="技术"/>
</entry>
<entry>
  <title>windows终端命令受限</title>
  <link href="https://ganto.me/post/20240315"/>
  <id>https://ganto.me/post/20240315</id>
  <updated>2024-03-15T00:00:00+08:00</updated>
  <published>2024-03-15T00:00:00+08:00</published>
  <author><name>干徒</name></author>
  <summary><![CDATA[在windows系统上，通过以下命令安装pnpm包管理工具，然后在终端执行pnpm -v会报错 npm install -g pnpm pnpm -v # 报错 运行get-ExecutionPolicy，显示Restricted（受限的） get-ExecutionPolicy Restricted 运行set-ExecutionPolicy RemoteSigned，设置RemoteSigned set-ExecutionPolicy RemoteSigned 再次查看 get-ExecutionPolicy RemoteSigned]]></summary>
  <content type="html"><![CDATA[<p>在windows系统上，通过以下命令安装pnpm包管理工具，然后在终端执行<code>pnpm -v</code>会报错</p>
<pre><code class="language-sh">npm install -g pnpm

pnpm -v # 报错

</code></pre>
<p>运行get-ExecutionPolicy，显示Restricted（受限的）</p>
<pre><code class="language-sh">get-ExecutionPolicy
Restricted

</code></pre>
<p>运行set-ExecutionPolicy RemoteSigned，设置RemoteSigned</p>
<pre><code class="language-sh">set-ExecutionPolicy RemoteSigned

</code></pre>
<p>再次查看</p>
<pre><code class="language-sh">get-ExecutionPolicy
RemoteSigned

</code></pre>
]]></content>
  <category term="Windows"/>
  <category term="技术"/>
</entry>
<entry>
  <title>TypeScript类型取反</title>
  <link href="https://ganto.me/post/20240313"/>
  <id>https://ganto.me/post/20240313</id>
  <updated>2024-03-13T00:00:00+08:00</updated>
  <published>2024-03-13T00:00:00+08:00</published>
  <author><name>干徒</name></author>
  <summary><![CDATA[读码见意 function func(arg: number) {} func(1) func(&quot;zs&quot;) // ERROR Argument of type 'string' is not assignable to parameter of type 'number'. 如想要将函数参数定义为非number的其他类型，则可以这样 function func&lt;T&gt;(arg: T extends number ? never : T) {} func(1) // ERROR Argument of type 'number' is not assignable to parameter of type 'never'. func(&quot;zs&quot;) func(true) func([]) func({}) func(() =&gt; {}) 写成一个通用的type类型 type negationType&lt;T, U&gt; = T extends U ? never : T function func&lt;T&gt;(arg: nega]]></summary>
  <content type="html"><![CDATA[<p>读码见意</p>
<pre><code class="language-ts">function func(arg: number) {}
func(1)
func(&quot;zs&quot;) // ERROR Argument of type 'string' is not assignable to parameter of type 'number'.

</code></pre>
<p>如想要将函数参数定义为非number的其他类型，则可以这样</p>
<pre><code class="language-ts">function func&lt;T&gt;(arg: T extends number ? never : T) {}
func(1) // ERROR Argument of type 'number' is not assignable to parameter of type 'never'.
func(&quot;zs&quot;)
func(true)
func([])
func({})
func(() =&gt; {})

</code></pre>
<p>写成一个通用的type类型</p>
<pre><code class="language-ts">type negationType&lt;T, U&gt; = T extends U ? never : T
function func&lt;T&gt;(arg: negationType&lt;T, number&gt;) {}
func(1) // ERROR Argument of type 'number' is not assignable to parameter of type 'never'.
func(&quot;zs&quot;)
func(true)
func([])
func({})
func(() =&gt; {})

</code></pre>
]]></content>
  <category term="TypeScript"/>
  <category term="技术"/>
</entry>
<entry>
  <title>实现一个丝滑的暗黑模式切换动画</title>
  <link href="https://ganto.me/post/20240102"/>
  <id>https://ganto.me/post/20240102</id>
  <updated>2024-01-02T00:00:00+08:00</updated>
  <published>2024-01-02T00:00:00+08:00</published>
  <author><name>干徒</name></author>
  <summary><![CDATA[体验：https://ganto.me 参考内容： 参考文章：https://juejin.cn/post/7269388083342082107 MDN：https://developer.mozilla.org/zh-CN/docs/Web/API/View_Transitions_API https://developer.mozilla.org/zh-CN/docs/Web/CSS/::view-transition-new 实现方式就是利用vueuse将html元素动态添加class类名dark 利用伪元素::view-transition-old以及::view-transition-new，如需了解这两个伪元素，请移步文章开头参考内容 可以这样理解，调用document.startViewTransition(() =&gt; { /* 修改html元素类名 */ })方法时，在该方法的回调函数中，添加修改页面变化的代码； 这样伪元素::view-transition-old记录的就是修改之前的页面'截图'，而伪元素::view-transition-new是修改页面变化]]></summary>
  <content type="html"><![CDATA[<blockquote>
<p>体验：<a href="https://ganto.me">https://ganto.me</a></p>
</blockquote>
<blockquote>
<p>参考内容：<br />
参考文章：<a href="https://juejin.cn/post/7269388083342082107">https://juejin.cn/post/7269388083342082107</a><br />
MDN：<a href="https://developer.mozilla.org/zh-CN/docs/Web/API/View_Transitions_API">https://developer.mozilla.org/zh-CN/docs/Web/API/View_Transitions_API</a> <a href="https://developer.mozilla.org/zh-CN/docs/Web/CSS/::view-transition-new">https://developer.mozilla.org/zh-CN/docs/Web/CSS/::view-transition-new</a></p>
</blockquote>
<p>实现方式就是利用vueuse将html元素动态添加class类名dark</p>
<p>利用伪元素<code>::view-transition-old</code>以及<code>::view-transition-new</code>，如需了解这两个伪元素，请移步文章开头参考内容</p>
<p>可以这样理解，调用<code>document.startViewTransition(() =&gt; { /* 修改html元素类名 */ })</code>方法时，在该方法的回调函数中，添加修改页面变化的代码；<br />
这样伪元素<code>::view-transition-old</code>记录的就是修改之前的页面'截图'，而伪元素<code>::view-transition-new</code>是修改页面变化后的页面，然后是这两个伪元素进行的动画过渡</p>
<p>如果你想快速在项目中添加该动画，请添加以下代码<br />
*css</p>
<pre><code class="language-css">html {
  --g-tabbar-border: #c9c9c9;
  --g-tabbar-item-after: #595959;
  --g-about-link-border: #c9c9c9;
  --g-about-link-hover: #374151;
  --g-blog-bg-color: #d4d4d4;
}
html.dark {
  --g-tabbar-border: #595959;
  --g-tabbar-item-after: #fff;
  --g-about-link-border: #374151;
  --g-about-link-hover: #fff;
  --g-blog-bg-color: #8a8a8a;
}

::view-transition-old(*) {
  animation: none;
}

::view-transition-new(*) {
  animation: clip .5s ease-in;
}

::view-transition-old(root) {
  z-index: 1;
}

::view-transition-new(root) {
  z-index: 9999;
}

html.dark::view-transition-old(*) {
  animation: clip .5s ease-in reverse;
}

html.dark::view-transition-new(*) {
  animation: none;
}

html.dark::view-transition-old(root) {
  z-index: 9999;
}

html.dark::view-transition-new(root) {
  z-index: 1;
}

@keyframes clip {
  from {
    clip-path: circle(0% at var(--x) var(--y));
  }
  to{
    clip-path: circle(var(--r) at var(--x) var(--y));
  }
}

</code></pre>
<p><code>clip-path</code> css样式中的 <code>circle</code> 函数，第一个参数就是圆的半径，第二、三个参数是圆心坐标</p>
<p>*js</p>
<pre><code class="language-js">const changeBtn = (func, $eve) =&gt; {
  const x = $eve.clientX
  const y = $eve.clientY
  // 计算鼠标点击位置距离视窗的最大圆半径
  const endRadius = Math.hypot(
    Math.max(x, innerWidth - x),
    Math.max(y, innerHeight - y),
  )
  document.documentElement.style.setProperty('--x', x + 'px')
  document.documentElement.style.setProperty('--y', y + 'px')
  document.documentElement.style.setProperty('--r', endRadius + 'px')
  // 判断浏览器是否支持document.startViewTransition
  if (document.startViewTransition) {
    // 如果支持就使用document.startViewTransition方法
    document.startViewTransition(() =&gt; {
      func.call() // 这里的函数是切换主题的函数，调用changeBtn函数时进行传入
    })
  } else {
    // 如果不支持，就使用最原始的方式，切换主题
    func.call()
  }
}

</code></pre>
<p>动画会用到鼠标点击按钮时的点击坐标</p>
<p>如果你想快速测试，在添加css代码后，直接在浏览器控制台Console中运行以下代码测试</p>
<p>*测试</p>
<pre><code class="language-js">document.querySelector('html').setAttribute('style', '--r: 100px; --x: 100px; --y: 100px;')
document.startViewTransition(() =&gt; {
    document.querySelector('html').classList.toggle('dark')
})

</code></pre>
<h1>完整案例</h1>
<pre><code class="language-html">&lt;!DOCTYPE html&gt;
&lt;html lang=&quot;en&quot;&gt;
  &lt;head&gt;
    &lt;meta charset=&quot;UTF-8&quot; /&gt;
    &lt;meta name=&quot;viewport&quot; content=&quot;width=device-width, initial-scale=1.0&quot; /&gt;
    &lt;title&gt;Document&lt;/title&gt;
    &lt;style&gt;
      html {
        --bg-color: #000;
        --text-color: #fff;
      }
      html.dark {
        --bg-color: #fff;
        --text-color: #000;
      }

      ::view-transition-old(*) {
        animation: none;
      }

      ::view-transition-new(*) {
        animation: clip 0.5s ease-in;
      }

      ::view-transition-old(root) {
        z-index: 1;
      }

      ::view-transition-new(root) {
        z-index: 9999;
      }

      html.dark::view-transition-old(*) {
        animation: clip 0.5s ease-in reverse;
      }

      html.dark::view-transition-new(*) {
        animation: none;
      }

      html.dark::view-transition-old(root) {
        z-index: 9999;
      }

      html.dark::view-transition-new(root) {
        z-index: 1;
      }

      @keyframes clip {
        from {
          clip-path: circle(0% at var(--x) var(--y));
        }
        to {
          clip-path: circle(var(--r) at var(--x) var(--y));
        }
      }

      /* 样式写法例子，使用css变量，可以实现动态切换主题 */
      body {
        background-color: var(--bg-color);
        color: var(--text-color);
      }
    &lt;/style&gt;
  &lt;/head&gt;
  &lt;body&gt;
    &lt;h1&gt;
      test text
    &lt;/h1&gt;
    &lt;button id=&quot;btn&quot;&gt;changeTheme&lt;/button&gt;

    &lt;script&gt;
      // 主题切换函数
      const changeTheme = () =&gt; {
        document.querySelector('html').classList.toggle('dark')
      }
      const changeBtn = (func, $eve) =&gt; {
        const x = $eve.clientX
        const y = $eve.clientY
        // 计算鼠标点击位置距离视窗的最大圆半径
        const endRadius = Math.hypot(
          Math.max(x, innerWidth - x),
          Math.max(y, innerHeight - y),
        )
        document.documentElement.style.setProperty('--x', x + 'px')
        document.documentElement.style.setProperty('--y', y + 'px')
        document.documentElement.style.setProperty('--r', endRadius + 'px')
        // 判断浏览器是否支持document.startViewTransition
        if (document.startViewTransition) {
          // 如果支持就使用document.startViewTransition方法
          document.startViewTransition(() =&gt; {
            func.call() // 这里的函数是切换主题的函数，调用changeBtn函数时进行传入
          })
        } else {
          // 如果不支持，就使用最原始的方式，切换主题
          func.call()
        }
      }
      document.getElementById('btn').addEventListener('click', (e) =&gt; {
        changeBtn(changeTheme, e)
      })
    &lt;/script&gt;
  &lt;/body&gt;
&lt;/html&gt;

</code></pre>
]]></content>
  <category term="Vue"/>
  <category term="前端"/>
  <category term="技术"/>
</entry>
<entry>
  <title>Vue3.3+ 新特性 defineOptions</title>
  <link href="https://ganto.me/post/20231221-2"/>
  <id>https://ganto.me/post/20231221-2</id>
  <updated>2023-12-21T00:00:00+08:00</updated>
  <published>2023-12-21T00:00:00+08:00</published>
  <author><name>干徒</name></author>
  <summary><![CDATA[defineOptions是一个宏，是在Vue3.3+中新增的新特性 defineOptions配置项 name 在Vue3.3之前，组件的默认组件名为.vue单文件组件[SFC]文件的名字，如果需要修改组件名则需要结合Options API进行配置 &lt;!-- src/components/Com.vue --&gt; &lt;script setup&gt; &lt;/script&gt; &lt;script&gt; export default { name: 'ComponentName' } &lt;/script&gt; &lt;template&gt; &lt;div&gt;Com Component&lt;/div&gt; &lt;/template&gt; 在以上的代码中，写了两个script标签，一个标签写Composition API代码，一个标签以Options API的方式配置组件名 虽然可以配置组件名，但是这种处理方式很不好 在Vue3.3+新增的defineOptions宏，可以很好的解决这个问题 &lt;!-- src/components/Com]]></summary>
  <content type="html"><![CDATA[<p><code>defineOptions</code>是一个宏，是在Vue3.3+中新增的新特性</p>
<h1>defineOptions配置项</h1>
<h2>name</h2>
<p>在Vue3.3之前，组件的默认组件名为.vue单文件组件[SFC]文件的名字，如果需要修改组件名则需要结合Options API进行配置</p>
<pre><code class="language-vue">&lt;!-- src/components/Com.vue --&gt;
&lt;script setup&gt;

&lt;/script&gt;

&lt;script&gt;
export default {
  name: 'ComponentName'
}
&lt;/script&gt;

&lt;template&gt;
  &lt;div&gt;Com Component&lt;/div&gt;
&lt;/template&gt;

</code></pre>
<p>在以上的代码中，写了两个script标签，一个标签写Composition API代码，一个标签以Options API的方式配置组件名<br />
虽然可以配置组件名，但是这种处理方式很不好</p>
<p>在Vue3.3+新增的defineOptions宏，可以很好的解决这个问题</p>
<pre><code class="language-vue">&lt;!-- src/components/Com.vue --&gt;
&lt;script setup&gt;
defineOptions({
  name: 'ComponentName'
})
&lt;/script&gt;

&lt;template&gt;
  &lt;div&gt;Com Component&lt;/div&gt;
&lt;/template&gt;

</code></pre>
<p>在以上代码中可以看到，defineOptions是全局的宏，无需导入</p>
<h2>inheritAttrs</h2>
<p>在Vue中如果在组件标签上添加属性，则会被透传到组件的根标签上，<em>在Vue3中，组件的根标签可以存在多个，如果根标签存在多个，那么透传将失效</em></p>
<pre><code class="language-vue">&lt;!-- src/App.vue --&gt;
&lt;script setup&gt;
import Com from './components/Com.vue'
&lt;/script&gt;

&lt;template&gt;
  &lt;Com class=&quot;comComponentClassName&quot; /&gt;
&lt;/template&gt;

</code></pre>
<pre><code class="language-vue">&lt;!-- src/components/Com.vue --&gt;
&lt;script setup&gt;
defineOptions({
  name: 'ComponentName',
})
&lt;/script&gt;

&lt;template&gt;
  &lt;div&gt;Com Component&lt;/div&gt;
&lt;/template&gt;

</code></pre>
<p>解析后的代码</p>
<pre><code class="language-html">&lt;div id=&quot;app&quot; data-v-app=&quot;&quot;&gt;
  &lt;div class=&quot;comComponentClassName&quot;&gt;Com Component&lt;/div&gt;
&lt;/div&gt;

</code></pre>
<p>有时在开发中，并不希望组件存在透传行为，我们可以通过配置进行关闭</p>
<pre><code class="language-vue">&lt;!-- src/components/Com.vue --&gt;
&lt;script setup&gt;
defineOptions({
  name: 'ComponentName',
})
&lt;/script&gt;

&lt;script&gt;
export default {
  inheritAttrs: false
}
&lt;/script&gt;

&lt;template&gt;
  &lt;div&gt;Com Component&lt;/div&gt;
&lt;/template&gt;

</code></pre>
<p>以上代码，在Vue3.3之前，如需配置组件禁用透传，那么配置方式和配置组件名一样，需要在单独的script写Options API配置项</p>
<p>在Vue3.3+可以通过defineOptions宏进行配置</p>
<pre><code class="language-vue">&lt;!-- src/components/Com.vue --&gt;
&lt;script setup&gt;
defineOptions({
  name: 'ComponentName',
  inheritAttrs: false,
})
&lt;/script&gt;

&lt;template&gt;
  &lt;div&gt;Com Component&lt;/div&gt;
&lt;/template&gt;

</code></pre>
<p><code>defineOptions</code>宏还可以配置其他内容，具体内容请查看官方文档 <a href="https://cn.vuejs.org/api/sfc-script-setup.html#defineoptions">https://cn.vuejs.org/api/sfc-script-setup.html#defineoptions</a></p>
]]></content>
  <category term="JavaScript"/>
  <category term="Vue"/>
  <category term="前端"/>
  <category term="技术"/>
</entry>
<entry>
  <title>Vue3 实验性特性 defineModel</title>
  <link href="https://ganto.me/post/20231221"/>
  <id>https://ganto.me/post/20231221</id>
  <updated>2023-12-21T00:00:00+08:00</updated>
  <published>2023-12-21T00:00:00+08:00</published>
  <author><name>干徒</name></author>
  <summary><![CDATA[在Vue3.4中，defineModel宏已经被正式启用，无需配置，直接可用 启用defineModel 目前[Vue3.3.13]defineModel宏是实验性特性，如果需要使用该宏，需要在vite.config.js配置以下内容 export default defineConfig({ plugins: [ vue({ script: { defineModel: true } }), ], }) 因为是实验性功能，在运行项目时，会有提示 [@vue/compiler-sfc] defineModel() is an experimental feature and disabled by default. To enable it, follow the RFC at https://github.com/vuejs/rfcs/discussions/503. defineModel出现的必要 在Vue中，父传子的数据是单向数据流，即无法直接通过子组件修改父组件传递过来的数据 如果需要修改可以通过自定义事件的方式，通过子组件的自定义事件来修改父组件的状态 &lt;!-- sr]]></summary>
  <content type="html"><![CDATA[<blockquote>
<p>在Vue3.4中，defineModel宏已经被正式启用，无需配置，直接可用</p>
</blockquote>
<h1>启用defineModel</h1>
<p>目前[Vue3.3.13]defineModel宏是实验性特性，如果需要使用该宏，需要在<code>vite.config.js</code>配置以下内容</p>
<pre><code class="language-js">export default defineConfig({
  plugins: [
    vue({
      script: {
        defineModel: true
      }
    }),
  ],
})

</code></pre>
<p>因为是实验性功能，在运行项目时，会有提示</p>
<blockquote>
<p>[@vue/compiler-sfc] defineModel() is an experimental feature and disabled by default.<br />
To enable it, follow the RFC at <a href="https://github.com/vuejs/rfcs/discussions/503">https://github.com/vuejs/rfcs/discussions/503</a>.</p>
</blockquote>
<h1>defineModel出现的必要</h1>
<p>在Vue中，父传子的数据是单向数据流，即无法直接通过子组件修改父组件传递过来的数据<br />
如果需要修改可以通过自定义事件的方式，通过子组件的自定义事件来修改父组件的状态</p>
<pre><code class="language-vue">&lt;!-- src/App.vue --&gt;
&lt;script setup&gt;
import { ref } from 'vue'
import Counter from './components/Counter.vue'

const count = ref(0)
const updateCount = (val) =&gt; {
  count.value = val
}
&lt;/script&gt;

&lt;template&gt;
  &lt;div&amp;gt;父组件：{{ count }}&lt;/div&gt;
  &lt;Counter :count=&quot;count&quot; @addCount=&quot;updateCount&quot;/&gt;
&lt;/template&gt;

</code></pre>
<pre><code class="language-vue">&lt;!-- src/components/Counter.vue --&gt;
&lt;script setup&gt;
const props = defineProps({
  count: Number
})

const emit = defineEmits([&quot;addCount&quot;])

const handleClick = () =&gt; {
  emit(&quot;addCount&quot;, props.count+1)
}
&lt;/script&gt;

&lt;template&gt;
  &lt;div&amp;gt;子组件：{{ count }}&lt;/div&gt;
  &lt;button @click=&quot;handleClick&quot;&gt;count+1&lt;/button&gt;
&lt;/template&gt;

</code></pre>
<p>以上代码可以实现子组件修改父组件的状态，虽然不算复杂，也很好理解原理，但是这并不优雅</p>
<p>可以通过v-model来进一步简化代码，以下代码父组件并不是通过属性的方式将数据传递给子组件，而是通过v-model进行传递<br />
子组件的代码量基本和上边的代码一致，只是自定义事件名变成了<code>update:count</code>的形式，这是固定写法<br />
父组件无需注册子组件的自定义事件</p>
<pre><code class="language-vue">&lt;!-- src/App.vue --&gt;
&lt;script setup&gt;
import { ref } from 'vue'
import Counter from './components/Counter.vue'
const count = ref(0)
&lt;/script&gt;

&lt;template&gt;
  &lt;div&amp;gt;父组件：{{ count }}&lt;/div&gt;
  &lt;Counter v-model:count=&quot;count&quot;/&gt;
&lt;/template&gt;

</code></pre>
<blockquote>
<p>如果父组件直接写<code>v-model=&quot;count&quot;</code>，其实可以理解为默认转换为<code>v-model:modelValue=&quot;count&quot;</code>，即：<code>:modelValue=&quot;count&quot;</code> <code>@update:modelValue=&quot;count&quot;</code><br />
子组件中需要props接收<code>modelValue</code>，自定义事件将变为<code>update:modelValue</code></p>
</blockquote>
<pre><code class="language-vue">&lt;!-- src/components/Counter.vue --&gt;
&lt;script setup&gt;
const props = defineProps({
  count: Number
})

const emit = defineEmits([&quot;update:count&quot;])

const handleClick = () =&gt; {
  emit(&quot;update:count&quot;, props.count+1)
}
&lt;/script&gt;

&lt;template&gt;
  &lt;div&amp;gt;子组件：{{ count }}&lt;/div&gt;
  &lt;button @click=&quot;handleClick&quot;&gt;count+1&lt;/button&gt;
&lt;/template&gt;

</code></pre>
<p>虽然简化了父组件的代码，但是子组件的代码量并没有减少，并且子组件自定义事件名变成了固定格式的写法<br />
这不仅让人产生疑惑: &quot;自定义事件没有在父组件中被使用，这无疑是增加代码阅读的成本&quot;</p>
<p>这些疑惑可以通过<code>defineModel</code>宏来打消<br />
父组件还是一样的写法，只需子组件通过defineModel宏来处理，甚至不用defineProps来定义父组件传递的数据</p>
<pre><code class="language-vue">&lt;!-- src/App.vue --&gt;
&lt;script setup&gt;
import { ref } from 'vue'
import Counter from './components/Counter.vue'

const count = ref(0)
&lt;/script&gt;

&lt;template&gt;
  &lt;div&amp;gt;父组件：{{ count }}&lt;/div&gt;
  &lt;Counter v-model:count=&quot;count&quot;/&gt;
&lt;/template&gt;

</code></pre>
<pre><code class="language-vue">&lt;!-- src/components/Counter.vue --&gt;
&lt;script setup&gt;
const count = defineModel('count')

const handleClick = () =&gt; {
  count.value += 1
}
&lt;/script&gt;

&lt;template&gt;
  &lt;div&amp;gt;子组件：{{ count }}&lt;/div&gt;
  &lt;button @click=&quot;handleClick&quot;&gt;count+1&lt;/button&gt;
&lt;/template&gt;

</code></pre>
<p>defineModel宏目前还是实验性功能，不应该在生产环境中进行使用</p>
]]></content>
  <category term="JavaScript"/>
  <category term="Vue"/>
  <category term="前端"/>
  <category term="技术"/>
</entry>
<entry>
  <title>JavaScript闭包直接修改内部属性</title>
  <link href="https://ganto.me/post/20231117-3"/>
  <id>https://ganto.me/post/20231117-3</id>
  <updated>2023-11-17T00:00:00+08:00</updated>
  <published>2023-11-17T00:00:00+08:00</published>
  <author><name>干徒</name></author>
  <summary><![CDATA[事例代码 var o = (function() { var obj = { a: 1, b: 2, } return { get: function(k) { return obj[k] } } })() 说明 如上一段代码，在不改变原代码的情况下，修改obj对象中的a、b属性。 分析 代码使用了闭包，返回一个对象，对象中有一个get函数，这个get函数只能通过o.get('a')的方式查看obj中的属性 如果想要直接修改是无法修改的 所有对象都有一个原型链，该原型链继承自Object，Object上有一个valueOf属性，该属性为一个函数，执行可以返回对象自身 var o = (function() { var obj = { a: 1, b: 2, } return { get: function(k) { return obj[k] } } })() console.log(o.get('valueOf')) 如上代码，可以打印出来obj的valueOf结构了，直接执行console.log(o.get('valueOf')())，发现已经报错了，这里报错的原因是因为在执行v]]></summary>
  <content type="html"><![CDATA[<h2>事例代码</h2>
<pre><code class="language-js">var o = (function() {
    var obj = {
        a: 1,
        b: 2,
    }
    return {
        get: function(k) {
            return obj[k]
        }
    }
})()

</code></pre>
<h2>说明</h2>
<p>如上一段代码，在不改变原代码的情况下，修改obj对象中的a、b属性。</p>
<h2>分析</h2>
<p>代码使用了闭包，返回一个对象，对象中有一个get函数，这个get函数只能通过<code>o.get('a')</code>的方式查看obj中的属性<br />
如果想要直接修改是无法修改的</p>
<p>所有对象都有一个原型链，该原型链继承自Object，Object上有一个<code>valueOf</code>属性，该属性为一个函数，执行可以返回对象自身</p>
<pre><code class="language-js">var o = (function() {
    var obj = {
        a: 1,
        b: 2,
    }
    return {
        get: function(k) {
            return obj[k]
        }
    }
})()
console.log(o.get('valueOf'))

</code></pre>
<p>如上代码，可以打印出来obj的valueOf结构了，直接执行<code>console.log(o.get('valueOf')())</code>，发现已经报错了，这里报错的原因是因为在执行valueOf的this指向错误。</p>
<p>如下代码，演示this指向：</p>
<pre><code class="language-js">const obj = Object.prototype.valueOf
console.log(obj()) // 报错

const obj = Object.prototype.valueOf()
console.log(obj) // 可以获取Object对象

</code></pre>
<p>那么标志着这种方式行不通</p>
<h2>突破</h2>
<pre><code class="language-js">var o = (function() {
    var obj = {
        a: 1,
        b: 2,
    }
    return {
        get: function(k) {
            return obj[k]
        }
    }
})()

Object.defineProperty(Object.prototype, 'xxx', {
    get() {
        return this
    }
})

console.log(o.get('xxx'));

</code></pre>
<p>以上代码是在Object的原型上添加了一个xxx属性的访问器，因为是在Object的原型上，所以其他属性也可以读取xxx属性<br />
Object原型上的xxx属性的访问器，返回了this，这里的this是只要哪个对象访问这个属性，this就指向哪个对象，这样就解决了this指向的问题</p>
<p>当o.get('xxx')执行的时候，会触发o对象返回的get方法中返回的obj['xxx']，这里就相当于o中的obj访问了xxx属性，所以这里读取o.get('xxx')，但是obj身上没有xxx属性，就会读Object身上的xxx属性，就会触发xxx属性访问器中的get方法，那么this指向obj，也就是obj对象</p>
<p>在此时我们就可以修改obj属性值了</p>
<pre><code class="language-js">var o = (function() {
    var obj = {
        a: 1,
        b: 2,
    }
    return {
        get: function(k) {
            return obj[k]
        }
    }
})()

Object.defineProperty(Object.prototype, 'xxx', {
    get() {
        return this
    }
})
o.get('xxx').a = 100
o.get('xxx').b = 200
console.log(o.get('a'), o.get('b')); // 100 200

</code></pre>
<h2>如何避免这种情况</h2>
<h3>判断对象属性是否存在</h3>
<p>可以在读取obj的属性的时候加一个判断</p>
<pre><code class="language-js">var o = (function() {
    var obj = {
        a: 1,
        b: 2,
    }
    return {
        get: function(k) {
            if (obj.hasOwnProperty(k)) {
                return obj[k]
            }
            return undefined
        }
    }
})()

Object.defineProperty(Object.prototype, 'xxx', {
    get() {
        return this
    }
})
o.get('xxx').a = 100
o.get('xxx').b = 200
console.log(o.get('a'), o.get('b'));

</code></pre>
<p>这样处理后就无法读取xxx属性了，以为xxx属性不是obj身上存在的属性</p>
<h3>将对象原型设置为null</h3>
<pre><code class="language-js">var o = (function() {
    var obj = {
        a: 1,
        b: 2,
    }
    Object.setPrototypeOf(obj, null)
    return {
        get: function(k) {
            return obj[k]
        }
    }
})()

Object.defineProperty(Object.prototype, 'xxx', {
    get() {
        return this
    }
})
o.get('xxx').a = 100
o.get('xxx').b = 200
console.log(o.get('a'), o.get('b'));

</code></pre>
<p>这样obj就不存在原型了，无法去Object身上读取xxx属性</p>
]]></content>
  <category term="JavaScript"/>
  <category term="技术"/>
</entry>
<entry>
  <title>使用class实现评分</title>
  <link href="https://ganto.me/post/20231117-2"/>
  <id>https://ganto.me/post/20231117-2</id>
  <updated>2023-11-17T00:00:00+08:00</updated>
  <published>2023-11-17T00:00:00+08:00</published>
  <author><name>干徒</name></author>
  <summary><![CDATA[创建Star类 class Star { constructor(will, score, dom) { this.will = will; this.score = score; this.dom = dom; } init() { const that = this; this.dom.forEach(element =&gt; { element.onmouseover = e =&gt; { that.point(Number(e.target.innerText)); } element.onmouseout = () =&gt; { that.point(); } element.onclick = function() { if (that.score === this.innerText) { that.score = 0; } else { that.score = Number(this.innerText); } } }) } point(parm) { this.will = parm || this.score; this.dom.forEach((eleme]]></summary>
  <content type="html"><![CDATA[<h1>创建Star类</h1>
<pre><code class="language-js">class Star {
  constructor(will, score, dom) {
    this.will = will;
    this.score = score;
    this.dom = dom;
  }
  init() {
    const that = this;
    this.dom.forEach(element =&gt; {
      element.onmouseover = e =&gt; {
        that.point(Number(e.target.innerText));
      }
      element.onmouseout = () =&gt; {
        that.point();
      }
      element.onclick = function() {
        if (that.score === this.innerText) {
          that.score = 0;
        } else {
          that.score = Number(this.innerText);
        }
      }
    })
  }
  point(parm) {
    this.will = parm || this.score;
    this.dom.forEach((element, i) =&gt; {
      element.className = i &lt; this.will ? &quot;on&quot; : &quot;&quot;;
    });
  }
}

</code></pre>
<h1>使用Star类</h1>
<p>创建Star实例时需要输入成员变量<br />
will 为 mouseover 的时候保存的星星数，用于鼠标经过星星时进行星星点亮的数据依据<br />
score 为 click 的时候确定选择的星星数<br />
dom 为 每组星星的 dom 数组</p>
<pre><code class="language-js">const star_1 = new Star(0, 0, document.querySelectorAll(&quot;.star_1 ul li&quot;));
star_1.init();

</code></pre>
<h1>完整代码</h1>
<pre><code class="language-html">&lt;!DOCTYPE html&gt;
&lt;html lang=&quot;en&quot;&gt;
&lt;head&gt;
  &lt;meta charset=&quot;UTF-8&quot;&gt;
  &lt;meta name=&quot;viewport&quot; content=&quot;width=device-width, initial-scale=1.0&quot;&gt;
  &lt;title&gt;Document&lt;/title&gt;
  &lt;style&gt;
    * {
      margin: 0;
      padding: 0;
      box-sizing: border-box;
    }
    html, body {
      background-color: #000;
      color: #fff;
    }
    body {
      height: 100vh;
      display: flex;
      justify-content: center;
      align-items: center;
    }
    main {
      .star {
        width: 200px;
        height: 40px;
        &amp; ul {
          display: flex;
          &amp; li {
            list-style: none;
            width: 40px;
            height: 40px;
            border-radius: 50%;
            background-color: yellowgreen;
            display: flex;
            justify-content: center;
            align-items: center;
            cursor: pointer;
          }
          &amp; li.on {
            background-color: red;
          }
        }
      }
      .btn {
        text-align: center;
        margin-top: 10px;
        #submit {
          display: inline-block;
        }
      }
    }
  &lt;/style&gt;
&lt;/head&gt;
&lt;body&gt;
  &lt;main&gt;
    &lt;div class=&quot;star star_1&quot;&gt;
      &lt;ul&gt;
        &lt;li&gt;1&lt;/li&gt;
        &lt;li&gt;2&lt;/li&gt;
        &lt;li&gt;3&lt;/li&gt;
        &lt;li&gt;4&lt;/li&gt;
        &lt;li&gt;5&lt;/li&gt;
      &lt;/ul&gt;
    &lt;/div&gt;
    &lt;div class=&quot;star star_2&quot;&gt;
      &lt;ul&gt;
        &lt;li&gt;1&lt;/li&gt;
        &lt;li&gt;2&lt;/li&gt;
        &lt;li&gt;3&lt;/li&gt;
        &lt;li&gt;4&lt;/li&gt;
        &lt;li&gt;5&lt;/li&gt;
      &lt;/ul&gt;
    &lt;/div&gt;
    &lt;div class=&quot;star star_3&quot;&gt;
      &lt;ul&gt;
        &lt;li&gt;1&lt;/li&gt;
        &lt;li&gt;2&lt;/li&gt;
        &lt;li&gt;3&lt;/li&gt;
        &lt;li&gt;4&lt;/li&gt;
        &lt;li&gt;5&lt;/li&gt;
      &lt;/ul&gt;
    &lt;/div&gt;
    &lt;div class=&quot;btn&quot;&gt;
      &lt;button id=&quot;submit&quot;&amp;gt;提交&lt;/button&gt;
    &lt;/div&gt;
  &lt;/main&gt;

  &lt;script&gt;
    window.onload = function() {
      class Star {
        constructor(will, score, dom) {
          this.will = will;
          this.score = score;
          this.dom = dom;
        }
        init() {
          const that = this;
          this.dom.forEach(element =&gt; {
            element.onmouseover = e =&gt; {
              that.point(Number(e.target.innerText));
            }
            element.onmouseout = () =&gt; {
              that.point();
            }
            element.onclick = function() {
              if (that.score === this.innerText) {
                that.score = 0;
              } else {
                that.score = Number(this.innerText);
              }
            }
          })
        }
        point(parm) {
          this.will = parm || this.score;
          this.dom.forEach((element, i) =&gt; {
            element.className = i &lt; this.will ? &quot;on&quot; : &quot;&quot;;
          });
        }
      }
      const star_1 = new Star(0, 0, document.querySelectorAll(&quot;.star_1 ul li&quot;));
      const star_2 = new Star(0, 0, document.querySelectorAll(&quot;.star_2 ul li&quot;));
      const star_3 = new Star(0, 0, document.querySelectorAll(&quot;.star_3 ul li&quot;));
      console.log(star_1, star_2, star_3)
      star_1.init();
      star_2.init();
      star_3.init();

      document.querySelector(&quot;#submit&quot;).onclick = () =&gt; {
        alert(`${star_1.score}, ${star_2.score}, ${star_3.score}`);
      }
    }
  &lt;/script&gt;
&lt;/body&gt;
&lt;/html&gt;

</code></pre>
]]></content>
</entry>
<entry>
  <title>函数柯里化</title>
  <link href="https://ganto.me/post/20231117"/>
  <id>https://ganto.me/post/20231117</id>
  <updated>2023-11-17T00:00:00+08:00</updated>
  <published>2023-11-17T00:00:00+08:00</published>
  <author><name>干徒</name></author>
  <summary><![CDATA[柯里化就是将多参函数变成单参函数 // 实现函数柯里化 function currying() { } // 测试柯里化函数 const sum = (a, b, c, d) =&gt; a + b + c + d; console.log(currying(sum)(1)(2)(3)(4)); // 10 console.log(currying(sum, 1)(2, 3)(4)); // 10 console.log(currying(sum, 1, 2)(3)(4)); // 10 console.log(currying(sum, 1, 2)(3, 4)); // 10 如上代码，实现柯里化函数 实现方式如下，自行理解代码 // 实现函数柯里化 function currying(fn, ...bindArgs) { return (...args) =&gt; { const allArgs = [...bindArgs, ...args]; if (allArgs.length &lt; fn.length) { return currying(fn, ...allArgs]]></summary>
  <content type="html"><![CDATA[<p>柯里化就是将多参函数变成单参函数</p>
<pre><code class="language-js">// 实现函数柯里化
function currying() {
  
}

// 测试柯里化函数
const sum = (a, b, c, d) =&gt; a + b + c + d;

console.log(currying(sum)(1)(2)(3)(4)); // 10
console.log(currying(sum, 1)(2, 3)(4)); // 10
console.log(currying(sum, 1, 2)(3)(4)); // 10
console.log(currying(sum, 1, 2)(3, 4)); // 10

</code></pre>
<p>如上代码，实现柯里化函数<br />
实现方式如下，自行理解代码</p>
<pre><code class="language-js">// 实现函数柯里化
function currying(fn, ...bindArgs) {
  return (...args) =&gt; {
    const allArgs = [...bindArgs, ...args];
    if (allArgs.length &lt; fn.length) {
      return currying(fn, ...allArgs);
    } else {
      return fn(...allArgs)
    }
  }
}

// 测试柯里化函数
const sum = (a, b, c, d) =&gt; a + b + c + d;

console.log(currying(sum)(1)(2)(3)(4)); // 10
console.log(currying(sum, 1)(2, 3)(4)); // 10
console.log(currying(sum, 1, 2)(3)(4)); // 10
console.log(currying(sum, 1, 2)(3, 4)); // 10

</code></pre>
]]></content>
</entry>
<entry>
  <title>自定义Typora主题分享</title>
  <link href="https://ganto.me/post/20230831"/>
  <id>https://ganto.me/post/20230831</id>
  <updated>2023-08-31T00:00:00+08:00</updated>
  <published>2023-08-31T00:00:00+08:00</published>
  <author><name>干徒</name></author>
  <summary><![CDATA[Typora主题的开发主要就是编写css样式，将Typora的默认样式进行覆盖 介绍 Toxic主题没有特别之处，使用了MiSans字体，看着比较工整 预览 体验 下载主题包 github仓库地址 欢迎下载使用、修改、分享 安装步骤 先将主题代码down下来，目录文件结构如下，只需要toxic.css文件、toxic文件夹 安装主题步骤，使用mac进行演示，windows安装方式请自行寻找 直接将主题文件拷贝到主题目录中，如图 重启Typora 然后选择Toxic主题]]></summary>
  <content type="html"><![CDATA[<p>Typora主题的开发主要就是编写css样式，将Typora的默认样式进行覆盖</p>
<h1>介绍</h1>
<p>Toxic主题没有特别之处，使用了<code>MiSans</code>字体，看着比较工整</p>
<h1>预览</h1>
<p><img src="https://img2023.cnblogs.com/blog/2229842/202308/2229842-20230831214029753-586461364.png" alt="" /><br />
<img src="https://img2023.cnblogs.com/blog/2229842/202308/2229842-20230831213436571-419322600.png" alt="" /><br />
<img src="https://img2023.cnblogs.com/blog/2229842/202308/2229842-20230831213442956-654898172.png" alt="" /><br />
<img src="https://img2023.cnblogs.com/blog/2229842/202308/2229842-20230831213622516-593509612.png" alt="" /></p>
<h1>体验</h1>
<h2>下载主题包</h2>
<p><a href="https://github.com/gantoho/typora-toxic-themes.git">github仓库地址</a> 欢迎下载使用、修改、分享</p>
<h2>安装步骤</h2>
<p>先将主题代码down下来，目录文件结构如下，只需要<code>toxic.css</code>文件、<code>toxic</code>文件夹<br />
<img src="https://img2023.cnblogs.com/blog/2229842/202308/2229842-20230831215447771-450309216.png" alt="" /></p>
<p>安装主题步骤，使用mac进行演示，windows安装方式请自行寻找<br />
<img src="https://img2023.cnblogs.com/blog/2229842/202308/2229842-20230831214459652-1983871182.png" alt="" /></p>
<p>直接将主题文件拷贝到主题目录中，如图<br />
<img src="https://img2023.cnblogs.com/blog/2229842/202308/2229842-20230831215244328-661387215.png" alt="" /></p>
<p>重启Typora<br />
然后选择Toxic主题<br />
<img src="https://img2023.cnblogs.com/blog/2229842/202308/2229842-20230831214717082-1753119573.png" alt="" /></p>
]]></content>
</entry>
<entry>
  <title>git学习教程</title>
  <link href="https://ganto.me/post/20230829"/>
  <id>https://ganto.me/post/20230829</id>
  <updated>2023-08-29T00:00:00+08:00</updated>
  <published>2023-08-29T00:00:00+08:00</published>
  <author><name>干徒</name></author>
  <summary><![CDATA[网址一：Learn Git Branching! https://learngitbranching.js.org/?locale=zh_CN 另外粘贴一篇详细介绍的链接： https://zhuanlan.zhihu.com/p/383960650 《为你自己学git》一书的练习场 https://gitbook.tw/playground 网址三： git原理入门 https://ithelp.ithome.com.tw/articles/10190453 网址四: 连猴子都能懂得git入门指南 https://backlog.com/git-tutorial/tw/ 博文：Git命令和操作的学习及在线练习 https://www.cnblogs.com/Sky-seeker/p/13332222.html git教程 https://www.yiibai.com/git 原文地址： https://www.cnblogs.com/leoych/p/15330559.html 其他链接： https://www.cnblogs.com/zhangsanfeng/p/10163968]]></summary>
  <content type="html"><![CDATA[<h1>网址一：Learn Git Branching!</h1>
<p><a href="https://learngitbranching.js.org/?locale=zh_CN">https://learngitbranching.js.org/?locale=zh_CN</a></p>
<p>另外粘贴一篇详细介绍的链接：<br />
<a href="https://zhuanlan.zhihu.com/p/383960650">https://zhuanlan.zhihu.com/p/383960650</a></p>
<h1>《为你自己学git》一书的练习场</h1>
<p><a href="https://gitbook.tw/playground">https://gitbook.tw/playground</a></p>
<h1>网址三： git原理入门</h1>
<p><a href="https://ithelp.ithome.com.tw/articles/10190453">https://ithelp.ithome.com.tw/articles/10190453</a></p>
<h1>网址四: 连猴子都能懂得git入门指南</h1>
<p><a href="https://backlog.com/git-tutorial/tw/">https://backlog.com/git-tutorial/tw/</a></p>
<h1>博文：Git命令和操作的学习及在线练习</h1>
<p><a href="https://www.cnblogs.com/Sky-seeker/p/13332222.html">https://www.cnblogs.com/Sky-seeker/p/13332222.html</a></p>
<h1>git教程</h1>
<p><a href="https://www.yiibai.com/git">https://www.yiibai.com/git</a></p>
<p><strong>原文地址：</strong> <a href="https://www.cnblogs.com/leoych/p/15330559.html">https://www.cnblogs.com/leoych/p/15330559.html</a></p>
<p><strong>其他链接：</strong> <a href="https://www.cnblogs.com/zhangsanfeng/p/10163968.html">https://www.cnblogs.com/zhangsanfeng/p/10163968.html</a><br />
<img src="https://img2023.cnblogs.com/blog/2229842/202309/2229842-20230906110959868-973072007.png" alt="" /></p>
]]></content>
</entry>
<entry>
  <title>博客园自定义主题</title>
  <link href="https://ganto.me/post/20230827"/>
  <id>https://ganto.me/post/20230827</id>
  <updated>2023-08-27T00:00:00+08:00</updated>
  <published>2023-08-27T00:00:00+08:00</published>
  <author><name>干徒</name></author>
  <summary><![CDATA[最新主题仓库：Gitee@ganto/cnblogs-theme 博客园默认皮肤选择 将博客园主题切换为：Custom 博客侧边栏公告 这里是定义公告栏目的地方 页面定制 CSS 代码 先将禁用模版默认CSS勾选上 源代码提供的css为scss格式，要将scss代码编译为css代码，再拷贝到 页面定制css代码 中 编译scss文件，可以利用vscode插件 Live Sass Compiler 进行编译 首先安装 Live Sass Compiler，安装好后，在vscode最底部（最新版是在最底部）有一个 Watch Sass 选项，点击即可编译sass。 页首 HTML 代码 这里是定义全局提示信息的地方 页脚 HTML 代码 页脚主要是Js相关代码 代码使用到了jQuery，jQuery无需额外引用，因为全局存在jQuery环境]]></summary>
  <content type="html"><![CDATA[<blockquote>
<p>最新主题仓库：<a href="https://gitee.com/ganto/cnblogs-theme.git">Gitee@ganto/cnblogs-theme</a></p>
</blockquote>
<h1>博客园默认皮肤选择</h1>
<p>将博客园主题切换为：<code>Custom</code></p>
<h1>博客侧边栏公告</h1>
<p>这里是定义公告栏目的地方</p>
<h1>页面定制 CSS 代码</h1>
<p><strong>先将<code>禁用模版默认CSS</code>勾选上</strong></p>
<p>源代码提供的css为scss格式，要将scss代码编译为css代码，再拷贝到 <strong>页面定制css代码</strong> 中</p>
<blockquote>
<p>编译scss文件，可以利用vscode插件 <em><strong>Live Sass Compiler</strong></em> 进行编译<br />
首先安装 <em><strong>Live Sass Compiler</strong></em>，安装好后，在vscode最底部（最新版是在最底部）有一个 <strong>Watch Sass</strong> 选项，点击即可编译sass。</p>
</blockquote>
<h1>页首 HTML 代码</h1>
<p>这里是定义全局提示信息的地方</p>
<h1>页脚 HTML 代码</h1>
<p>页脚主要是Js相关代码<br />
代码使用到了jQuery，jQuery无需额外引用，因为全局存在jQuery环境</p>
]]></content>
  <category term="JavaScript"/>
  <category term="前端"/>
  <category term="技术"/>
</entry>
<entry>
  <title>Golang学习笔记</title>
  <link href="https://ganto.me/post/20230816"/>
  <id>https://ganto.me/post/20230816</id>
  <updated>2023-08-16T00:00:00+08:00</updated>
  <published>2023-08-16T00:00:00+08:00</published>
  <author><name>干徒</name></author>
  <summary><![CDATA[Hello Golang // Hello Golang package main import &quot;fmt&quot; func main() { fmt.Println(&quot;Hello Golang&quot;) } Gogs是unknwon无闻主导开发的git管理平台，类似于gitlab，可以本地部署，采用Go语言开发，要比gitlab更加轻量。 Gogs官网 Gitea是Gogs的克隆项目，是属于Gogs的一个分支项目。 gitea.com gitea.io Golang 天生支持高并发 package main import ( &quot;fmt&quot; &quot;time&quot; ) func goFunc(i int) { fmt.Println(&quot;goroutine &quot;, i, &quot; ...&quot;) } func main() { for i := 0; i &lt; 10000; i++ { go goFunc(i) // 开启一个并发协程 } time.Sleep(time.Second) } Windo]]></summary>
  <content type="html"><![CDATA[<h1>Hello Golang</h1>
<pre><code class="language-go">// Hello Golang
package main

import &quot;fmt&quot;

func main() {
  	fmt.Println(&quot;Hello Golang&quot;)
}

</code></pre>
<p>Gogs是unknwon无闻主导开发的git管理平台，类似于gitlab，可以本地部署，采用Go语言开发，要比gitlab更加轻量。</p>
<p><a href="//gogs.io">Gogs官网</a></p>
<p>Gitea是Gogs的克隆项目，是属于Gogs的一个分支项目。</p>
<p>gitea.com gitea.io</p>
<h1>Golang</h1>
<p>天生支持高并发</p>
<pre><code class="language-go">package main

import (
	&quot;fmt&quot;
  &quot;time&quot;
)

func goFunc(i int) {
  fmt.Println(&quot;goroutine &quot;, i, &quot; ...&quot;)
}

func main() {
  for i := 0; i &lt; 10000; i++ {
    go goFunc(i) // 开启一个并发协程
  }
  
  time.Sleep(time.Second)
}

</code></pre>
<h1>Windows - Golang开发环境的搭建</h1>
<h2>安装配置SDK（软件开发工具包）</h2>
<p>go官网: <a href="https://go.dev">https://go.dev</a></p>
<p>将官网下载的SDK直接解压到本地目录D:\Program Files\go</p>
<p>在D:\Program Files\go\bin目录cmd，执行go version指令查看版本，如能正常打印版本，则表示安装成功。</p>
<pre><code class="language-sh">D:\Program Files\go\bin&gt;go versioin
go version go1.19.1 windows/amd64

</code></pre>
<h2>环境变量的配置</h2>
<table>
<thead>
<tr>
<th>key</th>
<th>value</th>
</tr>
</thead>
<tbody>
<tr>
<td>GOROOT</td>
<td>D:\Program Files\go</td>
</tr>
<tr>
<td>Path</td>
<td>%GOROOT%\bin</td>
</tr>
<tr>
<td>GOPATH</td>
<td>E:\Development\GolangLearn</td>
</tr>
</tbody>
</table>
<ul>
<li>
<p>GOROOT: 指定SDK安装的路径</p>
</li>
<li>
<p>Path: 引用上方的GOROOT环境变量然后进入bin目录下</p>
</li>
<li>
<p>GOPATH: 工作目录，项目的开发目录</p>
</li>
</ul>
<p>配置好之后，就可以全局使用go命令</p>
<h1>*基础</h1>
<h1>第一个go程序</h1>
<h2>目录</h2>
<pre><code class="language-sh"> GoProject
 └── src
     └── go_code
         ├── project01
         |   ├── main
         |   |   ├── hello.exe
         |   |   └── hello.go
         |   └── package
         └── project02

</code></pre>
<h2>程序</h2>
<pre><code class="language-go">// hello.go

package main
import &quot;fmt&quot;
func main() {
	fmt.Println(&quot;hello go&quot;)
}

</code></pre>
<pre><code class="language-sh">go build hello.go # 执行go build 生成.exe文件
hello.exe # hello go

</code></pre>
<pre><code class="language-sh">go run hello.go # go run可以直接将.go文件转换成.exe文件，然后运行

</code></pre>
<p>打包指定文件名</p>
<pre><code class="language-sh">go build -o myhello.exe hello.go

</code></pre>
<h2>注意</h2>
<ul>
<li>在Go语言中，每个文件都必须归属一个包</li>
<li>定义的包或变量、导入的包，必须使用，否则报错</li>
<li>代码结尾不需要分号，多条语句不要写在同一行</li>
<li>严格区分大小写</li>
</ul>
<h1>转义字符</h1>
<table>
<thead>
<tr>
<th>符号</th>
<th>含义</th>
</tr>
</thead>
<tbody>
<tr>
<td><code>\t</code></td>
<td>一个制表符，实现对齐的功能</td>
</tr>
<tr>
<td><code>\n</code></td>
<td>换行符</td>
</tr>
<tr>
<td><code>\\</code></td>
<td>一个<code>\</code></td>
</tr>
<tr>
<td><code>\&quot;</code></td>
<td>一个<code>&quot;</code></td>
</tr>
<tr>
<td><code>\r</code></td>
<td>一个回车 fmt.Println(&quot;Hello \r Golang&quot;)</td>
</tr>
</tbody>
</table>
<h1>数据类型</h1>
<p>先背诵Java的数据类型：</p>
<table>
<thead>
<tr>
<th>类型名称</th>
<th>字节空间</th>
<th>应用场景</th>
</tr>
</thead>
<tbody>
<tr>
<td>byte</td>
<td>1Byte</td>
<td>字节数据</td>
</tr>
<tr>
<td>short</td>
<td>2Byte</td>
<td>短整数</td>
</tr>
<tr>
<td>int</td>
<td>4Byte</td>
<td>普通整数</td>
</tr>
<tr>
<td>long</td>
<td>8Byte</td>
<td>长整数</td>
</tr>
<tr>
<td>float</td>
<td>4Byte</td>
<td>浮点数</td>
</tr>
<tr>
<td>double</td>
<td>8Byte</td>
<td>双精度浮点数</td>
</tr>
<tr>
<td>boolean</td>
<td>1Byte</td>
<td>逻辑变量(true,flase)</td>
</tr>
<tr>
<td>char</td>
<td>2Byte</td>
<td>一个字符</td>
</tr>
</tbody>
</table>
<p>Go的数据类型：</p>
<table>
<thead>
<tr>
<th>类型</th>
<th>描述</th>
</tr>
</thead>
<tbody>
<tr>
<td>布尔型</td>
<td>布尔型的值只可以是常量 true 或者 false。一个简单的例子：var b bool = true。</td>
</tr>
<tr>
<td>数字类型</td>
<td>整型 int 和浮点型 float32、float64，Go 语言支持整型和浮点型数字，并且支持复数，其中位的运算采用补码。</td>
</tr>
<tr>
<td>字符串类型:</td>
<td>字符串就是一串固定长度的字符连接起来的字符序列。Go 的字符串是由单个字节连接起来的。Go 语言的字符串的字节使用 UTF-8 编码标识 Unicode 文本。</td>
</tr>
<tr>
<td>派生类型:</td>
<td>包括：</td>
</tr>
<tr>
<td>(a) 指针类型（Pointer）</td>
<td></td>
</tr>
<tr>
<td>(b) 数组类型</td>
<td></td>
</tr>
<tr>
<td>(c) 结构化类型(struct)</td>
<td></td>
</tr>
<tr>
<td>(d) Channel 类型</td>
<td></td>
</tr>
<tr>
<td>(e) 函数类型</td>
<td></td>
</tr>
<tr>
<td>(f) 切片类型</td>
<td></td>
</tr>
<tr>
<td>(g) 接口类型（interface）</td>
<td></td>
</tr>
<tr>
<td>(h) Map 类型</td>
<td></td>
</tr>
</tbody>
</table>
<h1>变量声明</h1>
<h2>四种变量的声明方式</h2>
<pre><code class="language-go">package main

import (
  &quot;fmt&quot;
)

// 声明全局变量
var num1 int = 100
var num2 = 200

func main() {
  // 方法一：声明一个变量 int类型变量的默认值是0
  var a int
  fmt.Println(&quot;a =&quot;, a)
  fmt.Printf(&quot;type of a = %T\n&quot;, a)
  
  // 方法而：声明一个变量，初始化一个值
  var b int = 100
  fmt.Println(&quot;b =&quot;, b)
  fmt.Printf(&quot;type of b = %T\n&quot;, b)

  var b1 string = &quot;hello go&quot;
  fmt.Printf(&quot;b1 = '%s', type of b1 = %T\n&quot;, b1, b1)
  
  // 方法三：在初始化的时候，可以省去数据类型，通过值自动匹配当前的变量的数据类型
  var c = 100
  fmt.Println(&quot;c =&quot;, c)
  fmt.Printf(&quot;type of c = %T\n&quot;, c)

  var c1 = &quot;hello go&quot;
  fmt.Printf(&quot;c1 = '%s', type of c1 = %T\n&quot;, c1, c1)

  // 方法四：常用 省去var关键字，直接自动匹配
  e := 100
  fmt.Println(&quot;e =&quot;, e)
  fmt.Printf(&quot;type of e = %T\n&quot;, e)
  

  // 全局变量打印
  fmt.Println(num1, num2)
}

</code></pre>
<p>方法一、方法二、方法三是可以声明全局变量的</p>
<h2>声明多个变量</h2>
<pre><code class="language-go">package main

import (
  &quot;fmt&quot;
)

func main() {
  var x, y int = 234, 293
  fmt.Println(&quot;x =&quot;, x, &quot;y =&quot;, y)

  var a, b = 100, &quot;b&quot;
  fmt.Println(a, b)

  var(
    xx int = 1
    yy bool = true
  )
  fmt.Println(xx, yy)
}

</code></pre>
<h2>变量的内置 pair 结构详细说明</h2>
<h1>常量声明</h1>
<pre><code class="language-go">package main

import (
  &quot;fmt&quot;
)

func main() {
  const MAX int = 10
  fmt.Println(MAX)
}

</code></pre>
<h2>IOTA</h2>
<p>iota只能出现在const定义的变量中</p>
<pre><code class="language-go">package main

import (
  &quot;fmt&quot;
)

// const 定义枚举类型
const (
  BEIJING = 0
  SHANGHAI = 1
  SHENZHEN = 2
  ZHENGZHOU = 3
)

// 添加一个关键字iota，每行的iota都会累加1，第一行的iota默认值是0
const (
  A = iota // iota = 0
  B // iota = 1
  C // iota = 2
  D // iota = 3
)

const (
  NUM1, NUM2 = iota+1, iota+2 // iota = 0; iota + 1 = 1, iota + 2 = 2
  NUM3, NUM4 // iota = 1; iota + 1 = 2, iota + 2 = 3
  NUM5, NUM6 // iota = 2; iota + 1 = 3, iota + 2 = 4
  NUM7, NUM8 // iota = 3; iota + 1 = 4, iota + 2 = 5
)

func main() {
  const MAX int = 10
  fmt.Println(MAX)

  fmt.Println(BEIJING, SHANGHAI, SHENZHEN, ZHENGZHOU)
  
  fmt.Println(A, B, C, D)

  fmt.Println(&quot;\n&quot;, NUM1, NUM2, &quot;\n&quot;, NUM3, NUM4, &quot;\n&quot;, NUM5, NUM6, &quot;\n&quot;, NUM7, NUM8)
}

</code></pre>
<h1>位运算符</h1>
<p>&lt;&lt; 左移，&gt;&gt; 右移</p>
<pre><code class="language-go">package main

import &quot;fmt&quot;

func main() {
	const (
		_  = iota
		KB = 1 &lt;&lt; (10 * iota) // 十进制1转换成二进制0001，往左位移10位，变成0001 0000 0000，十进制为1024
		MB = 1 &lt;&lt; (10 * iota)
		GB = 1 &lt;&lt; (10 * iota)
		TB = 1 &lt;&lt; (10 * iota)
		PB = 1 &lt;&lt; (10 * iota)
	)
	fmt.Println(KB) // 1024
	fmt.Println(MB) // 1048576
	fmt.Println(GB) // 1073741824
	fmt.Println(TB) // 1099511627776
	fmt.Println(PB) // 1125899906842624
}

</code></pre>
<h1>函数</h1>
<h2>多返回值</h2>
<pre><code class="language-go">package main

import (
  &quot;fmt&quot;
)

func foo1(a string, b int) int {
  fmt.Println(&quot;a =&quot;, a)
  fmt.Println(&quot;b =&quot;, b)
  
  c := 10
  return c
}

// 返回多个返回值，匿名的
func foo2(a string, b int) (int, int) {
  fmt.Println(&quot;a =&quot;, a)
  fmt.Println(&quot;b =&quot;, b)
  return 666, 999
}

// 返回多个返回值，有形参的
func foo3(x int, y int) (r1 int, r2 int) { // 这里返回的r1, r2 为int类型，所以默认值为0
  r1 = x
  r2 = y
  return

  // return x, y // 和上方代码效果一样
}

func foo4(a int, b int) (r1, r2 int) {
  r1 = a
  r2 = b
  return
}

func main() {
  c := foo1(&quot;haha&quot;, 11)
  fmt.Println(&quot;return =&quot;, c)

  return1, return2 := foo2(&quot;xixi&quot;, 99)
  fmt.Println(return1, return2)

  r11, r22 := foo3(1, 2)
  fmt.Println(r11, r22)

  rx, ry := foo4(3, 4)
  fmt.Println(rx, ry)
}

</code></pre>
<h1>import导包路径问题与init方法调用流程</h1>
<p>init函数一般先于main函数前执行，可以在init中进行初始化操作</p>
<pre><code class="language-go">package main

import &quot;lib1&quot; // 注意：这里是找 D:\Program Files\go\src\ 下的lib1
import &quot;lib2&quot;

func main() {
	lib1.Lib1Test()
	lib2.Lib2Test()
}

</code></pre>
<h1>import匿名及别名导包方式</h1>
<ul>
<li>
<p><code>_</code>为匿名别名，意思为导入了包，并且起了匿名别名，但是不使用也不会报错，会调用匿名导入包的init函数</p>
</li>
<li>
<p><code>mylib2</code>为别名，可以使用别名<code>mylib2.Lib2Test()</code>调用包中的方法</p>
</li>
<li>
<p><code>.</code>为将包中的所有方法导入到当前包的作用中，可以直接调用<code>Lib3Test()</code>（少用，不同包中同名函数，会造成歧义）</p>
</li>
</ul>
<pre><code class="language-go">package main
import (
	_ &quot;GolangStudy/5-init/lib1&quot;
  mylib2 &quot;GolangStudy/5-init/lib2&quot;
  . &quot;GolangStudy/5-init/lib3&quot;
)

func main() {
  // lib1.Lib1Test()
  
  // lib2.Lib2Test()
  mylib2.Lib2Test()
  
  Lib3Test()
}

</code></pre>
<p>另一种写法，和上方一样</p>
<pre><code class="language-go">package main

import _ &quot;GolangStudy/5-init/lib1&quot;
import mylib2 &quot;GolangStudy/5-init/lib2&quot;
import . &quot;GolangStudy/5-init/lib3&quot;

func main() {
  // lib1.Lib1Test()
  
  // lib2.Lib2Test()
  mylib2.Lib2Test()
  
  Lib3Test()
}

</code></pre>
<h1>指针</h1>
<p>引子</p>
<pre><code class="language-go">package main

import &quot;fmt&quot;

func changeValue(p int) {
	p = 10
}

func main() {
	var a int = 1
	changeValue(a)
	fmt.Println(&quot;a =&quot;, a) // a = 1
}

</code></pre>
<p>以上代码会打印出<code>a = 1</code>，这里是值传递，所以p和a没有关系</p>
<p>可以通过引用传递的方式，将两者建立关系</p>
<pre><code class="language-go">package main

import &quot;fmt&quot;

func changeValue(p *int) {
	*p = 10 // 修改p指向的那个内存地址的值，也就是a的值
}

func main() {
	var a int = 1
	changeValue(&amp;a) // 将a的引用（内存地址）传递过去
	fmt.Println(&quot;a =&quot;, a) // a = 10
}

</code></pre>
<p>指针例子：</p>
<pre><code class="language-go">package main

import &quot;fmt&quot;

func swap(a int, b int) {
  var temp int
  temp = a
  a = b
  b = temp
}

func main() {
  var a int = 10
  var b int = 20
  
  // swap
  
  fmt.Println(&quot;a =&quot;, a, &quot; b =&quot;, b)
}

</code></pre>
<p>以上，只是值传递，并不会改变main函数中的a,b变量</p>
<pre><code class="language-go">package main

import &quot;fmt&quot;

func swap(a *int, b *int) {
  var temp int
  temp = *a // 把a的内存地址赋值给temp
  *a = *b // 把b的内存地址赋值给a的内存地址
  *b = temp // 把temp的值赋值给b的内存地址
}

func main() {
  var a int = 10
  var b int = 20
  
  swap(&amp;a, &amp;b)
  
  fmt.Println(&quot;a =&quot;, a, &quot; b =&quot;, b)
}

</code></pre>
<h2>二级指针</h2>
<pre><code class="language-go">package main

import &quot;fmt&quot;

func main() {
	var a int = 10

  var aa *int // 一级指针
	aa = &amp;a
	fmt.Println(&amp;a, &quot; &quot;, aa)

	var aaa **int // 二级指针
	aaa = &amp;aa

	fmt.Println(&amp;aa, &quot; &quot;, aaa)

	**aaa = 22

	fmt.Println(a) // 22
}

</code></pre>
<h1>defer语句调用顺序</h1>
<p>defer定义的语句放在函数结束前进行触发，比如go语言中打开一个文件，需要最后关闭，可以直接添加defer语句，进行关闭</p>
<p>类似于Java中try catch finally 中的finally，Java中的finally无论程序进入到try还是catch中，都最后执行finall中的语句</p>
<pre><code class="language-go">package main

import &quot;fmt&quot;

func main() {

	// 写入defer关键字
	defer fmt.Println(&quot;main -------------&gt; end1&quot;)
  defer fmt.Println(&quot;main -------------&gt; end2&quot;)

	fmt.Println(&quot;main::hello go 1&quot;)
	fmt.Println(&quot;main::hello go 2&quot;)
	/*
		main::hello go 1
		main::hello go 2
		main -------------&gt; end2
		main -------------&gt; end1
	*/
}

</code></pre>
<p>如果存在多个defer定义的语句，那么类似于栈的原理，先进后出，main end1先进，所以后出</p>
<p>defer 和 return 执行顺序对比</p>
<pre><code class="language-go">package main

import &quot;fmt&quot;

func deferFunc() int {
	fmt.Println(&quot;defer func called...&quot;)
	return 0
}

func returnFunc() int {
	fmt.Println(&quot;return func called...&quot;)
	return 0
}

func returnAndDefer() int {
	defer deferFunc()
	return returnFunc()
}

func main() {
	returnAndDefer()
}

</code></pre>
<p>可以看到结果，defer还是在最后执行</p>
<h1>数组与动态数组的区别</h1>
<h2>定义数组语法</h2>
<pre><code class="language-go">package main

import &quot;fmt&quot;

func main() {
	// 固定长度的数组
	var myArray [10]int
	var i int 
	for i = 0; i &lt; len(myArray); i++ {
		fmt.Println(myArray[i], &quot; &quot;, i)
	}

	// 另一种定义固定长度数组的方式
	myArray1 := [6]int{1,2,3,4}
	// 另一种for循环，for range
	for index, value := range myArray1 {
		fmt.Println(value, &quot; &quot;, index)
	}

	// 查看数组的数据类型
	fmt.Printf(&quot;myArray type = %T\n&quot;, myArray) // myArray type = [10]int
	fmt.Printf(&quot;myArray1 type = %T\n&quot;, myArray1) // myArray1 type = [6]int
}

</code></pre>
<h2>值传递</h2>
<pre><code class="language-go">package main

import &quot;fmt&quot;

func printArray(myArray [4]int) {
  for index, value := range myArray {
    fmt.Println(&quot;value =&quot;, value)
  }
  myArray[0] = 100
}

func main() {
  myArray := [4]int{1,2,3,4}
  printArray(myArray)
  
  for index, value := range myArray {
    fmt.Println(&quot;value =&quot;, value)
  }
}

</code></pre>
<h2>引用传递</h2>
<pre><code class="language-go">package main

import &quot;fmt&quot;

func printArray(myArray []int) {
  for index, value := range myArray {
    fmt.Println(&quot;value =&quot;, value)
  }
  myArray[0] = 100
}

func main() {
  myArray := []int{1,2,3,4}
  printArray(myArray)
  
  for index, value := range myArray {
    fmt.Println(&quot;value =&quot;, value)
  }
}

</code></pre>
<p>引用传递在Golang中被称为切片slice</p>
<p>动态数组在传递上是引用传递，而且不同元素长度的动态数组他们的形参是一致</p>
<h2>数组切割</h2>
<pre><code class="language-go">package main

import &quot;fmt&quot;

func main() {
	//定义一个数组
	a1 := []int{1, 2, 3, 4, 5, 6, 7, 8, 9}
	s2 := a1[0:4] //基于一个数组切割  [0:4]为起始、结束下标，左包含 右不包含  即为[1,2,3,4]
	fmt.Println(s2) // [1 2 3 4]
}

</code></pre>
<h1>切片</h1>
<p>切片的初始化方式有以下几种</p>
<pre><code class="language-go">var nums []int // 值
nums := []int{1, 2, 3} // 值
nums := make([]int, 0, 0) // 值
nums := new([]int) // 指针

</code></pre>
<h2>slice切片的4种声明定义方式</h2>
<p>Go 语言切片是对数组的抽象。</p>
<p>Go 数组的长度不可改变，在特定场景中这样的集合就不太适用，Go 中提供了一种灵活，功能强悍的内置类型切片(&quot;动态数组&quot;)，与数组相比切片的长度是不固定的，可以追加元素，在追加时可能使切片的容量增大。</p>
<h3>第一种</h3>
<p>声明slice1是一个切片，并且初始化默认值是：1，2，3。切片长度len是3</p>
<pre><code class="language-go">package main

import &quot;fmt&quot;

func main() {
	slice1 := []int{1,2,3}
	fmt.Printf(&quot;len = %d, slice1 = %v\n&quot;, len(slice1), slice1) // len = 3, slice1 = [1 2 3]
}

</code></pre>
<p>其中<code>%d</code>为切片长度的占位符，<code>%v</code>则是打印切片的详细信息</p>
<h3>第二种</h3>
<p>声明slice1是一个切片，但是并没有给slice1分配空间</p>
<pre><code class="language-go">package main

import &quot;fmt&quot;

func main() {
	var slice1 []int
  // 因为没有分配空间，所以以下代码会报错
  slice1[0] = 10 // 报错
	fmt.Printf(&quot;len = %d, slice1 = %v\n&quot;, len(slice1), slice1) // len = 0, slice1 = []
  
  // 判断一个slice是否为0
  if slice1 == nil {
    fmt.Println(&quot;slice1是一个空切片&quot;)
  } else {
    fmt.Println(&quot;slice1是有空间的&quot;)
  }
}

</code></pre>
<p>通过make()开辟空间，默认值为0</p>
<pre><code class="language-go">package main

import &quot;fmt&quot;

func main() {
	slice1 := []int{1,2,3}
	slice1 = make([]int, 3)
  slice1[0] = 10
	fmt.Printf(&quot;len = %d, slice1 = %v\n&quot;, len(slice1), slice1) // len = 3, slice1 = [0 0 0]
}

</code></pre>
<h3>第三种</h3>
<p>声明slice1是一个切片，同时给slice1分配3个空间，初始化值为0</p>
<pre><code class="language-go">package main

import &quot;fmt&quot;

func main() {
	var slice1 []int = make([]int, 3)
	fmt.Printf(&quot;len = %d, slice1 = %v\n&quot;, len(slice1), slice1) // len = 3, slice1 = [0 0 0]
}

</code></pre>
<p>第三种的简写形式</p>
<pre><code class="language-go">package main

import &quot;fmt&quot;

func main() {
	slice1 := make([]int, 3)
	fmt.Printf(&quot;len = %d, slice1 = %v\n&quot;, len(slice1), slice1) // len = 3, slice1 = [0 0 0]
}

</code></pre>
<p>make() 其实可以传递三个参数：</p>
<ul>
<li>第一个参数是切片的 <code>类型</code></li>
<li>第二个参数是切片的 <code>长度</code></li>
<li>第三个参数是切片的 <code>容量</code></li>
</ul>
<pre><code class="language-go">package main

import &quot;fmt&quot;

func main() {
	nums := make([]int, 1, 2)
	fmt.Println(nums, len(nums), cap(nums)) // [0] 1 2
}

</code></pre>
<p>其中 <strong>长度</strong> 永远 <em>少于等于</em> <strong>容量</strong></p>
<h3>第四种</h3>
<p>第四种是指针</p>
<pre><code class="language-go">package main

import &quot;fmt&quot;

func main() {
	nums := new([]int) // 指针
	fmt.Println(nums) // &amp;[]
}

</code></pre>
<p>用法暂不可知</p>
<h2>slice切片容量追加与截取</h2>
<h3>切片追加</h3>
<pre><code class="language-go">package main

import &quot;fmt&quot;

func main() {
  //                       len, cap
	var numbers = make([]int, 3, 5)

	// len = 3, cap = 5, numbers = [0 0 0] 其中长度3，容量5
	fmt.Printf(&quot;len = %d, cap = %d, numbers = %v\n&quot;, len(numbers), cap(numbers), numbers)

	// 向numbers切片追加一个元素1， numbers len = 4, [0,0,0,1], cap = 5
	numbers = append(numbers, 11)
	// len = 4, cap = 5, numbers = [0 0 0 11]
	fmt.Printf(&quot;len = %d, cap = %d, numbers = %v\n&quot;, len(numbers), cap(numbers), numbers)
	
	numbers = append(numbers, 23)
	// len = 5, cap = 5, numbers = [0 0 0 11 23]
	fmt.Printf(&quot;len = %d, cap = %d, numbers = %v\n&quot;, len(numbers), cap(numbers), numbers)
	
	// 此时容量已经满了，在追加，会自动在开辟一个cap大小的容量，扩容到原容量的2倍
	numbers = append(numbers, 41)
	// len = 6, cap = 10, numbers = [0 0 0 11 23 41]
	fmt.Printf(&quot;len = %d, cap = %d, numbers = %v\n&quot;, len(numbers), cap(numbers), numbers)
	
	var numbers2 = make([]int, 3)
	// len = 3, cap = 3, numbers2 = [0 0 0]
	fmt.Printf(&quot;len = %d, cap = %d, numbers2 = %v\n&quot;, len(numbers2), cap(numbers2), numbers2)
	numbers2 = append(numbers2, 23)
	// len = 4, cap = 6, numbers2 = [0 0 0 23]
	fmt.Printf(&quot;len = %d, cap = %d, numbers2 = %v\n&quot;, len(numbers2), cap(numbers2), numbers2)
}

</code></pre>
<h3>截取</h3>
<pre><code class="language-go">package main

import &quot;fmt&quot;

func main() {
	s := []int{2,4,1} // len = 3, cap = 3

	// [0, 2)
	s1 := s[0:2]
	fmt.Println(s1) // [2, 4]
}

</code></pre>
<table>
<thead>
<tr>
<th>_</th>
<th>说明</th>
</tr>
</thead>
<tbody>
<tr>
<td>[:]</td>
<td>从第0位截取到末尾，也就是截取全部</td>
</tr>
<tr>
<td>[2:]</td>
<td>从第2位截取到末尾</td>
</tr>
<tr>
<td>[:3]</td>
<td>从第0位截取到第3位，但不包含第3位</td>
</tr>
<tr>
<td>[0:2]</td>
<td>从第0为截取到第2位，但不包含第2位</td>
</tr>
</tbody>
</table>
<h3>copy</h3>
<p>以下类似于js中的深拷贝/浅拷贝</p>
<pre><code class="language-go">package main

import &quot;fmt&quot;

func main() {
	s := []int{2,4,1,23,5,6,223,1231}

	s1 := s[:2]
	fmt.Println(s1)
	s1[0] = 123 // 改变s1的第0位值，s也会改变
	fmt.Println(s1)
	fmt.Println(s)
}

</code></pre>
<p>使用copy 可以将底层数组的slice一起进行拷贝</p>
<pre><code class="language-go">package main

import &quot;fmt&quot;

func main() {
	s := []int{1,2,3}

	s1 := make([]int, 3)

	// 将s中的值，一次拷贝到s1中
	copy(s1, s)
	s1[0] = 123

	fmt.Println(s1) // [123 2 3]
	fmt.Println(s) // [1 2 3]
}

</code></pre>
<p>以上代码s1和s没有关联</p>
<h1>Map 集合</h1>
<p>Map 是一种无序的键值对的集合。</p>
<h2>语法</h2>
<pre><code class="language-go">package main

import &quot;fmt&quot;

func main() {
	// 声明myMap1是一种map类型 key是string类型，value是string类型
	var myMap1 map[string]string
	if myMap1 == nil {
		fmt.Println(&quot;myMap1 是一个空map&quot;)
	} else {
		fmt.Println(&quot;myMap1 不是一个空map&quot;)
	}
}

</code></pre>
<p>make开辟空间</p>
<p>第一种方式</p>
<pre><code class="language-go">package main

import &quot;fmt&quot;

func main() {
	// 声明myMap1是一种mao类型 key是string类型，value是string类型
	var myMap1 map[string]string

	// 在使用map前，需要先用make给map分配数据空间
	myMap1 = make(map[string]string)

	myMap1[&quot;id&quot;] = &quot;001&quot;
	myMap1[&quot;name&quot;] = &quot;Golang&quot;

	fmt.Println(myMap1)
}

</code></pre>
<p>第二种方式使用make开辟空间，是上方代码的简写形式</p>
<pre><code class="language-go">package main

import &quot;fmt&quot;

func main() {
	// 声明myMap1是一种map类型 key是int / string类型，value是string类型；并开辟容量为1的空间
	myMap1 := make(map[int]string, 1)
	// myMap1 := make(map[string]string)
  
  // 创建一个初始容量为 10 的 Map
	// m := make(map[string]int, 10)

	myMap1[1] = &quot;001&quot;
	myMap1[2] = &quot;Golang&quot;

	fmt.Println(myMap1)
}

</code></pre>
<p>第三种声明方式</p>
<p>使用字面量创建 Map</p>
<pre><code class="language-go">package main

import &quot;fmt&quot;

func main() {
	myMap1 := map[string] string {
		&quot;one&quot;: &quot;Golang&quot;,
		&quot;two&quot;: &quot;Java&quot;,
		&quot;three&quot;: &quot;C&quot;,
	}

	fmt.Println(myMap1)
}

</code></pre>
<h2>操作map</h2>
<h3>获取元素</h3>
<pre><code class="language-go">package main

import &quot;fmt&quot;

func main() {
	// 使用字面量创建 Map
	m := map[string]string{
		&quot;apple&quot;: &quot;apple&quot;,
		&quot;banana&quot;: &quot;banana&quot;,
		&quot;orange&quot;: &quot;orange&quot;,
	}
	// 获取键值对
	v1 := m[&quot;apple&quot;]
	v2, ok := m[&quot;pear&quot;]  // 如果键不存在，ok 的值为 false，v2 的值为该类型的零值
	fmt.Println(&quot;v1:&quot;, v1, &quot;, v2:&quot;, v2, &quot;, ok:&quot;, ok, &quot;.&quot;)
  // v1: apple , v2:  , ok: false .
}

</code></pre>
<h3>修改元素</h3>
<pre><code class="language-go">package main

import &quot;fmt&quot;

func main() {
	// 使用字面量创建 Map
	m := map[string]string{
		&quot;apple&quot;: &quot;apple&quot;,
		&quot;banana&quot;: &quot;banana&quot;,
		&quot;orange&quot;: &quot;orange&quot;,
	}
	m[&quot;apple&quot;] = &quot;xiaomi&quot;
  fmt.Println(m[&quot;apple&quot;])
  // xiaomi
}

</code></pre>
<h3>获取 Map 的长度</h3>
<pre><code class="language-go">package main

import &quot;fmt&quot;

func main() {
	// 使用字面量创建 Map
	m := map[string]string{
		&quot;apple&quot;: &quot;apple&quot;,
		&quot;banana&quot;: &quot;banana&quot;,
		&quot;orange&quot;: &quot;orange&quot;,
	}
  len := len(m)
  fmt.Println(len)
  // 3
}

</code></pre>
<h3>遍历 Map</h3>
<pre><code class="language-go">package main

import &quot;fmt&quot;

func main() {
	// 使用字面量创建 Map
	m := map[string]string{
		&quot;apple&quot;: &quot;apple&quot;,
		&quot;banana&quot;: &quot;banana&quot;,
		&quot;orange&quot;: &quot;orange&quot;,
	}
	for key, value := range m {
		fmt.Println(key, value)
	}
	/*
		apple apple
		banana banana
		orange orange
	*/
}

</code></pre>
<h3>删除元素</h3>
<pre><code class="language-go">package main

import &quot;fmt&quot;

func main() {
	// 使用字面量创建 Map
	m := map[string]string{
		&quot;apple&quot;: &quot;apple&quot;,
		&quot;banana&quot;: &quot;banana&quot;,
		&quot;orange&quot;: &quot;orange&quot;,
	}
	// 删除键值对
	delete(m, &quot;banana&quot;)
	for key, value := range m {
		fmt.Println(key, value)
	}
	/*
		apple apple
		orange orange
	*/
}

</code></pre>
<h2>map的基本使用方式</h2>
<pre><code class="language-go">package main

import &quot;fmt&quot;

func main() {
	// 定义map
	cityMap := make(map[string]string)

	// 添加
	cityMap[&quot;china&quot;] = &quot;zhengzhou&quot;
	cityMap[&quot;usa&quot;] = &quot;riben&quot;

	// 遍历
	for key, value := range cityMap {
		fmt.Println(key, &quot;:&quot;, value)
	}

	// 删除
	delete(cityMap, &quot;usa&quot;)

	fmt.Println(&quot;--------------&quot;)

	// 修改
	cityMap[&quot;china&quot;] = &quot;shangqiu&quot;

	// 遍历
	for key, value := range cityMap {
		fmt.Println(key, &quot;:&quot;, value)
	}
}

</code></pre>
<p>引用传递</p>
<pre><code class="language-go">package main

import &quot;fmt&quot;

// 这里是引用传递，传递是指针，也就是传递过来的是cityMap的内存地址
func printMap(cityMap map[string]string) {
	cityMap[&quot;usa&quot;] = &quot;dog&quot;
	// 遍历
	for key, value := range cityMap {
		fmt.Println(key, &quot;:&quot;, value)
	}
}

func main() {
	// 定义map
	cityMap := make(map[string]string)

	// 添加
	cityMap[&quot;china&quot;] = &quot;zhengzhou&quot;
	cityMap[&quot;usa&quot;] = &quot;riben&quot;

	// 遍历
	printMap(cityMap)

	fmt.Println(&quot;--------------&quot;)

	// 修改
	cityMap[&quot;china&quot;] = &quot;shangqiu&quot;

	// 遍历
	for key, value := range cityMap {
		fmt.Println(key, &quot;:&quot;, value)
	}
}

</code></pre>
<h2>查询map种是否存在某个元素</h2>
<pre><code class="language-go">package main

import &quot;fmt&quot;

func main() {
	// 使用字面量创建 Map
	m := map[string]string{
		&quot;apple&quot;: &quot;apple&quot;,
		&quot;banana&quot;: &quot;banana&quot;,
		&quot;orange&quot;: &quot;orange&quot;,
	}
	value, ok := m[&quot;ganto&quot;]
	if (ok) {
		fmt.Println(&quot;存在键为：&quot;, value, &quot;的值。&quot;)
	} else {
		fmt.Println(&quot;不存在该键&quot;)
	}
  // 不存在该键
}

</code></pre>
<h1>struct 结构体</h1>
<p>基本定义与使用</p>
<pre><code class="language-go">package main

import &quot;fmt&quot;

// 声明一种新的数据类型myint，是int的一个别名
type myint int

func main() {
	var a myint = 10
	fmt.Println(&quot;a =&quot;, a) // a = 10
	fmt.Printf(&quot;type of a = %T\n&quot;, a) // type of a = main.myint
}

</code></pre>
<p>默认值传递，可以通过指针修改为引用传递</p>
<pre><code class="language-go">package main

import &quot;fmt&quot;

// 定义一个结构体
type Book struct {
	title string
	auth string
}

func changeBook(book Book) {
	// 传递一个book的副本
	book.auth = &quot;李四&quot;
}

func changeBook1(book *Book) {
	// 传递一个book的副本
	book.auth = &quot;李四&quot;
}


func main() {
	var book1 Book
	book1.title = &quot;Golang&quot;
	book1.auth = &quot;张三&quot;

	fmt.Printf(&quot;%v\n&quot;, book1) // {Golang 张三}

	changeBook(book1)

	fmt.Printf(&quot;%v\n&quot;, book1) // {Golang 张三}
	
	changeBook1(&amp;book1)
	
	fmt.Printf(&quot;%v\n&quot;, book1) // {Golang 李四}
}

</code></pre>
<pre><code class="language-go">package main

import &quot;fmt&quot;

type Books struct {
   title string
   author string
   subject string
   book_id int
}


func main() {

    // 创建一个新的结构体
    fmt.Println(Books{&quot;Go 语言&quot;, &quot;www.runoob.com&quot;, &quot;Go 语言教程&quot;, 6495407})

    // 也可以使用 key =&gt; value 格式
    fmt.Println(Books{title: &quot;Go 语言&quot;, author: &quot;www.runoob.com&quot;, subject: &quot;Go 语言教程&quot;, book_id: 6495407})

    // 忽略的字段为 0 或 空
   fmt.Println(Books{title: &quot;Go 语言&quot;, author: &quot;www.runoob.com&quot;})
}

/*
  {Go 语言 www.runoob.com Go 语言教程 6495407}
  {Go 语言 www.runoob.com Go 语言教程 6495407}
  {Go 语言 www.runoob.com  0}
*/

</code></pre>
<h1>面向对象</h1>
<h2>类的表示</h2>
<p>go 语言中，类的表示是通过结构体进行的</p>
<pre><code class="language-go">type Hero struct {
	Name string
	Ad int
	Level int
}

</code></pre>
<h2>封装</h2>
<pre><code class="language-go">package main

import &quot;fmt&quot;

// 定义一个结构体
type Hero struct {
	Name string
	Ad int
	Level int
}

func (this Hero) Show() {
	fmt.Println(&quot;hero = &quot;, this)
	fmt.Println(&quot;Name = &quot;, this.Name)
	fmt.Println(&quot;Ad = &quot;, this.Ad)
	fmt.Println(&quot;Level = &quot;, this.Level)
}

func (this Hero) GetName() string {
	return this.Name
}

func (this Hero) SetName(Name string) {
	this.Name = Name
}

func main() {
	// 创建一个对象
	hero := Hero{Name: &quot;张三&quot;, Ad: 100, Level: 1}

	hero.Show()
  // hero =  {张三 100 1}
	// Name =  张三
	// Ad =  100
	// Level =  1

	hero.SetName(&quot;李四&quot;)

	hero.Show()
  // hero =  {张三 100 1}
	// Name =  张三
 	// Ad =  100
	// Level =  1
}

</code></pre>
<p>以上写法，虽然没有语法错误，但是有功能上的问题，就是调用 <code>SetName()</code> 方法的时候，无法修改值，因为 <code>(this Hero)</code> 是值传递，非引用传递。</p>
<p>修改为指针引用传递</p>
<pre><code class="language-go">package main

import &quot;fmt&quot;

// 定义一个结构体
type Hero struct {
	Name string
	Ad int
	Level int
}

func (this *Hero) Show() {
	fmt.Println(&quot;hero = &quot;, this)
	fmt.Println(&quot;Name = &quot;, this.Name)
	fmt.Println(&quot;Ad = &quot;, this.Ad)
	fmt.Println(&quot;Level = &quot;, this.Level)
}

func (this *Hero) GetName() string {
	return this.Name
}

func (this *Hero) SetName(Name string) {
	this.Name = Name
}

func main() {
	// 创建一个对象
	hero := Hero{Name: &quot;张三&quot;, Ad: 100, Level: 1}

	hero.Show()
  // hero =  &amp;{张三 100 1}
	// Name =  张三
	// Ad =  100
	// Level =  1

	hero.SetName(&quot;李四&quot;)

	hero.Show()
  // hero =  &amp;{李四 100 1}
	// Name =  李四
	// Ad =  100
	// Level =  1

}

</code></pre>
<p>通过 <code>(this *Hero)</code> 修改成为引用传递后，再次调用 <code>SetName()</code> 方法，则可以修改值。</p>
<p>golang中的 变量名、类名、属性名 的首字母大小写，不仅代表着不同的变量，还表示变量是否公开。如果首字母 <code>大写</code> 则表示是一个 <code>公开</code> 的变量；如果首字母 <code>小写</code> 则表示一个 <code>私有</code> 的变量。</p>
<pre><code class="language-go">type Hero struct {
	name string // 私有属性
	Ad int // 公开属性
	Level int // 公开属性
}

</code></pre>
<pre><code class="language-go">func (this *Hero) GetName() string { // 公开方法
	return this.Name
}

func (this *Hero) getName() string { // 私有方法
	return this.Name
}

</code></pre>
<pre><code class="language-go">type Hero struct { // 公开类
	...
}

type hero struct { // 私有类
	...
}

</code></pre>
<p>类名、属性名、方法名 首字母大写表示对外（其它包）可以访问，否则只能够在本包内访问。</p>
<h2>继承</h2>
<p>go中的类的继承是在结构体中写入需要继承的类名即可</p>
<pre><code class="language-go">// 父类
type Human struct {
  ...
}

type SuperMan struct {
	// SuperMan类继承了Human类的方法
	Human

	level int
}

</code></pre>
<p>实例化对象的时候，需要嵌套父类的实例化</p>
<pre><code class="language-go">s := SuperMan{Human{&quot;李4&quot;, &quot;男&quot;}, 18}

</code></pre>
<p>另有一种实例化的写法，这样就不用嵌套父类的实例化，更加的直观</p>
<pre><code class="language-go">var s SuperMan
s.name = &quot;李4&quot;
s.sex = &quot;男&quot;
s.level = 18

</code></pre>
<p>以下是完整例子</p>
<pre><code class="language-go">package main

import &quot;fmt&quot;

type Human struct {
	name string
	sex string
}

func (this *Human) Eat() {
	fmt.Println(&quot;Human.Eat()...&quot;, this)
}

func (this *Human) Walk() {
	fmt.Println(&quot;Human.Walk()...&quot;)
}

type SuperMan struct {
	// SuperMan类继承了Human类的方法
	Human

	level int
}

// 重定义父类的 Eat() 方法
func (this *SuperMan) Eat() {
	fmt.Println(&quot;SuperMan.Eat()...&quot;, this)
}

// SuperMan类中的新方法
func (this *SuperMan) Fly() {
	fmt.Println(&quot;SuperMan.Fly()...&quot;)
}

func main() {
	h := Human{name: &quot;张三&quot;, sex: &quot;女&quot;}
	// h := Human{&quot;张三&quot;, &quot;女&quot;} // 简写，需要按照顺序

	h.Eat()
	h.Walk()

	s := SuperMan{Human{&quot;李4&quot;, &quot;男&quot;}, 18}

	s.Eat()
  s.Walk() // 因为Walk()方法，没有重写，所以调用的是父类的Walk()方法
	s.Fly()
}
/*
Human.Eat()... &amp;{张三 女}
Human.Walk()...
SuperMan.Eat()... &amp;{{李4 男} 18}
Human.Walk()...
SuperMan.Fly()...
*/

</code></pre>
<h2>多态</h2>
<h3>接口的定义</h3>
<pre><code class="language-go">// 本质是一个指针
type AnimalIF interface {
	Sleep()
	GetColor() string // 获取动物的颜色
	GetType() string // 获取动物的种类
}

</code></pre>
<h3>多态</h3>
<p>一个类实现一个接口，必须将接口中的方法都实现</p>
<p>Golang 中，类实现了接口中的所有方法，就实现了这个接口。</p>
<pre><code class="language-go">package main

import &quot;fmt&quot;

// 本质是一个指针
type AnimalIF interface {
	Sleep()
	GetColor() string // 获取动物的颜色
	GetType() string // 获取动物的种类
}

// 具体的类
type Cat struct {
	color string // 猫的颜色
}
// 实现接口中的方法
func (this *Cat) Sleep() {
	fmt.Println(&quot;Cat.Sleep()...&quot;)
}
func (this *Cat) GetColor() string {
	fmt.Println(&quot;Cat.GetColor()...&quot;)
	return this.color
}
func (this *Cat) GetType() string {
	fmt.Println(&quot;Cat.GetType()...&quot;)
	return &quot;Cat&quot;
}

// 具体的类
type Dog struct {
	color string
}
// 实现接口中的方法
func (this *Dog) Sleep() {
	fmt.Println(&quot;Dog.Sleep()...&quot;)
}
func (this *Dog) GetColor() string {
	fmt.Println(&quot;Dog.GetColor()...&quot;)
	return this.color
}
func (this *Dog) GetType() string {
	fmt.Println(&quot;Dog.GetType()...&quot;)
	return &quot;Dog&quot;
}

func showAnimal(animal AnimalIF) {
	animal.Sleep() // 多态
	fmt.Println(&quot;color =&quot;, animal.GetColor())
	fmt.Println(&quot;kind =&quot;, animal.GetType())
}

func main() {
	var animal AnimalIF // 父类型引用指向子类型对象
	animal = &amp;Dog{&quot;红色&quot;} // 多态
	animal.Sleep()

	animal = &amp;Cat{&quot;黑色&quot;} // 多态
	animal.Sleep()

	cat := Cat{&quot;绿色&quot;}
	dog := Dog{&quot;白色&quot;}
	showAnimal(&amp;cat)
	showAnimal(&amp;dog)
}

</code></pre>
<p>以上就通过接口，实现了go语言中的多态。父类型引用指向子类型对象。</p>
<p>这些都和Java中的多态机制的概念和作用基本保持一致，只是实现方式有了区别。</p>
<h3>interface 空接口通用万能类型</h3>
<p>空接口：<code>interface{}</code></p>
<p>int、string、float32、float64、struct... 都实现了 <code>interface{}</code>，根据多态机制，<code>interface{}</code> 类型 引用 任意的数据类型。（这就类似于Java中的 Object 对象）</p>
<pre><code class="language-go">package main

import &quot;fmt&quot;

// interface{} 是万能数据类型
func myFunc(arg interface{}) {
	fmt.Println(&quot;myFunc is called...&quot;)
	fmt.Println(arg)

	// interface{} 提供 “类型断言” 机制
	value, ok := arg.(string)
	if !ok {
		fmt.Println(&quot;arg is not string type&quot;)
		fmt.Println(&quot;============\n&quot;)
	} else {
		fmt.Println(&quot;arg is string type, value =&quot;, value)
		fmt.Printf(&quot;arg type is %T\n&quot;, arg)
		fmt.Printf(&quot;value type is %T\n&quot;, value)
		fmt.Println(&quot;============\n&quot;)
	}
}

type Book struct {
	auth string
}

func main() {
	book := Book{&quot;Golang&quot;}
	myFunc(book)
	myFunc(100)
	myFunc(3.14)
	myFunc(&quot;gantoho&quot;)
}

</code></pre>
<h3>interface 类型断言机制</h3>
<pre><code class="language-go">package main

import &quot;fmt&quot;

func Func(x interface{}) {
	value, ok := x.(string)
	fmt.Println(value)
	fmt.Println(ok)
}

func main() {
	Func(&quot;123&quot;)
}

</code></pre>
<p>以上代码只有当 ok 为 true 的时候，value 才能有值。</p>
<h2>反射</h2>
<h3>变量结构</h3>
<p>变量是由 type 和 value 组成，type 和 value 统称为 pair，type又有 static type（静态类型：int、string...） 和 concrete type（具体类型）。</p>
<pre><code class="language-go">package main

import &quot;fmt&quot;

func main() {
	var a string
	// pair&lt;statictype: string, value: &quot;abc&quot;&gt;
	a = &quot;abc&quot;

	// pair&lt;type: string, value: &quot;abc&quot;&gt;
	var allType interface{}
	allType = a
	str, _ := allType.(string)
	fmt.Printf(&quot;%s %T&quot;, str, str) // abc string
}

</code></pre>
<p>例子：</p>
<pre><code class="language-go">package main

import (
	&quot;fmt&quot;
)

type Reader interface {
	ReadBook()
}

type Writer interface {
	WriteBook()
}

type Book struct {
}

func (this Book) ReadBook() {
	fmt.Println(&quot;Read a Book&quot;)
}

func (this Book) WriteBook() {
	fmt.Println(&quot;Write a Book&quot;)
}

func main() {
	b := &amp;Book{}

	var r Reader
	r = b
	r.ReadBook()

	var w Writer
	w = r.(Writer)
	w.WriteBook()
}

</code></pre>
<h3>reflect包</h3>
<ul>
<li><code>func ValueOf(i interface{}) Value {...}</code> ValueOf用来获取输入参数接口中的数据的值，如果接口为空则返回0</li>
<li><code>func TypeOf(i interface{}) Type {...}</code> TypeOf 用来动态获取输入参数接口中的值的类型，如果接口为空则返回nil</li>
</ul>
<pre><code class="language-go">package main

import (
	&quot;fmt&quot;
	&quot;reflect&quot;
)

func reflectNum(arg interface{}) {
	fmt.Println(&quot;Type: &quot;, reflect.TypeOf(arg))
	fmt.Println(&quot;Value: &quot;, reflect.ValueOf(arg))
}

func main() {
	var a float32 = 100.1
	reflectNum(a)
	// Type:  float32
	// Value:  100.1
}


</code></pre>
<p>如果传入指针</p>
<pre><code class="language-go">package main

import (
	&quot;fmt&quot;
	&quot;reflect&quot;
)

func reflectNum(arg interface{}) {
	fmt.Println(&quot;Type: &quot;, reflect.TypeOf(arg))
	fmt.Println(&quot;Value: &quot;, reflect.ValueOf(arg))
}

func main() {
	var a float32 = 100.1
	reflectNum(&amp;a)
	// Type:  *float32
	// Value:  0xc00001c098
}

</code></pre>
<p>实例：</p>
<pre><code class="language-go">
package main

import (
    &quot;fmt&quot;
    &quot;reflect&quot;
)

func main() {
    var num float64 = 1.2345

    pointer := reflect.ValueOf(&amp;num)
    value := reflect.ValueOf(num)

    // 可以理解为“强制转换”，但是需要注意的时候，转换的时候，如果转换的类型不完全符合，则直接panic
    // Golang 对类型要求非常严格，类型一定要完全符合
    // 如下两个，一个是*float64，一个是float64，如果弄混，则会panic
    convertPointer := pointer.Interface().(*float64)
    convertValue := value.Interface().(float64)

    fmt.Println(convertPointer)
    fmt.Println(convertValue)
}

运行结果：
0xc42000e238
1.2345

</code></pre>
<p><code>reflect.TypeOf()</code> 有两个方法，分别是：<code>.Name()</code>获取类型名称（可以是自定义类型名称） 和 <code>.Kind()</code>获取真实类型名称。</p>
<pre><code class="language-go">package main

import (
	&quot;fmt&quot;
	&quot;reflect&quot;
)

type User struct {
	Id int
}

func main() {
	user := User{1}
	LookType(user)
}

func LookType(input interface{}) {
	inputType := reflect.TypeOf(input)
	fmt.Println(inputType.Name(), inputType.Kind()) // User struct
}

</code></pre>
<p>完整案例</p>
<pre><code class="language-go">package main

import (
	&quot;fmt&quot;
	&quot;reflect&quot;
)

type User struct {
	Id int
	Name string
	Age int
}

func (this User) Call() int {
	fmt.Println(this)
	return 0
}

func main() {
	user := User{1, &quot;ToHo&quot;, 20}
	LookType(user)
}

func LookType(input interface{}) {
	// 获取input的type
	inputType := reflect.TypeOf(input)
	fmt.Println(inputType, inputType.Name(), inputType.Kind()) // main.User User struct

	// 获取input的value
	inputValue := reflect.ValueOf(input)
	inputValueAll := reflect.ValueOf(input).Interface()
	fmt.Println(inputValue, inputValueAll) // {1 ToHo 20} {1 ToHo 20}

	// 通过type获取里面的字段
	// 1.获取interface的reflect.Type，通过Type得到NumField，进行遍历
	// 2.得到每个field，数据类型
	// 3.通过field的一个Interface()方法得到对应的value
	fmt.Println(inputType.NumField()) // 3 类中的字段总数
	for i := 0; i &lt; inputType.NumField(); i++ {
		field := inputType.Field(i)
		value := inputValue.Field(i).Interface()
		value1 := inputValue.Field(i) // 加不加Interface()好像效果一样。还不知区别。
		fmt.Println(field, field.Name, field.Type, value, value1)
		// 类中的字段详情     字段名称    字段类型     字段值      字段值
		// {Id  int  0 [0] false} Id int 1 1
		// {Name  string  8 [1] false} Name string ToHo ToHo
		// {Age  int  24 [2] false} Age int 20 20
	}

	// 通过type获取里面的方法, 调用
	fmt.Println(inputType.NumMethod()) // 1 类中的方法总数
	for i := 0; i &lt; inputType.NumMethod(); i++ {
		m := inputType.Method(i)
		fmt.Println(m.Name, m.Type)
		// 类中的方法名称     类中的方法类型
		// Call func(main.User) int
	}
}

</code></pre>
<p>数组和切片，亦有区别</p>
<pre><code class="language-go">package main

import (
	&quot;fmt&quot;
	&quot;reflect&quot;
)

func main() {
	a := []int{1,2,3,4,5}
	aa := reflect.TypeOf(a)
	b := [5]int{1,2,3,4,5}
	bb := reflect.TypeOf(b)
	fmt.Println(aa, aa.Kind(), bb, bb.Kind()) // []int slice [5]int array
	fmt.Printf(&quot;%T %T&quot;, a, b) // []int [5]int
}

</code></pre>
<p>可以看出通过Printf打印出来的变量类型是有局限性的，最重要的是，Printf只能用来打印，如果想要在语句中用到变量类型，还是得用reflect包进行反射。</p>
<h3>解析结构体标签Tag</h3>
<pre><code class="language-go">package main

import (
	&quot;fmt&quot;
	&quot;reflect&quot;
)

type resume struct {
	Name string `json:&quot;name&quot; doc:&quot;我的名字&quot; age:&quot;age&quot; val:&quot;30&quot;`
}

func findDoc(stru interface{}) (map[string]string, map[string]string) {
	t := reflect.TypeOf(stru).Elem()
	doc := make(map[string]string)
	age := make(map[string]string)
	for i := 0; i &lt; t.NumField(); i++ {
		doc[t.Field(i).Tag.Get(&quot;json&quot;)] = t.Field(i).Tag.Get(&quot;doc&quot;)
		age[t.Field(i).Tag.Get(&quot;age&quot;)] = t.Field(i).Tag.Get(&quot;val&quot;)
	}

	return doc, age

}

func main() {
	var stru resume
	doc, age := findDoc(&amp;stru)
	fmt.Printf(&quot;name字段为：%s，age字段为：%s\n&quot;, doc[&quot;name&quot;], age[&quot;age&quot;])
  // name字段为：我的名字，age字段为：30
}

</code></pre>
<p>结构体标签关键函数 <code>.ELem()</code> 和 <code>.Tag.Get(&quot;&quot;)</code>。</p>
<p><code>.Elem()</code>函数，是通过 <code>TypeOf()</code> 函数获取结构体标签内容。</p>
<p>然后通过for循环，将数据循环出来，通过 <code>Tag.Get(&quot;&quot;)</code> 获取某个值，再组合成 <code>map</code>。</p>
<pre><code class="language-go">package main

import (
	&quot;fmt&quot;
	&quot;reflect&quot;
)

type resume struct {
	Name string `json:&quot;name&quot; doc:&quot;我的名字&quot; age:&quot;age&quot; val:&quot;30&quot;`
	Sex string `json:&quot;sex&quot; doc:&quot;男&quot;`
}

func findTag(stru interface{}) (map[string]string) {
	t := reflect.TypeOf(stru).Elem()
	doc := make(map[string]string)
	fmt.Println(t.NumField()) // 2 字段数量
	for i := 0; i &lt; t.NumField(); i++ {
		doc[t.Field(i).Tag.Get(&quot;json&quot;)] = t.Field(i).Tag.Get(&quot;doc&quot;)
		doc[t.Field(i).Tag.Get(&quot;age&quot;)] = t.Field(i).Tag.Get(&quot;val&quot;)
	}

	return doc

}

func main() {
	var stru resume
	doc := findTag(&amp;stru)
	fmt.Printf(&quot;name字段为：%s，age字段为：%s\n&quot;, doc[&quot;name&quot;], doc[&quot;age&quot;])
	fmt.Printf(&quot;sex字段为：%s\n&quot;, doc[&quot;sex&quot;])
	// name字段为：我的名字，age字段为：30
	// sex字段为：男
}

</code></pre>
<h3>结构体标签在json中的应用</h3>
<pre><code class="language-go">package main

import (
	&quot;fmt&quot;
	&quot;encoding/json&quot;
)

type Movie struct {
	Title string `json:&quot;title&quot;`
	Year int `json:&quot;year&quot;`
	Price int `json:&quot;rmb&quot;`
	Actors []string `json:&quot;actors&quot;`
}

func main() {
	movie := Movie{&quot;喜剧之王&quot;, 2000, 10, []string{&quot;星爷&quot;, &quot;张柏芝&quot;}}

	// 编码的过程 结构体 转换成 json
	jsonStr, err := json.Marshal(movie)
	if err != nil {
		fmt.Println(&quot;json marshal error&quot;, err)
		return
	}
	fmt.Printf(&quot;jsonStr = %s\n&quot;, jsonStr)
	// jsonStr = {&quot;title&quot;:&quot;喜剧之王&quot;,&quot;year&quot;:2000,&quot;rmb&quot;:10,&quot;actors&quot;:[&quot;星爷&quot;,&quot;张柏芝&quot;]}

	// 解码的过程 json 转换成 结构体
	myMovie := Movie{}
	err = json.Unmarshal(jsonStr, &amp;myMovie)
	if err != nil {
		fmt.Println(&quot;json unmarshal error&quot;, err)
		return
	}
	fmt.Printf(&quot;%v\n&quot;, myMovie)
	// {喜剧之王 2000 10 [星爷 张柏芝]}
}

</code></pre>
<p>如果不写结构体标签，则会将成员变量名当作json数据的key</p>
<pre><code class="language-go">package main

import (
	&quot;fmt&quot;
	&quot;encoding/json&quot;
)

type Movie struct {
	Title string
	Year int
	Price int
	Actors []string
}

func main() {
	movie := Movie{&quot;喜剧之王&quot;, 2000, 10, []string{&quot;星爷&quot;, &quot;张柏芝&quot;}}

	// 编码的过程 结构体 转换成 json
	jsonStr, err := json.Marshal(movie)
	if err != nil {
		fmt.Println(&quot;json marshal error&quot;, err)
		return
	}
	fmt.Printf(&quot;jsonStr = %s\n&quot;, jsonStr)
	// jsonStr = {&quot;Title&quot;:&quot;喜剧之王&quot;,&quot;Year&quot;:2000,&quot;Price&quot;:10,&quot;Actors&quot;:[&quot;星爷&quot;,&quot;张柏芝&quot;]}
}

</code></pre>
<h1>Range 范围</h1>
<p>Go 语言中 range 关键字用于 for 循环中迭代数组(array)、切片(slice)、通道(channel)或集合(map)的元素。在数组和切片中它返回元素的索引和索引对应的值，在集合中返回 key-value 对。</p>
<p>for 循环的 range 格式可以对 slice、map、数组、字符串等进行迭代循环。格式如下：</p>
<pre><code class="language-go">arr := []string{&quot;aaa&quot;, &quot;bbb&quot;, &quot;ccc&quot;}
for key, value := range arr {
  fmt.Println(&quot;key：&quot;, key, &quot;，value：&quot;, value, &quot;。&quot;)
}

</code></pre>
<pre><code class="language-go">for key, value := range oldMap {
    newMap[key] = value
}

</code></pre>
<p>以上代码中的 key 和 value 是可以省略。</p>
<p>如果只想读取 key，格式如下：</p>
<pre><code class="language-go">for key := range oldMap
// 或者
for key, _ := range oldMap

</code></pre>
<p>只想读取value，格式如下：</p>
<pre><code class="language-go">for _, value := range oldMap

</code></pre>
<p>因为value是第二个参数，所以第一个参数不能省略</p>
<p>例子：</p>
<pre><code class="language-go">package main

import &quot;fmt&quot;

var pow = []int{1, 2, 4, 8, 16, 32, 64, 128}

func main() {
  for i, v := range pow {
    fmt.Printf(&quot;2^%d : %d\n&quot;, i, v)
  }
}

</code></pre>
<p>for 循环的 range 格式可以省略 key 和 value，如下实例：</p>
<pre><code class="language-go">for key, value := range map1 {
  fmt.Printf(&quot;key is: %d - value is: %f\n&quot;, key, value)
}

// 读取 key
for key := range map1 {
  fmt.Printf(&quot;key is: %d\n&quot;, key)
}

// 读取 key
for key, _ := range map1 {
  fmt.Printf(&quot;key is: %d\n&quot;, key)
}

// 读取 value
for _, value := range map1 {
  fmt.Printf(&quot;value is: %f\n&quot;, value)
}


</code></pre>
<p>range 遍历其他数据结构：</p>
<pre><code class="language-go">package main
import &quot;fmt&quot;
func main() {
    //这是我们使用 range 去求一个 slice 的和。使用数组跟这个很类似
    nums := []int{2, 3, 4}
    sum := 0
    for _, num := range nums {
        sum += num
    }
    fmt.Println(&quot;sum:&quot;, sum)
    //在数组上使用 range 将传入索引和值两个变量。上面那个例子我们不需要使用该元素的序号，所以我们使用空白符&quot;_&quot;省略了。有时侯我们确实需要知道它的索引。
    for i, num := range nums {
        if num == 3 {
            fmt.Println(&quot;index:&quot;, i)
        }
    }
    //range 也可以用在 map 的键值对上。
    kvs := map[string]string{&quot;a&quot;: &quot;apple&quot;, &quot;b&quot;: &quot;banana&quot;}
    for k, v := range kvs {
        fmt.Printf(&quot;%s -&gt; %s\n&quot;, k, v)
    }

    //range也可以用来枚举 Unicode 字符串。第一个参数是字符的索引，第二个是字符（Unicode的值）本身。
    for i, c := range &quot;go&quot; {
        fmt.Println(i, c)
    }
}

/*
sum: 9
index: 1
a -&gt; apple
b -&gt; banana
0 103
1 111
*/

</code></pre>
<h2>range 与 通道</h2>
<pre><code class="language-go">package main

import (
	&quot;fmt&quot;
)

func main() {
	ch := make(chan int)

	go func() {
		for i := 0; i &lt; 4; i++ {
			ch &lt;- i
		}
		close(ch)
	}()

	// for {
	// 	if data, ok := &lt;-ch; ok {
	// 		fmt.Println(data)
	// 	} else {
	// 		break
	// 	}
	// }

	// 和上方 for if 一样的效果
	for data := range ch {
		fmt.Println(data)
	}

	fmt.Println(&quot;Main Finished..&quot;)
}

</code></pre>
<h1>递归函数</h1>
<p>递归操作就是自己调用自己，但是一定要设置退出条件，否则将会一直执行，导致死循环。</p>
<h2>阶乘（例子）</h2>
<pre><code class="language-go">package main

import &quot;fmt&quot;

func Factorial(n uint64)(result uint64) {
	if (n &gt; 0) {
		result := n * Factorial(n - 1)
		return result
	}
	return 1
}

func main() {
	i := 3
	fmt.Println(Factorial(uint64(i)))
}

</code></pre>
<h2>斐波那契数列</h2>
<pre><code class="language-go">package main

import &quot;fmt&quot;

func fibonacci(n int) int {
  if n &lt; 2 {
   return n
  }
  return fibonacci(n-2) + fibonacci(n-1)
}

func main() {
    var i int
    for i = 0; i &lt; 10; i++ {
       fmt.Printf(&quot;%d\t&quot;, fibonacci(i))
    }
}

</code></pre>
<h1>类型转换</h1>
<h2>数值类型转换</h2>
<pre><code class="language-go">var a int = 10
var b float64 = float64(a)

</code></pre>
<p>将 <code>int</code> 类型转换成 <code>uint64</code> 类型</p>
<pre><code class="language-go">package main

import &quot;fmt&quot;

func main() {
	i := 100
	fmt.Printf(&quot;%T %d\n&quot;, i, i)
	ii := uint64(i)
	fmt.Printf(&quot;%T %d&quot;, ii, ii)
}

</code></pre>
<p>将整型 <code>int</code> 转化为浮点型 <code>float32</code>，并计算结果，将结果赋值给浮点型变量：</p>
<pre><code class="language-go">package main

import &quot;fmt&quot;

func main() {
   var sum int = 17
   var count int = 5
   var mean float32
   
   mean = float32(sum)/float32(count)
   fmt.Printf(&quot;mean 的值为: %f\n&quot;,mean)
}

</code></pre>
<h2>字符串类型转换</h2>
<h3>字符串转换为整型</h3>
<p><code>strconv.Atoi</code> 函数可以将整数形式的string字符串，转换成int类型。</p>
<p><code>strconv.Atoi</code> 函数返回两个参数，第一个参数为转换后的数据，第二个参数为可能发生错误的错误信息，我们可以使用空白标识符 <strong>_</strong> 来忽略这个错误。</p>
<pre><code class="language-go">package main

import (
	&quot;fmt&quot;
	&quot;strconv&quot;
)

func main() {
	str := &quot;123&quot;
	num, err := strconv.Atoi(str)
	if err != nil {
		fmt.Println(&quot;转换错误:&quot;, err)
	} else {
		fmt.Printf(&quot;字符串 '%s' 转换为整数为：%d %T\n&quot;, str, num, num)
    // 字符串 '123' 转换为整数为：123 int
	}
}

</code></pre>
<h3>整型转换为字符串</h3>
<p><code>strconv.Itoa</code> 函数可以将int类型的整型数字，转换成string类型的字符串。</p>
<p><code>strconv.Itoa</code> 函数返回一个参数，参数为转换后的数据。</p>
<pre><code class="language-go">package main

import (
	&quot;fmt&quot;
	&quot;strconv&quot;
)

func main() {
	i := 123
	num := strconv.Itoa(i)
	fmt.Printf(&quot;i: %d %T, num: %s %T。&quot;, i, i, num, num)
}

</code></pre>
<h3>字符串转换为浮点型</h3>
<p><code>strconv.ParseFloat</code> 函数返回两个参数，第一个参数为转换后的数据，第二个参数为可能发生错误的错误信息，我们可以使用空白标识符 <strong>_</strong> 来忽略这个错误。</p>
<pre><code class="language-go">package main

import (
    &quot;fmt&quot;
    &quot;strconv&quot;
)

func main() {
    str := &quot;3.14&quot;
    num, err := strconv.ParseFloat(str, 64)
    if err != nil {
        fmt.Println(&quot;转换错误:&quot;, err)
    } else {
        fmt.Printf(&quot;字符串 '%s' 转为浮点型为：%f\n&quot;, str, num)
    }
}

</code></pre>
<h3>浮点型转换为字符串</h3>
<pre><code class="language-go">package main

import (
    &quot;fmt&quot;
    &quot;strconv&quot;
)

func main() {
    num := 3.14
    str := strconv.FormatFloat(num, 'f', 2, 64)
    fmt.Printf(&quot;浮点数 %f 转为字符串为：'%s'\n&quot;, num, str)
}

</code></pre>
<h2>接口类型转换</h2>
<p>接口类型转换有两种情况：<code>类型断言</code>和<code>类型转换</code>。</p>
<pre><code class="language-go">value.(type) 
或者 
value.(T)

</code></pre>
<p>其中 value 是接口类型的变量，type 或 T 是要转换成的类型。</p>
<p>如果类型断言成功，它将返回转换后的值和一个布尔值，表示转换是否成功。</p>
<pre><code class="language-go">package main

import &quot;fmt&quot;

func main() {
    var i interface{} = &quot;Hello, World&quot;
    str, ok := i.(string)
    if ok {
        fmt.Printf(&quot;'%s' is a string\n&quot;, str)
    } else {
        fmt.Println(&quot;conversion failed&quot;)
    }
}

</code></pre>
<h1>接口</h1>
<p>实例</p>
<pre><code class="language-go">package main

import (
	&quot;fmt&quot;
)

// 定义一个 DivideError 结构
type DivideError struct {
	dividee int
	divider int
}

// 实现 `error` 接口
func (de *DivideError) Error() string {
	strFormat := `
    Cannot proceed, the divider is zero.
    dividee: %d
    divider: 0
`
	return fmt.Sprintf(strFormat, de.dividee)
}

// 定义 `int` 类型除法运算的函数
func Divide(varDividee int, varDivider int) (result int, errorMsg string) {
	if varDivider == 0 {
		dData := DivideError{
			dividee: varDividee,
			divider: varDivider,
		}
		errorMsg = dData.Error()
		return
	} else {
		return varDividee / varDivider, &quot;&quot;
	}

}

func main() {

	// 正常情况
	if result, errorMsg := Divide(100, 10); errorMsg == &quot;&quot; {
		fmt.Println(&quot;100/10 = &quot;, result)
	}
	// 当除数为零的时候会返回错误信息
	if _, errorMsg := Divide(100, 0); errorMsg != &quot;&quot; {
		fmt.Println(&quot;errorMsg is: &quot;, errorMsg)
	}

}

</code></pre>
<p>输出</p>
<pre><code class="language-go">100/10 =  10

errorMsg is:                            
    Cannot proceed, the divider is zero.
    dividee: 100
    divider: 0

</code></pre>
<p>golang中的接口，可以用于实现多态</p>
<h1>错误处理</h1>
<p>例子</p>
<pre><code class="language-go">package main

import (
    &quot;fmt&quot;
)

// 定义一个 DivideError 结构
type DivideError struct {
    dividee int
    divider int
}

// 实现 `error` 接口
func (de *DivideError) Error() string {
    strFormat := `
    Cannot proceed, the divider is zero.
    dividee: %d
    divider: 0
`
    return fmt.Sprintf(strFormat, de.dividee)
}

// 定义 `int` 类型除法运算的函数
func Divide(varDividee int, varDivider int) (result int, errorMsg string) {
    if varDivider == 0 {
            dData := DivideError{
                    dividee: varDividee,
                    divider: varDivider,
            }
            errorMsg = dData.Error()
            return
    } else {
            return varDividee / varDivider, &quot;&quot;
    }

}

func main() {

    // 正常情况
    if result, errorMsg := Divide(100, 10); errorMsg == &quot;&quot; {
            fmt.Println(&quot;100/10 = &quot;, result)
    }
    // 当除数为零的时候会返回错误信息
    if _, errorMsg := Divide(100, 0); errorMsg != &quot;&quot; {
            fmt.Println(&quot;errorMsg is: &quot;, errorMsg)
    }

}

</code></pre>
<h1>*高阶</h1>
<h1>并发（go）</h1>
<h2>基本使用</h2>
<p>golang天然支持高并发，我们只需要通过go关键字来开启 <code>goroutine</code> 即可。</p>
<pre><code class="language-go">package main

import (
    &quot;fmt&quot;
    &quot;time&quot;
)

func say(s string) {
    for i := 0; i &lt; 5; i++ {
        time.Sleep(100 * time.Millisecond)
        fmt.Println(s)
    }
}

func main() {
    go say(&quot;world&quot;)
    say(&quot;hello&quot;)
}

</code></pre>
<p>运行对比以下两个例子即可看出区别，例子中只有使用go关键字和没有使用go关键字的区别：</p>
<p>使用go关键字</p>
<pre><code class="language-go">package main
 
import (
    &quot;fmt&quot;
    &quot;time&quot;
)
 
func newTask() {
    i := 0
    for {
        i++
        fmt.Printf(&quot;new goroutine: i = %d\n&quot;, i)
        time.Sleep(1*time.Second) //延时1s
    }
}
 
func main() {
    //创建一个 goroutine，启动另外一个任务
    go newTask()
    i := 0
    //main goroutine 循环打印
    for {
        i++
        fmt.Printf(&quot;main goroutine: i = %d\n&quot;, i)
        time.Sleep(1 * time.Second) //延时1s
    }
}

</code></pre>
<p>没有使用go关键字</p>
<pre><code class="language-go">package main

import (
    &quot;fmt&quot;
    &quot;time&quot;
)
// 子goroutine
func newTask() {
    i := 0
    for {
        i++
        fmt.Printf(&quot;new goroutine: i = %d\n&quot;, i)
        time.Sleep(1*time.Second) //延时1s
    }
}
// 主goroutine
func main() {
    //创建一个 goroutine，启动另外一个任务
    newTask()
    i := 0
    //main goroutine 循环打印
    for {
        i++
        fmt.Printf(&quot;main goroutine: i = %d\n&quot;, i)
        time.Sleep(1 * time.Second) //延时1s
    }
}

</code></pre>
<p>只有主goroutine一直存在，子goroutine才能存在，否则子goroutine直接结束</p>
<pre><code class="language-go">package main

import (
    &quot;fmt&quot;
    &quot;time&quot;
)
// 子goroutine
func newTask() {
    i := 0
    for {
        i++
        fmt.Printf(&quot;new goroutine: i = %d\n&quot;, i)
        time.Sleep(1*time.Second) //延时1s
    }
}
// 主goroutine
func main() {
    //创建一个 goroutine，启动另外一个任务
    go newTask()

	fmt.Println(&quot;main goroutine exit&quot;)

    // i := 0
    // //main goroutine 循环打印
    // for {
    //     i++
    //     fmt.Printf(&quot;main goroutine: i = %d\n&quot;, i)
    //     time.Sleep(1 * time.Second) //延时1s
    // }
}

</code></pre>
<p>可以创建匿名goroutine</p>
<pre><code class="language-go">package main

import (
  &quot;fmt&quot;
	&quot;runtime&quot;
	&quot;time&quot;
)

func main() {
	// 用go创建承载一个形参为空，返回值为空的一个函数
    go func() {
		defer fmt.Println(&quot;A.defer&quot;)

		func() {
			defer fmt.Println(&quot;B.defer&quot;)
			// 退出当前goroutine
			runtime.Goexit()
			fmt.Println(&quot;B&quot;)
		}()

		fmt.Println(&quot;A&quot;)
	}()

	// 死循环
	for {
		time.Sleep(1 * time.Second)
	}
}

</code></pre>
<p>其中<code>func() {}()</code>是立即执行函数。</p>
<p><code>runtime.Goexit()</code> 可以将goroutine退出</p>
<p>也可以声明带参数的匿名函数</p>
<pre><code class="language-go">package main

import (
    &quot;fmt&quot;
    &quot;time&quot;
)

func main() {
    go func(x int, y int) bool {
        fmt.Println(&quot;x&quot;, x, &quot;y&quot;, y)
        return true
    }(10, 20)

    // 死循环
    for {
      	time.Sleep(1 * time.Second)
    }
}

</code></pre>
<p>在以上代码中，匿名函数返回了布尔类型的返回值，但是无法通过普通的语法进行获取，需要使用通道来进行协程之间的正常通信，因为协程是异步的，无法同步赋值。</p>
<h2>time包</h2>
<p>在以上的案例中可以看到导入的time包</p>
<p><code>time.Sleep</code> 是延迟函数，内部传入的参数 <code>time.Second</code> 反射出来时 <code>int64</code> 类型，值是 <code>1s</code>，time.Sleep 函数中好像必须传入 time.Second 。</p>
<pre><code class="language-go">time.Sleep(1 * time.Second)

</code></pre>
<p><code>time.Now()</code> 是获取当前时间的函数，在此函数下，还包含：<code>.Year()</code>，<code>.Month()</code>，<code>.Day()</code>，<code>.Hour()</code>，<code>.Minute()</code>，<code>.Second()</code> 等函数，他们是分别获取 年、月、日、时、分、秒 的函数。</p>
<pre><code class="language-go">now := time.Now()
fmt.Println(now)
fmt.Println(now.Year())
fmt.Println(now.Month())
fmt.Println(now.Day())
fmt.Println(now.Hour())
fmt.Println(now.Minute())
fmt.Println(now.Second())

</code></pre>
<h1>通道（channel）</h1>
<h2>基本</h2>
<p>通道（channel）是用来传递数据的一个数据结构。</p>
<p>通道可用于两个 <code>goroutine</code> 之间通过传递一个指定类型的值来同步运行和通讯。操作符 <code>&lt;-</code> 用于指定通道的方向，发送或接收。如果未指定方向，则为双向通道。</p>
<pre><code class="language-go">ch &lt;- v    // 把 v 发送到通道 ch
v := &lt;-ch  // 从 ch 接收数据
           // 并把值赋给 v

</code></pre>
<p>声明一个通道很简单，我们使用chan关键字即可，通道在使用前必须先创建：</p>
<pre><code class="language-go">ch := make(chan int)

</code></pre>
<h2>无通道缓冲区</h2>
<p><strong>注意</strong>：默认情况下，通道是不带缓冲区的。发送端发送数据，同时必须有接收端相应的接收数据。</p>
<p>以下实例通过两个 goroutine 来计算数字之和，在 goroutine 完成计算后，它会计算两个结果的和：</p>
<pre><code class="language-go">package main

import &quot;fmt&quot;

func sum(s []int, c chan int) {
        sum := 0
        for _, v := range s {
                sum += v
        }
        c &lt;- sum // 把 sum 发送到通道 c
}

func main() {
        s := []int{7, 2, 8, -9, 4, 0}

        c := make(chan int)
      	b := make(chan int)
        go sum(s[:len(s)/2], c)  // 数组下标 开始 - 2
        go sum(s[len(s)/2:], b) // 数组下标 3 - 末尾
        x, y := &lt;-c, &lt;-b // 从通道 c 中接收

        fmt.Println(x, y, x+y) // 17 -5 12
}

</code></pre>
<h2>通道缓冲区</h2>
<p>通道可以设置缓冲区，通过 make 的第二个参数指定缓冲区大小：</p>
<pre><code class="language-go">ch := make(chan int, 100)

</code></pre>
<p>通过 <code>len()</code> 和 <code>cap()</code> 获取通道的 <code>长度</code> 和 <code>容量</code></p>
<pre><code class="language-go">package main

import &quot;fmt&quot;

func main() {
	ch := make(chan int, 5)
	ch &lt;- 199
	fmt.Println(len(ch), cap(ch))
}

</code></pre>
<p>带缓冲区的通道允许发送端的数据发送和接收端的数据获取处于异步状态，就是说发送端发送的数据可以放在缓冲区里面，可以等待接收端去获取数据，而不是立刻需要接收端去获取数据。</p>
<p>不过由于缓冲区的大小是有限的，所以还是必须有接收端来接收数据的，否则缓冲区一满，数据发送端就无法再发送数据了。</p>
<p><strong>注意</strong>：如果通道不带缓冲，发送方会阻塞直到接收方从通道中接收了值。如果通道带缓冲，发送方则会阻塞直到发送的值被拷贝到缓冲区内；如果缓冲区已满，则意味着需要等待直到某个接收方获取到一个值。接收方在有值可以接收之前会一直阻塞。</p>
<p><em><strong>意思就是：有缓冲区</strong></em></p>
<p>如下代码，设置缓存区为3的通道，将三个数存放到通道中，正好存满，延时两秒进行取通道中的数据。</p>
<pre><code class="language-go">package main

import (
	&quot;fmt&quot;
	&quot;time&quot;
)

func main() {
	ch := make(chan int, 3)
	fmt.Println(&quot;len(ch) = &quot;, len(ch), &quot;, cap(ch) = &quot;, cap(ch))

	go func() {
		defer fmt.Println(&quot;子go程结束&quot;)

		for i := 0; i &lt; 3; i++ {
			ch &lt;- i
			fmt.Println(&quot;子go程正在运行，发送的元素 = &quot;, i, &quot; len(ch) = &quot;, len(ch), &quot; cap(ch) = &quot;, cap(ch))
		}
	}()

	time.Sleep(2 * time.Second)

	for i := 0; i &lt; 3; i++ {
		num := &lt;-ch // 从通道ch中国呢取数据，并赋值给num
		fmt.Println(&quot;num = &quot;, num)
	}

	fmt.Println(&quot;main结束&quot;)
}

</code></pre>
<p>打印结果</p>
<pre><code class="language-go">len(ch) =  0 , cap(ch) =  3
子go程正在运行，发送的元素 =  0  len(ch) =  1  cap(ch) =  3
子go程正在运行，发送的元素 =  1  len(ch) =  2  cap(ch) =  3
子go程正在运行，发送的元素 =  2  len(ch) =  3  cap(ch) =  3
子go程结束
num =  0
num =  1
num =  2
main结束

</code></pre>
<p>如果存进去的数据大于通道ch的容量，则会发生阻塞，当通道的容量被腾出来，才能再存。</p>
<pre><code class="language-go">package main

import (
	&quot;fmt&quot;
	&quot;time&quot;
)

func main() {
	ch := make(chan int, 3)
	fmt.Println(&quot;len(ch) = &quot;, len(ch), &quot;, cap(ch) = &quot;, cap(ch))

	go func() {
		defer fmt.Println(&quot;子go程结束&quot;)

		for i := 0; i &lt; 4; i++ {
			ch &lt;- i
			fmt.Println(&quot;子go程正在运行，发送的元素 = &quot;, i, &quot; len(ch) = &quot;, len(ch), &quot; cap(ch) = &quot;, cap(ch))
		}
	}()

	time.Sleep(2 * time.Second)

	for i := 0; i &lt; 4; i++ {
		num := &lt;-ch // 从通道ch中国呢取数据，并赋值给num
		fmt.Println(&quot;num = &quot;, num)
	}

	fmt.Println(&quot;main结束&quot;)
	time.Sleep(2 * time.Second)
}

</code></pre>
<p>打印结果：</p>
<pre><code class="language-go">len(ch) =  0 , cap(ch) =  3
子go程正在运行，发送的元素 =  0  len(ch) =  1  cap(ch) =  3
子go程正在运行，发送的元素 =  1  len(ch) =  2  cap(ch) =  3
子go程正在运行，发送的元素 =  2  len(ch) =  3  cap(ch) =  3
num =  0
num =  1
num =  2
num =  3
main结束
子go程正在运行，发送的元素 =  3  len(ch) =  0  cap(ch) =  3
子go程结束

</code></pre>
<h2>关闭通道</h2>
<p>关闭通道是通过 <code>close(ch)</code> 关键字进行关闭的</p>
<pre><code class="language-go">package main

import (
	&quot;fmt&quot;
)

func main() {
	ch := make(chan int)

	go func() {
		for i := 0; i &lt; 4; i++ {
			ch &lt;- i
		}
		// close关闭一个通道channel
		close(ch)
	}()

	// 死循环
	for {
		// if语句缩写，表示ok代表if的判断条件。如果ok为true，则表示通道还未关闭；如果ok为false，则表示通道已经关闭。
		if data, ok := &lt;-ch; ok {
			fmt.Println(data)
		} else {
			break
		}
	}

	fmt.Println(&quot;Main Finished..&quot;)
}

</code></pre>
<pre><code class="language-css">0
1
2
3
Main Finished..

</code></pre>
<p>如果以上代码没有关闭通道，则会出现死锁，然后报错停止运行</p>
<pre><code class="language-go">package main

import (
	&quot;fmt&quot;
)

func main() {
	ch := make(chan int)

	go func() {
		for i := 0; i &lt; 4; i++ {
			ch &lt;- i
		}
		// close关闭一个通道channel
		// close(ch)
	}()

	// 死循环
	for {
		// if语句缩写，表示ok代表if的判断条件。如果ok为true，则表示通道还未关闭；如果ok为false，则表示通道已经关闭。
		if data, ok := &lt;-ch; ok {
			fmt.Println(data)
		} else {
			break
		}
	}

	fmt.Println(&quot;Main Finished..&quot;)
}

</code></pre>
<pre><code class="language-less">0
1
2
3
fatal error: all goroutines are asleep - deadlock!

goroutine 1 [chan receive]:
main.main()
        /Volumes/MacData/golang/main.go:21 +0xbf
exit status 2

</code></pre>
<p>如果向一个关闭的通道发送数据，也会报错</p>
<pre><code class="language-go">package main

import (
	&quot;fmt&quot;
)

func main() {
	ch := make(chan int)

	go func() {
		for i := 0; i &lt; 4; i++ {
			ch &lt;- i
			// close关闭一个通道channel
			close(ch) // 发送第一个参数后，直接关闭通道
		}
	}()

	// 死循环
	for {
		// if语句缩写，表示ok代表if的判断条件。如果ok为true，则表示通道还未关闭；如果ok为false，则表示通道已经关闭。
		if data, ok := &lt;-ch; ok {
			fmt.Println(data)
		} else {
			break
		}
	}

	fmt.Println(&quot;Main Finished..&quot;)
}

</code></pre>
<pre><code class="language-less">0
Main Finished..
panic: send on closed channel

goroutine 18 [running]:
main.main.func1()
        /Volumes/MacData/golang/main.go:12 +0x32
created by main.main
        /Volumes/MacData/golang/main.go:10 +0x6a
exit status 2

</code></pre>
<h2>通道 与 range</h2>
<p>[range 与 通道](#range 与 通道)</p>
<h2>通道 与 select</h2>
<p>单流程下，一个go只能监控一个通道的状态，select可以完成监控多个channel的状态</p>
<pre><code class="language-go">package main

import (
	&quot;fmt&quot;
)

func fibonacii(ch, quit chan int) {
	x, y := 1, 1
	
	for {
		select {
		case ch &lt;- x:
			x, y = y, x+y
		case &lt;-quit:
			fmt.Println(&quot;quit&quot;)
			return
		}
	}
}

func main() {
	ch := make(chan int)
	quit := make(chan int)

	go func() {
		for i := 0; i &lt; 10; i++ {
			fmt.Println(&lt;-ch)
		}
		
		quit &lt;- 1
	}()

	fibonacii(ch, quit)
}

</code></pre>
<pre><code class="language-undefined">1
1
2
3
5
8
13
21
34
55
quit

</code></pre>
<p>以上代码，main函数中，定义了两个通道，一个用于存放数字，一个用于结束程序。</p>
<p>当main中的 for循环中 想要读取<code>&lt;-ch</code>通道中的数据，但如果没有读到就会发生阻塞，等待fibonacii函数中，将数据存放到通道<code>ch</code>中即可读到，这个过程执行10次后，跳出main函数中的for循环，然后将一个数存到<code>quit</code>通道内，这个数字可以任意，因为fibonacii中<code>case &lt;-quit:</code>只是检测到<code>quit</code>通道有数据就会<code>return</code>。<code>case ch &lt;- x:</code> 的意思是检测ch通道是否可以存放数据，如果可以存放就将<code>x</code>存放到<code>ch</code>通道内，并进入case内，如果不能则阻塞。</p>
<p>select具备多路channel的监控状态功能</p>
<h1>骚的语法</h1>
<pre><code class="language-go">package main

import &quot;fmt&quot;

func main() {
        s := []int{7, 2, 8, -9, 4, 0}

        fmt.Println(s[:len(s)/2], s[len(s)/2:]) // [7 2 8] [-9 4 0]
}

</code></pre>
<p><code>s[:index]</code> <code>s[index:]</code>index为数组下标，冒号在前，表示截取0到中间位置，不包含下标处的值；冒号在后，表示截取中介位置到末尾，包含下标处的值。</p>
<h1>GOPATH工作模式的弊端</h1>
<p>GOPATH的弊端：</p>
<ul>
<li>无版本控制概念</li>
<li>无法同步一致第三方版本号</li>
<li>无法指定当前项目引用的第三方版本号</li>
</ul>
<p>正是因为GOPATH有诸多弊端，才有了Go Modules来取代GOPATH</p>
<h1>*进阶</h1>
<h1>Go Modules</h1>
<h2>go mod命令</h2>
<p>执行一下命令查看go mod支持哪些命令</p>
<pre><code class="language-sh">go mod help

</code></pre>
<table>
<thead>
<tr>
<th>命令</th>
<th>作用</th>
</tr>
</thead>
<tbody>
<tr>
<td>go mod init</td>
<td>生成 go.mod 文件</td>
</tr>
<tr>
<td>go mod download</td>
<td>下载 go.mod 文件中指明的所有依赖</td>
</tr>
<tr>
<td>go mod tidy</td>
<td>整理现有的依赖</td>
</tr>
<tr>
<td>go mod graph</td>
<td>查看现有的依赖结构</td>
</tr>
<tr>
<td>go mod edit</td>
<td>编辑 go.mod 文件</td>
</tr>
<tr>
<td>go mod vendor</td>
<td>导出项目所有的依赖到vendor目录</td>
</tr>
<tr>
<td>go mod verify</td>
<td>校验一个模块是否被篡改过</td>
</tr>
<tr>
<td>go mod why</td>
<td>查看为什么需要依赖某模块</td>
</tr>
</tbody>
</table>
<p>查看go mod环境变量</p>
<pre><code class="language-sh">go env

</code></pre>
<p>可以通过命令，将GO111MODULE改为on，默认auto，建议设置为<code>on</code></p>
<pre><code class="language-sh">go env -w GO111MODULE=on

</code></pre>
<h2>GOPROXY</h2>
<p>这个环境变量主要是用于设置Go模块代理（Go module proxy），其作用是用于使Go在后续拉取模块版本时直接通过镜像站点来快速拉取。</p>
<p>GOPROXY的默认地址为： <a href="https://proxy.golang.org">https://proxy.golang.org</a> ,direct</p>
<p>建议改成国内镜像源</p>
<ul>
<li>阿里云：<a href="https://mirrors.aliyun.com/goproxy">https://mirrors.aliyun.com/goproxy</a></li>
<li>七牛云： <a href="https://goproxy.cn">https://goproxy.cn</a> ,direct</li>
</ul>
<pre><code class="language-bash">go env -w GOPROXY= https://goproxy.cn ,direct

</code></pre>
<p>可以设置多个镜像源，以逗号<code>,</code>分割开即可</p>
<pre><code class="language-sh">go env -w GOPROXY= https://goproxy.cn,https://mirrors.aliyun.com/goproxy ,direct

</code></pre>
<p>查看是否设置成功</p>
<pre><code class="language-sh">go env
# 或
go env | grep GOPROXY

</code></pre>
<h2>GOSUMDB</h2>
<p>用来校验拉取的第三方库是否是完整的</p>
<p>GOSUMDB的默认值为：sum.golang.org，在国内也是无法访问的，但是GOSUMDB可以被Go模块代理所代理（详见：Proxying a Checksum Database）。</p>
<p>如果设置了GOPROXY，这个就不用设置了</p>
<p>通过一下命令查看 GOSUMDB</p>
<pre><code class="language-sh">go env | grep GOSUMDB

</code></pre>
<p>可以通过以下命令设置GOSUMDB</p>
<pre><code class="language-sh">go env -w GOSUMDB=off

</code></pre>
<p>一般不建议设置关闭，因为关闭之后无法对拉取的代码进行校验。</p>
<h2>GoModules初始化项目</h2>
<h3>开启Go Modules</h3>
<pre><code class="language-sh">go env -w GO111MODULE=on

</code></pre>
<p>查看</p>
<pre><code class="language-sh">go env | grep GO111MODULE

</code></pre>
<p>也可以通过直接设置系统环境变量（写入对应的～/.bash_profile文件即可）来实现这个目的：</p>
<pre><code class="language-sh">vim ~/.bashrc

</code></pre>
<p>填入以下内容，保存退出后</p>
<pre><code class="language-sh">export GO111MODULE=on

</code></pre>
<p>接着执行</p>
<pre><code class="language-sh">source ~/.bashrc

</code></pre>
<h3>初始化项目</h3>
<p>创建项目文件夹</p>
<pre><code class="language-sh">mkdir -p ganto/modules_test
# 进入到项目文件夹内
cd ganto/modules_test

</code></pre>
<p>执行初始化modules命令</p>
<pre><code class="language-sh">go mod init github.com/gantoho/modules_test

</code></pre>
<p>创建main.go文件</p>
<pre><code class="language-go">package main

import (
	&quot;fmt&quot;
	&quot;github.com/aceld/zinx/ziface&quot;
	&quot;github.com/aceld/zinx/znet&quot;
)

// ping test 自定义路由
type PingRouter struct {
	znet.BaseRouter
}

// Ping Handle
func (this *PingRouter) Handle(request ziface.IRequest) {
	// 先读取客户端的数据
	fmt.Println(&quot;recv from client : msgId=&quot;, request.GetMsgID(), &quot;, data=&quot;, string(request.GetData()))

	// 再回写ping...ping...ping
	err := request.GetConnection().SendBuffMsg(0, []byte(&quot;ping...ping...ping&quot;))
	if err != nil {
		fmt.Println(err)
	}
}

func main() {
	// 1 创建一个server句柄
	s := znet.NewServer()

	// 2 配置路由
	s.AddRouter(0, &amp;PingRouter{})

	// 3 开启服务
	s.Serve()
}

</code></pre>
<p>运行前，先进行下载导入的包</p>
<pre><code class="language-sh">go get github.com/aceld/zinx/ziface
go get github.com/aceld/zinx/znet

</code></pre>
<h2>改变模块依赖关系</h2>
<pre><code class="language-sh">go mod edit -replace=zinx@v0.0.2=zinx@v0.0.1

</code></pre>
<h2>go mod的基本使用</h2>
<p>先初始化mod</p>
<pre><code class="language-sh">go mod init example.com/m/v2

</code></pre>
<p>然后安装gin</p>
<pre><code class="language-sh">go get -u github.com/gin-gonic/gin

</code></pre>
<p>在go程序中，要先引用gin才能使用</p>
<pre><code class="language-go">import (
	&quot;github.com/gin-gonic/gin&quot;
)

</code></pre>
<p>简单例子：</p>
<pre><code class="language-go">package main

import (
	&quot;fmt&quot;
	&quot;github.com/gin-gonic/gin&quot;
	&quot;net/http&quot;
	&quot;reflect&quot;
)

func main() {
	r := gin.Default()
	r.GET(&quot;/api&quot;, func(c *gin.Context) {
		msg := c.Query(&quot;msg&quot;)
		fmt.Println(len(msg))
		if len(msg) == 0 {
			msg = &quot;默认值&quot;
		}
		fmt.Println(&quot;接收的参数msg：&quot;, msg, reflect.TypeOf(msg))
		data := map[string]interface{}{
			&quot;code&quot;: &quot;ok&quot;,
			&quot;data&quot;: map[string]string{&quot;name&quot;: &quot;张三&quot;, &quot;age&quot;: msg},
		}
		c.AsciiJSON(http.StatusOK, data)
	})
	r.Run(&quot;:8989&quot;)
}

</code></pre>
<p>例子调试：<a href="http://localhost:8989/api?msg=iamziyou">http://localhost:8989/api?msg=iamziyou</a></p>
<h2>有趣的例子</h2>
<pre><code class="language-go">package main

import (
	&quot;fmt&quot;
	&quot;github.com/gin-gonic/gin&quot;
	&quot;net/http&quot;
)

type Num struct {
	value string
}

func main() {
	num := Num{}
	r := gin.Default()
	r.GET(&quot;/setNum&quot;, func(c *gin.Context) {
		passWord := c.Query(&quot;password&quot;)
		data := map[string]interface{}{}
		if passWord == &quot;ganto&quot; {
			num.value = c.Query(&quot;num&quot;)
			fmt.Printf(&quot;num.value的类型：%T&quot;, num.value)
			data = map[string]interface{}{
				&quot;code&quot;: &quot;设置成功&quot;,
			}
		} else {
			if passWord == &quot;&quot; {
				data = map[string]interface{}{
					&quot;code&quot;: &quot;请输入密码&quot;,
				}
			} else {
				data = map[string]interface{}{
					&quot;code&quot;: &quot;密码错误&quot;,
				}
			}
		}
		c.JSON(http.StatusOK, data)
	})
	r.GET(&quot;/getNum&quot;, func(c *gin.Context) {
		num1 := c.Query(&quot;num&quot;)
		data := map[string]interface{}{}
		if num1 == num.value {
			data = map[string]interface{}{
				&quot;code&quot;: &quot;正确&quot;,
			}
		} else {
			data = map[string]interface{}{
				&quot;code&quot;: &quot;失败&quot;,
			}
		}
		c.JSON(http.StatusOK, data)
	})
	r.Run(&quot;:8989&quot;)
}

</code></pre>
<blockquote>
<p>通过setNum接口，携带num和password参数，对数据进行设置；</p>
<p>通过getNum接口，携带num参数，对数据进行验证。</p>
</blockquote>
<h1>使用Go Modules初始化项目</h1>
<p><a href="#GoModules%E5%88%9D%E5%A7%8B%E5%8C%96%E9%A1%B9%E7%9B%AE">GoModules初始化项目</a></p>
<h1>连接数据库MySQL</h1>
<p>创建数据库test</p>
<pre><code class="language-sql">SET NAMES utf8mb4;
SET FOREIGN_KEY_CHECKS = 0;

-- ----------------------------
-- Table structure for user
-- ----------------------------
DROP TABLE IF EXISTS `user`;
CREATE TABLE `user`  (
  `id` varchar(20) CHARACTER SET utf8mb4 COLLATE utf8mb4_bin NOT NULL,
  `name` varchar(255) CHARACTER SET utf8mb4 COLLATE utf8mb4_bin NULL DEFAULT NULL,
  `age` tinyint(0) NULL DEFAULT NULL,
  `address` varchar(255) CHARACTER SET utf8mb4 COLLATE utf8mb4_bin NULL DEFAULT NULL,
  PRIMARY KEY (`id`) USING BTREE
) ENGINE = InnoDB CHARACTER SET = utf8mb4 COLLATE = utf8mb4_bin ROW_FORMAT = Dynamic;

-- ----------------------------
-- Records of user
-- ----------------------------
INSERT INTO `user` VALUES ('12132', '张三', 35, '北京市');
INSERT INTO `user` VALUES ('16162', '王五', 22, '上海市');

SET FOREIGN_KEY_CHECKS = 1;

</code></pre>
<p>安装依赖</p>
<pre><code class="language-sh">github.com/go-sql-driver/mysql
github.com/jmoiron/sqlx

</code></pre>
<p>查询</p>
<p>main.go</p>
<pre><code class="language-go">package main

import (
    &quot;fmt&quot;
	&quot;github.com/jmoiron/sqlx&quot;
	_ &quot;github.com/go-sql-driver/mysql&quot;
)

var db *sqlx.DB

type Person struct {
    UserId   string `db:&quot;id&quot;`
    Username string `db:&quot;name&quot;`
    Age      int    `db:&quot;age&quot;`
    Address  string `db:&quot;address&quot;`
}

func init() {
    conn, err := sqlx.Open(&quot;mysql&quot;, &quot;root:admin@tcp(127.0.0.1)/test&quot;)
    if err != nil {
        fmt.Println(&quot;Open mysql failed&quot;, err)
        return
    }

    db = conn
}

func main() {
	query()
	list()
    defer db.Close()
}

func query() {
    var person Person
    //查询一个是Get，多个是Select
    err := db.Get(&amp;person, &quot;select * from user where id = ?&quot;, &quot;12132&quot;)
    if err != nil {
        fmt.Println(&quot;query failed:&quot;, err)
        return
    }
    fmt.Printf(&quot;query succ:%+v&quot;, person)
}

func list() {
	var perons []Person
	err := db.Select(&amp;perons, &quot;select * from user&quot;)
	if err != nil {
		fmt.Println(&quot;list err&quot;, err)
		return
	}
	fmt.Printf(&quot;list succ,%+v&quot;, perons)
}

</code></pre>
<p>新增</p>
<pre><code class="language-go">func insert() {
   result, err := db.Exec(&quot;insert into user value (?,?,?,?)&quot;, &quot;120230&quot;, &quot;李四&quot;, 12, &quot;广州市&quot;)
   if err != nil {
      fmt.Println(&quot;insert err:&quot;, err)
      return
   }
   id, err := result.LastInsertId()
   if err != nil {
      fmt.Println(&quot;insert err:&quot;, err)
      return
   }
   fmt.Println(&quot;insert succ:&quot;, id)
}

</code></pre>
<p>更新</p>
<pre><code class="language-go">func update() {
   res, err := db.Exec(&quot;update user set name = ? where id = ?&quot;, &quot;赵六&quot;, &quot;120230&quot;)
   if err != nil {
      fmt.Println(&quot;update err:&quot;, err)
      return
   }
   eff, err := res.RowsAffected()
   if err != nil || eff == 0 {
      fmt.Println(&quot;update err:&quot;, err)
      return
   }
   fmt.Println(&quot;Update succ&quot;)
}

</code></pre>
<p>删除</p>
<pre><code class="language-go">func delete() {
   res, err := db.Exec(&quot;delete from user where id = ?&quot;, &quot;120230&quot;)
   if err != nil {
      fmt.Println(&quot;delete err:&quot;, err)
      return
   }
   eff, err := res.RowsAffected()
   if err != nil || eff == 0 {
      fmt.Println(&quot;delete err:&quot;, err)
      return
   }
   fmt.Println(&quot;delete succ&quot;)
}

</code></pre>
<h1>即时通信系统/项目</h1>
<h2>即时通信系统/v0.1基础server构建</h2>
<p>server.go</p>
<pre><code class="language-go">package main

import (
	&quot;fmt&quot;
	&quot;net&quot;
)

type Server struct {
	Ip   string
	Port int
}

// 创建一个server的接口
func NewServer(ip string, port int) *Server {
	server := &amp;Server{
		Ip:   ip,
		Port: port,
	}
	return server
}

func (this *Server) Handler(conn net.Conn) {
	// ...当前链接的业务
	fmt.Println(&quot;链接建立成功&quot;, conn)
}

// 启动服务器的接口
func (this *Server) Start() {
	// socket listen
	listener, err := net.Listen(&quot;tcp&quot;, fmt.Sprintf(&quot;%s:%d&quot;, this.Ip, this.Port))
	if err != nil {
		fmt.Println(&quot;net.Listen err:&quot;, err)
		return
	}

	// close listen socket
	defer listener.Close()

	for {
		// accept
		conn, err := listener.Accept()
		if err != nil {
			fmt.Println(&quot;listener accept err:&quot;, err)
			continue
		}
		// do handler
		go this.Handler(conn)
	}
}

</code></pre>
<p>main.go</p>
<pre><code class="language-go">package main

func main() {
	server := NewServer(&quot;127.0.0.1&quot;, 9999)
	server.Start()
}

</code></pre>
<p>编译命令</p>
<pre><code class="language-sh">go build -o server main.go server.go

</code></pre>
<p>编译完成会多一个server文件</p>
<p>执行</p>
<pre><code class="language-sh">./server

</code></pre>
<p>可以在浏览器访问<code>127.0.0.1:9999</code>，或者终端输入命令<code>nc 127.0.0.1:9999</code>，进行验证服务是否开启成功。</p>
<h2>即时通信系统/v0.2用户上线及广播功能</h2>
<p>server.go</p>
<pre><code class="language-go">package main

import (
	&quot;fmt&quot;
	&quot;net&quot;
	&quot;sync&quot;
)

type Server struct {
	Ip   string
	Port int

	// 在线用户的列表
	OnlineMap map[string]*User
	mapLock   sync.RWMutex

	// 消息广播的channel
	Message chan string
}

// 创建一个server的接口
func NewServer(ip string, port int) *Server {
	server := &amp;Server{
		Ip:        ip,
		Port:      port,
		OnlineMap: make(map[string]*User),
		Message:   make(chan string),
	}
	return server
}

// 监听Message广播消息channel的goroutine，一旦有消息就发送给全部的在线User
func (this *Server) ListenMessager() {
	for {
		msg := &lt;-this.Message

		//	将msg发送给全部的在线User
		this.mapLock.Lock()
		for _, cli := range this.OnlineMap {
			cli.C &lt;- msg
		}
		this.mapLock.Unlock()
	}
}

// 广播消息的方法
func (this *Server) BroadCast(user *User, msg string) {
	sendMsg := &quot;[&quot; + user.Addr + &quot;]&quot; + user.Name + &quot;:&quot; + msg
	this.Message &lt;- sendMsg
}

func (this *Server) Handler(conn net.Conn) {
	// ...当前链接的业务
	//fmt.Println(&quot;链接建立成功&quot;, conn)
	user := NewUser(conn)

	// 用户上线了，将用户加入到onlineMap中
	this.mapLock.Lock()
	this.OnlineMap[user.Name] = user
	this.mapLock.Unlock()

	// 广播当前用户上线消息
	this.BroadCast(user, &quot;已上线&quot;)

	//	当前handler阻塞
	select {}
}

// 启动服务器的接口
func (this *Server) Start() {
	// socket listen
	listener, err := net.Listen(&quot;tcp&quot;, fmt.Sprintf(&quot;%s:%d&quot;, this.Ip, this.Port))
	if err != nil {
		fmt.Println(&quot;net.Listen err:&quot;, err)
		return
	}

	// close listen socket
	defer listener.Close()

	//启动监听Message的goroutine
	go this.ListenMessager()

	for {
		// accept
		conn, err := listener.Accept()
		if err != nil {
			fmt.Println(&quot;listener accept err:&quot;, err)
			continue
		}
		// do handler
		go this.Handler(conn)
	}
}

</code></pre>
<p>user.go</p>
<pre><code class="language-go">package main

import &quot;net&quot;

type User struct {
	Name string
	Addr string
	C    chan string
	conn net.Conn
}

// 创建一个用户的API
func NewUser(conn net.Conn) *User {
	userAddr := conn.RemoteAddr().String()
	user := &amp;User{
		Name: userAddr,
		Addr: userAddr,
		C:    make(chan string),
		conn: conn,
	}

	// 启动监听当前User channel消息的goroutine
	go user.ListenMessage()

	return user
}

// 监听当前User channel的方法，一旦有消息，就直接发送给对端客户端
func (this *User) ListenMessage() {
	for {
		msg := &lt;-this.C
		this.conn.Write([]byte(msg + &quot;\n&quot;))
	}
}

</code></pre>
<p>main.go</p>
<pre><code class="language-go">package main

func main() {
	server := NewServer(&quot;127.0.0.1&quot;, 9999)
	server.Start()
}

</code></pre>
<p>编译、执行</p>
<pre><code class="language-sh">go build -o server main.go server.go user.go

./server

</code></pre>
]]></content>
</entry>
<entry>
  <title>Web Component</title>
  <link href="https://ganto.me/post/20230412"/>
  <id>https://ganto.me/post/20230412</id>
  <updated>2023-04-12T00:00:00+08:00</updated>
  <published>2023-04-12T00:00:00+08:00</published>
  <author><name>干徒</name></author>
  <summary><![CDATA[原生Web Component的使用]]></summary>
  <content type="html"><![CDATA[<p><a href="https://developer.mozilla.org/zh-CN/docs/Web/API/Web_components">Web Component MDN</a></p>
<h2>例子1：</h2>
<pre><code class="language-html">&lt;!DOCTYPE html&gt;
&lt;html lang=&quot;en&quot;&gt;
&lt;head&gt;
  &lt;meta charset=&quot;UTF-8&quot;&gt;
  &lt;meta name=&quot;viewport&quot; content=&quot;width=device-width, initial-scale=1.0&quot;&gt;
  &lt;title&gt;Document&lt;/title&gt;
&lt;/head&gt;
&lt;body&gt;
  &lt;popup-info text=&quot;web components&quot; style=&quot;background-color: 50px;&quot;/&gt;

  &lt;script&gt;
    // Create a class for the element
    class PopUpInfo extends HTMLElement {
      constructor() {
        // Always call super first in constructor
        super();

        // Create a shadow root
        var shadow = this.attachShadow({ mode: &quot;open&quot; });

        // Create spans
        var wrapper = document.createElement(&quot;span&quot;);
        wrapper.setAttribute(&quot;class&quot;, &quot;wrapper&quot;);
        var icon = document.createElement(&quot;span&quot;);
        icon.setAttribute(&quot;class&quot;, &quot;icon&quot;);
        icon.setAttribute(&quot;tabindex&quot;, &quot;0&quot;);
        var info = document.createElement(&quot;span&quot;);
        info.setAttribute(&quot;class&quot;, &quot;info&quot;);

        // Take attribute content and put it inside the info span
        var text = this.getAttribute(&quot;text&quot;);
        info.textContent = text;

        // Insert icon
        var imgUrl;
        if (this.hasAttribute(&quot;img&quot;)) {
          imgUrl = this.getAttribute(&quot;img&quot;);
        } else {
          imgUrl = &quot;https://baidu.com/favicon.ico&quot;;
        }
        var img = document.createElement(&quot;img&quot;);
        img.style = `
          width: 50px;
          height: 50px;
          border: 2px solid #f0f;
          border-radius: 10px;
        `
        img.src = imgUrl;
        icon.appendChild(img);

        // Create some CSS to apply to the shadow dom
        var style = document.createElement(&quot;style&quot;);

        style.textContent = `
          .wrapper {
            position: relative;
          }
          
          .info {
            font-size: 0.8rem;
            width: 200px;
            display: inline-block;
            border: 1px solid black;
            padding: 10px;
            background: white;
            border-radius: 10px;
            opacity: 0;
            transition: 0.6s all;
            position: absolute;
            top: 20px;
            left: 10px;
            z-index: 3;
          }
          
          img {
            width: 20.2rem;
          }
          
          .icon:hover + .info, .icon:focus + .info {
            opacity: 1;
          }
        `;

        // attach the created elements to the shadow dom

        shadow.appendChild(style);
        shadow.appendChild(wrapper);
        wrapper.appendChild(icon);
        wrapper.appendChild(info);
      }
    }

    customElements.define(&quot;popup-info&quot;, PopUpInfo);
  &lt;/script&gt;
&lt;/body&gt;
&lt;/html&gt;
</code></pre>
<h2>例子2：</h2>
<p>这个例子使用了template标签的形式描述html结构，而不是如例子1那样，用纯js来描述html结构
index.html</p>
<pre><code class="language-html">&lt;!DOCTYPE html&gt;
&lt;html&gt;

&lt;head&gt;
  &lt;meta charset=&quot;utf-8&quot;&gt;
  &lt;meta name=&quot;viewport&quot; content=&quot;width=device-width&quot;&gt;
  &lt;title&gt;JS Bin&lt;/title&gt;
&lt;/head&gt;

&lt;body&gt;
  &lt;user-card image=&quot;https://semantic-ui.com/images/avatar2/large/kristy.png&quot; name=&quot;User Name&quot;
    email=&quot;yourmail@some-email.com&quot;&gt;&lt;/user-card&gt;

  &lt;template id=&quot;userCardTemplate&quot;&gt;
    &lt;style&gt;
      :host {
        display: flex;
        align-items: center;
        width: 450px;
        height: 180px;
        background-color: #d4d4d4;
        border: 1px solid #d5d5d5;
        box-shadow: 1px 1px 5px rgba(0, 0, 0, 0.1);
        border-radius: 3px;
        overflow: hidden;
        padding: 10px;
        box-sizing: border-box;
        font-family: 'Poppins', sans-serif;
      }

      .image {
        flex: 0 0 auto;
        width: 160px;
        height: 160px;
        vertical-align: middle;
        border-radius: 5px;
      }

      .container {
        box-sizing: border-box;
        padding: 20px;
        height: 160px;
      }

      .container&gt;.name {
        font-size: 20px;
        font-weight: 600;
        line-height: 1;
        margin: 0;
        margin-bottom: 5px;
      }

      .container&gt;.email {
        font-size: 12px;
        opacity: 0.75;
        line-height: 1;
        margin: 0;
        margin-bottom: 15px;
      }

      .container&gt;.button {
        padding: 10px 25px;
        font-size: 12px;
        border-radius: 5px;
        text-transform: uppercase;
      }
    &lt;/style&gt;

    &lt;img class=&quot;image&quot;&gt;
    &lt;div class=&quot;container&quot;&gt;
      &lt;p class=&quot;name&quot;&gt;&lt;/p&gt;
      &lt;p class=&quot;email&quot;&gt;&lt;/p&gt;
      &lt;button class=&quot;button&quot;&gt;Follow John&lt;/button&gt;
    &lt;/div&gt;
  &lt;/template&gt;

  &lt;script src=&quot;./index.js&quot;&gt;&lt;/script&gt;
&lt;/body&gt;

&lt;/html&gt;
</code></pre>
<p>index.js</p>
<pre><code class="language-js">class UserCard extends HTMLElement {
  constructor() {
    super();
    var shadow = this.attachShadow( { mode: 'closed' } );
    
    var templateElem = document.getElementById('userCardTemplate');
    var content = templateElem.content.cloneNode(true); // 这里克隆一个新的结构，而不是在原template节点上操作，因为确保原template不会变化，从而可以复用
    content.querySelector('img').setAttribute('src', this.getAttribute('image'));
    content.querySelector('.container&gt;.name').innerText = this.getAttribute('name');
    content.querySelector('.container&gt;.email').innerText = this.getAttribute('email');

    shadow.appendChild(content);
  }
}
window.customElements.define('user-card', UserCard);
</code></pre>
<h2>说明</h2>
<p><code>this.attachShadow( { mode: 'closed' } );</code> 这段代码是创建一个自定义元素
<code>mode: 'closed'</code>表示自定义组件对外部不可见，即不能通过JavaScript访问，也不能通过外部CSS样式表来直接修改其内部元素的样式
可选项为 <code>open</code>、<code>closed</code>，mode属性必须写</p>
<h2>生命周期</h2>
<table>
<thead>
<tr>
<th>函数</th>
<th>说明</th>
</tr>
</thead>
<tbody>
<tr>
<td>connectedCallback</td>
<td>自定义元素添加至页面。</td>
</tr>
<tr>
<td>disconnectedCallback</td>
<td>自定义元素从页面中移除。</td>
</tr>
<tr>
<td>adoptedCallback</td>
<td>自定义元素移动至新页面。</td>
</tr>
<tr>
<td>attributeChangedCallback</td>
<td>属性改变</td>
</tr>
</tbody>
</table>
<pre><code class="language-html">&lt;!DOCTYPE html&gt;
&lt;html&gt;

&lt;head&gt;
  &lt;meta charset=&quot;utf-8&quot;&gt;
  &lt;meta name=&quot;viewport&quot; content=&quot;width=device-width&quot;&gt;
  &lt;title&gt;Web Component&lt;/title&gt;
&lt;/head&gt;

&lt;body&gt;
  &lt;iframe id=&quot;iframe&quot; style=&quot;display: none;&quot; frameborder=&quot;0&quot;&gt;&lt;/iframe&gt;

  &lt;my-com class=&quot;my-com&quot; data=&quot;123&quot;&gt;&lt;/my-com&gt;
  &lt;button onclick=&quot;document.querySelector('.my-com').remove()&quot;&amp;gt;移除组件&lt;/button&gt;
  &lt;button onclick=&quot;move()&quot;&amp;gt;移动到新页面&lt;/button&gt;
  &lt;button onclick=&quot;document.querySelector('.my-com').setAttribute('data', '456')&quot;&amp;gt;变更属性&lt;/button&gt;

  &lt;script&gt;
    function move() {
      const iframeNode = document.querySelector('#iframe').contentDocument
      console.dir(iframeNode, '===');
      const myComNode = document.querySelector('.my-com')
      iframeNode.body.appendChild(myComNode.cloneNode(true))

      // document.querySelector('.my-com').remove()
    }
  &lt;/script&gt;
  &lt;script src=&quot;./MyCom.js&quot;&gt;&lt;/script&gt;
&lt;/body&gt;

&lt;/html&gt;
</code></pre>
<pre><code class="language-js">class MyCom extends HTMLElement {
  constructor() {
    super();
    var shadow = this.attachShadow({ mode: &quot;open&quot; });

    const div = document.createElement(&quot;div&quot;)
    div.innerHTML = &quot;123&quot;

    shadow.appendChild(div)
  }

  static get observedAttributes() {
    return ['data'];
  }

  connectedCallback() {
    console.log(&quot;自定义元素添加至页面。&quot;);
  }

  disconnectedCallback() {
    console.log(&quot;自定义元素从页面中移除。&quot;);
  }

  adoptedCallback() {
    console.log(&quot;自定义元素移动至新页面。&quot;);
  }

  attributeChangedCallback(name, oldValue, newValue) {
    console.log(`属性 ${name} 已变更。 变更前 ${oldValue}, 变更后 ${newValue} 。`);
  }
}

customElements.define(&quot;my-com&quot;, MyCom);
</code></pre>
]]></content>
  <category term="JavaScript"/>
  <category term="Web Component"/>
</entry>
<entry>
  <title>Java学习笔记</title>
  <link href="https://ganto.me/post/20230301"/>
  <id>https://ganto.me/post/20230301</id>
  <updated>2023-03-01T00:00:00+08:00</updated>
  <published>2023-03-01T00:00:00+08:00</published>
  <author><name>干徒</name></author>
  <summary><![CDATA[基础👇 简单Java类 第一种开发要求 类名称必须存在有意义，例如：Book、Emp； 类之中所有的属性必须private封装，封装后的属性必须提供有setter、getter方法； 类之中可以提供有任意多个构造方法，但是必须保留有一个无参构造方法； 类之中不允许出现任何的输出语句，所有的信息输出必须交给被调用处输出； 类之中需要提供有一个取得对象完整信息的方法，暂定为：getInfo()，而且返回String型数据； 范例 class Emp{ // 定义一个有意义的类 // 用private封装 private int empno; private String ename; private String job; private double sal; private double comm; public Emp(){} // 无参构造方法 public Emp(int empno,String ename,String job,double sal,double comm){ // 有参构造方法 empno = empno; ename = ename; job = job;]]></summary>
  <content type="html"><![CDATA[<h1>基础👇</h1>
<h1>简单Java类</h1>
<h3>第一种开发要求</h3>
<ul>
<li>类名称必须存在有意义，例如：Book、Emp；</li>
<li>类之中所有的属性必须private封装，封装后的属性必须提供有setter、getter方法；</li>
<li>类之中可以提供有任意多个构造方法，但是必须保留有一个无参构造方法；</li>
<li>类之中不允许出现任何的输出语句，所有的信息输出必须交给被调用处输出；</li>
<li>类之中需要提供有一个取得对象完整信息的方法，暂定为：getInfo()，而且返回String型数据；</li>
</ul>
<h3>范例</h3>
<pre><code class="language-java">class Emp{ // 定义一个有意义的类

    // 用private封装
    private int empno;
    private String ename;
    private String job;
    private double sal;
    private double comm;

    public Emp(){} // 无参构造方法
    public Emp(int empno,String ename,String job,double sal,double comm){ // 有参构造方法
        empno = empno;
        ename = ename;
        job = job;
        sal = sal;
        comm = comm;
    }

    // setter方法
    public void setEmpno(int e){
        empno = e;
    }
    public void setEname(String e){
        ename = e;
    }
    public void setJob(String j){
        job = j;
    }
    public void setSal(double s){
        sal = s;
    }
    public void setComm(double c){
        comm = c;
    }

    // getter方法
    public int getEmpno(){
        return empno;
    }
    public String getEname(){
        return ename;
    }
    public String getJob(){
        return job;
    }
    public double getSal(){
        return sal;
    }
    public double getComm(){
        return comm;
    }
    
    public String getInfo(){ // 取得对象完整信息的方法
        return &quot;雇员编号：&quot; + empno + &quot;\n&quot; + 
               &quot;雇员姓名：&quot; + ename + &quot;\n&quot; + 
               &quot;雇员职位：&quot; + job + &quot;\n&quot; + 
               &quot;基本工资：&quot; + sal + &quot;\n&quot; + 
               &quot;佣    金：&quot; + comm;
    }
}
public class Demo{
    public static void main(String args[]){
        Emp e = new Emp(7369,&quot;SMITH&quot;,&quot;CLERK&quot;,800.0,1.0);
        e.setEname(&quot;ALLEN&quot;);
        System.out.println(e.getInfo());
        System.out.println(&quot;姓名：&quot; + e.getEname());
    }
}

</code></pre>
<h1>数组的定义与使用</h1>
<h3>数组的基本概念</h3>
<ul>
<li>
<p>声明并开辟数组：</p>
<p>数据类型 数组名称[] = new 数据类型[长度];</p>
<p>数据类型[] 数组名称 = new 数据类型[长度];</p>
</li>
<li>
<p>分布完成：</p>
<ul>
<li>
<p>声明数组：数据类型 数组名称[] = null;</p>
</li>
<li>
<p>开辟数组：数组名称 = new 数据类型[长度];</p>
</li>
</ul>
</li>
</ul>
<h3>定义数组</h3>
<pre><code class="language-java">public class Demo{
    public static void main(String args[]){
        // 声明并开辟了一个三个长度的数组
        int data[] = new int[3];

        // 给数组赋值，int类型的数组默认值为0
        data[0] = 0;
        data[1] = 1;
        data[2] = 2;

        System.out.println(data[0]); // 获取数组下标为0的数据

        System.out.println(data.length); // 获取数组长度

        for(int i = 0; i &lt; data.length; i++){ // 利用for循环，将数组中的所有数据输出
            System.out.println(data[i]);
        }
    }
}

</code></pre>
<p>上方为数组为动态初始化</p>
<p>下方为数组静态初始化</p>
<ul>
<li>格式一：简化格式
<ul>
<li>数据类型 数组名称[] = {值,值,值,...};</li>
</ul>
</li>
<li>格式二：完整格式
<ul>
<li>数据类型 数组名称[] = new 数据类型[] {值,值,值,...};</li>
</ul>
</li>
</ul>
<h3>定义数组</h3>
<pre><code class="language-java">public class Demo{
    public static void main(String args[]){
        int data[] = new int[]{1,2,3,4,5};
        for(int i = 0; i &lt; data.length; i++){ 
            System.out.println(data[i]);
        }
    }
}

</code></pre>
<h1>二维数组</h1>
<h3>语法</h3>
<pre><code class="language-java">动态初始化：数据类型 数组名称[][] = new 数据类型[行的个数][列的个数];
静态初始化：数据类型 数组名称[][] = new 数据类型[][]{{值,值,值,...},{值,值,值,...}};

</code></pre>
<h3>范例</h3>
<pre><code class="language-java">public class Demo{
    public static void main(String args[]){
        int data[][] = new int[][]{
            {1,2,3},
            {4,5,6},
            {7,8,9}
        };
        for(int i = 0; i &lt; data.length; i++){
            for(int j = 0; j &lt; data[i].length; j++){
                System.out.print(data[i][j] + &quot;\t&quot;);
            }
            System.out.println();
        }
    }
}

</code></pre>
<h1>数组与方法参数的传递</h1>
<h3>范例：一个数组传递的程序</h3>
<pre><code class="language-java">public class Demo{
    public static void main(String args[]){
        int data[] = new int[]{1,2,3};
        change(data);
        for(int i = 0; i &lt; data.length; i++){
            System.out.println(data[i]);
        }
    }
    public static void change(int temp[]){
        for(int i = 0; i &lt; temp.length; i++){
            temp[i] *= 2;
        }
    }
}

</code></pre>
<h3>实现一个数组排序</h3>
<pre><code class="language-java">public class Demo{
    public static void main(String args[]){
        int data[] = new int[]{2,1,9,0,5,4,3,7,6,8};
        print(data);
    }
    public static void print(int temp[]){
        for(int i = 0; i &lt; temp.length; i++){
            System.out.print(temp[i] + &quot;、&quot;);
        }
        System.out.println();
    }
}

</code></pre>
<h1>方法</h1>
<h2>重载</h2>
<p>方法重载又被称为：overload</p>
<p>在同一个类中，方法名相同，参数列表（参数数量、参数类型、参数顺序）不同，就是方法重载。</p>
<pre><code class="language-java">// 参数数量不同
public class Hello
{
  public static void main(String[] args) {
    sum(1);
		sum(1, 2);
  }
  
  public static void sum(int num1) {
		System.out.print(&quot;方发一&quot;);
  }
  public static void sum(int num2, int num1) {
		System.out.print(&quot;方发二&quot;);
  }
}

</code></pre>
<pre><code class="language-java">// 参数类型不同
public class Hello
{
  public static void main(String[] args) {
    System.out.print(sum(1, 2));
    System.out.print(sum(&quot;百度&quot;, &quot;一下&quot;));
    System.out.print(sum(1.2, 2.3));
  }
  
  public static int sum(int num1, int num2) {
		return num1 + num2;
  }
  
  public static String sum(String str1, String str2) {
    return str1 + str2;
  }
  
  public static double sum(double num1, double num2) {
    return num1 + num2;
  }
}

</code></pre>
<pre><code class="language-java">// 参数顺序不同
public class Hello
{
  public static void main(String[] args) {
    sum(1, &quot;123&quot;);
		sum(&quot;123&quot;, 1);
  }
  
  public static void sum(int num1, String num2) {
		System.out.print(&quot;方发一&quot;);
  }
  public static void sum(String num2, int num1) {
		System.out.print(&quot;方发二&quot;);
  }
}

</code></pre>
<h2>封装</h2>
<ul>
<li>所有属性私有化，使用<code>private</code>关键字斤西瓜修饰，private表示私有的，修饰的所有数据只能在本类中访问。</li>
<li>对外提供简单的操作入口，也就是说以后外部程序想要访问age属性，必须通过这些简单的入口进行访问。</li>
</ul>
<pre><code class="language-java">package com.ganto.www;

public class User {
  private int age;

  public int getAge() {
    return age;
  }

  public void setAge(int age) {
    if(age &lt;= 0 || age &gt;= 150) {
      return;
    }
    this.age = age;
  }
}

</code></pre>
<blockquote>
<p>setter、getter方法没有static关键字</p>
<p>有static关键字修饰的方法通过<code>类名.方法名(实参)</code>调用</p>
<p>没有static关键字修饰的方法通过<code>引用.方法名(实参)</code>调用</p>
<p>static关键字，其实就是将变量或者方法暴漏在全局变量中，可以直接通过<code>类名.</code>的形式，去操作</p>
</blockquote>
<pre><code class="language-java">package com.ganto.www;

public class Main {
  public static void main(String[] args) {

    // 实例化对象
    User u = new User();

    u.setAge(2);

    System.out.println(u.getAge());
  }
}

</code></pre>
<h3>构造方法</h3>
<ul>
<li>构造方法又被称作构造函数、构造器、Constructor</li>
<li>构造方法的语法结构：<code>修饰符列表 构造方法名(形参列表){构造方法体};</code></li>
<li>构造方法的方法名就是本类的类名</li>
<li>构造方法的作用：
<ul>
<li>构造方法存在的意义是，通过构造方法的调用，可以创建对象</li>
<li>创建对象的同时，初始化实例变量的内存空间（将没有赋值的实例变量进行初始化）</li>
</ul>
</li>
<li>构造方法怎么调用：<code>User u = new User();</code>，可以看出构造方法调用就是实例化对象</li>
<li>构造方法如果在类中没有定义的话，会默认创建一个没有参数的构造方法</li>
<li>构造方法可以重载</li>
</ul>
<pre><code class="language-java">package com.ganto.www;

public class User {
  public User() {

  }
  public User(int i) {
    
  }
}

</code></pre>
<h3>this关键字</h3>
<p>实例化对象的对象中才有this：<code>User u = new User();</code></p>
<h3>static关键字</h3>
<p>通过static关键字声明的方法，通过<code>类名.方法名</code>进行调用</p>
<p>没有通过static关键字声明的方法，通过<code>引用.方法名</code>进行调用</p>
<h2>继承</h2>
<p>(1) Java是一门面向对象的编程语言，有三大特性：封装、继承、多态</p>
<p>(2) 继承基本的作用是：代码复用。但是继承最重要的作用是：有了继承才有了以后方法的覆盖和多态机制</p>
<p>(3) 继承的语法格式：</p>
<pre><code class="language-scala">[修饰符列表] class 类名 extends 父类名 {	
	类体 = 属性 + 方法
}

</code></pre>
<p>(4) java语言当中的继承只支持单继承，一个类不能同时继承很多类，只能继承一个类。在C++中支持多继承。</p>
<p>(5) 关于继承中的一些术语：</p>
<p>B类继承A类，其中：</p>
<p>A类称为：父类、基类、超类、superclass</p>
<p>B类称为：子类、派生类、subclass</p>
<p>(6) 在java语言中子类继承父类：</p>
<p>- 私有的不支持继承<br />
- 构造方法不支持继承<br />
- 其他数据都可以被继承</p>
<p>(7) 虽然java语言中当中支持单继承，但是一个类也可以间接继承其他类，例如：</p>
<p>C extends B {}</p>
<p>B extends A {}</p>
<p>A extends T {}</p>
<p>其中C类直接继承B类，但是C类间接继承B类、T类</p>
<p>(8) java语言中假设一个类没有显示继承任何自定义类，则该类默认继承JavaSE库中提供的java.lang.Object类。</p>
<h3>方法重写</h3>
<p>当父类中的方法已经不能满足子类中的需求了，就需要在子类中将继承过来的方法进行重写/覆盖。</p>
<h2>多态</h2>
<p>关于多态中涉及到的几个概念：</p>
<ul>
<li>
<p>向上转型（upcasting）</p>
<p>子类型 =》父类型（自动类型转换）</p>
</li>
<li>
<p>向下转型（downcasting）</p>
<p>父类型 =》子类型（强制类型转换）</p>
</li>
<li>
<p>无论是向上转型还是向下转型，梁总类型之间必须要有继承关系。没有继承关系，程序无法编译通过。</p>
</li>
</ul>
<p>例子：</p>
<p>Animal.java</p>
<pre><code class="language-java">package com.ganto.www;

// 动物类
public class Animal {
    public void move() {
        System.out.println(&quot;动物在移动&quot;);
    }
}

</code></pre>
<p>Cat.java</p>
<pre><code class="language-java">package com.ganto.www;

// 猫类
public class Cat extends Animal{
    // 重写Animal中继承过来的方法
    public void move() {
        System.out.println(&quot;猫在奔跑&quot;);
    }

    // 不是从父类中继承过来的方法，这个方法是猫类中特有的行为
    public void catchM() {
        System.out.println(&quot;猫抓老鼠&quot;);
    }
}

</code></pre>
<p>Bird.java</p>
<pre><code class="language-java">package com.ganto.www;

// 鸟儿类
public class Bird extends Animal{
    public void move() {
        System.out.println(&quot;鸟儿在飞翔&quot;);
    }
}

</code></pre>
<p>Test.java</p>
<pre><code class="language-java">package com.ganto.www;

// 测试类
public class Test {
    public static void main(String[] args) {
        Animal a = new Cat();
        a.move(); // 正常 运行Cat()类中的方法
      	// a.catchM(); // 报错
    }
}

</code></pre>
<p>以上代码属于向上类型转换，a.move()先根据Animal类型进行编译，然后运行时是根据实例Cat进行运行，所以拥有多种形态，被称为多态。</p>
<p>如果a.catchM()将会报错，因为在第一阶段编译都没有通过，编译会先查找Animal中的catchM()方法， 然后没有找到就会报错，编译没有找到，更别说运行了。</p>
<p>如果就是想让a.catchM()可以运行，需要将a转换成Cat类型<code>(Cat) a</code>，这是向下装换。</p>
<p>Test.java</p>
<pre><code class="language-java">package com.ganto.www;

public class Test {
    public static void main(String[] args) {
        Animal a = new Cat();
        a.move();
      	
        ((Cat) a).catchM();
      	
      	// Cat c = (Cat)a; // 这俩行代码行方法代码相同
      	// c.catchM();
    }
}

</code></pre>
<p>向下类型转换出现的异常情况</p>
<pre><code class="language-java">package com.ganto.www;

public class Test {
    public static void main(String[] args) {
        Animal a = new Bird();
      	Cat c = (Cat)a;
    }
}

</code></pre>
<p>以上代码虽然编译不会报错，但是运行会报强制类型转换的异常，详情请看<a href="#java.lang.ClassCastException">#java.lang.ClassCastException</a></p>
<p>解决办法如下，先通过<code>instanceof</code>判断a的指向类型，再进行安全的强制类型转换</p>
<pre><code class="language-java">package com.ganto.www;

public class Test {
    public static void main(String[] args) {
        Animal a = new Bird();
        if(a instanceof Cat){
            Cat c = (Cat) a;
            c.catchM();
        }else if(a instanceof Bird) {
            Bird b = (Bird) a;
            b.eat();
        }
    }
}

</code></pre>
<h3>多态作用</h3>
<p>多态的作用：面向抽象编程，尽量不要面向具体编程。</p>
<blockquote>
<p>降低程序的耦合度，提高程序的扩展力。</p>
<p>能使用多态尽量使用多态。</p>
<p>父类型引用指向子类型对象。</p>
</blockquote>
<p>宠物类 Pet.java</p>
<pre><code class="language-java">package com.ganto.www;

/**
 * 宠物类
 */
public class Pet {
    public void eat() {
        System.out.println(&quot;吃东西&quot;);
    }
}

</code></pre>
<p>猫类 Cat.java</p>
<pre><code class="language-java">package com.ganto.www;

/**
 * 宠物猫
 */
public class Cat extends Pet{
    public void eat() {
        System.out.println(&quot;小猫正在吃鱼！&quot;);
    }
}

</code></pre>
<p>小狗类 Dog.java</p>
<pre><code class="language-java">package com.ganto.www;

/**
 * 小狗类
 */
public class Dog extends Pet{
    public void eat() {
        System.out.println(&quot;小狗在啃骨头！&quot;);
    }
}

</code></pre>
<p>主人类 Ren.java</p>
<pre><code class="language-java">package com.ganto.www;

/**
 * 主人类
 */
public class Ren {
    // 喂养宠物
    public void feed(Pet p) {
        p.eat();
    }
}

</code></pre>
<p>测试类 Test.java</p>
<pre><code class="language-java">package com.ganto.www;

/**
 * 测试类
 */
public class Test {
    public static void main(String[] args) {
        Ren r = new Ren();
        r.feed(new Cat());
        r.feed(new Dog());
    }
}

</code></pre>
<h2>final关键字</h2>
<p>1、final是一个关键字，表示最终的，不可变的</p>
<p>2、final修饰的类无法被继承</p>
<p>3、final修饰的方法无法被覆盖</p>
<p>4、final修饰的变量一旦赋值之后，不可重新赋值</p>
<p>5、final修饰的实例变量必须手动赋值，或者在构造方法中赋值，两者本质都是需要手动赋值，不能使用默认值</p>
<p>6、final修饰的引用，一旦指向某个对象后，不能重新指向别的对象地址，那么被指向的对象无法被垃圾回收器回收</p>
<p>7、final修饰的实例变量，一般和static联合使用，被称为常量</p>
<p>常量的定义语法格式：<code>public static final 类型 常量名 = 值</code></p>
<p>Java规范中要求所有常量的名字全部大写，每个单词之间使用下划线连接。</p>
<pre><code class="language-java">package com.ganto.www;
/**
 * 测试类
 */
public class Test {
    public static void main(String[] args) {
        System.out.println(Chinese.GUO_JI);
        System.out.println(&quot;圆周率：&quot; + Math.PI);
    }
}
class Math{
    public static final double PI = 3.1415926;
}
class Chinese{
    public static final String GUO_JI = &quot;中国&quot;;
}

</code></pre>
<h1>package和import</h1>
<p>关于java语言中的包机制：</p>
<p>1、包又称为package，java中引入package这种语法机制只要是为了方便程序的管理。不同功能的类被分门别类放到不同的软件包当中，查找比较方便，管理比较方便，以维护。</p>
<p>2、怎么定义package呢？</p>
<ul>
<li>在java源程序的第一行上编写package语句。</li>
<li>package只能编写一个语句。</li>
<li>语法架构：
<ul>
<li>package 包名;</li>
</ul>
</li>
</ul>
<p>3、报名的命名规范：</p>
<ul>
<li>公司域名倒序 + 项目名 + 模块名 + 功能名；</li>
<li>采用这种方式重名的几率较低。因为公司域名具有全球唯一性。</li>
</ul>
<p>4、包名要求全部小写，包名也是标识符，必须遵循标识符的命名规则。</p>
<p>5、一个包将来对应的是一个目录。目录之间使用<code>.</code>隔开</p>
<p>6、使用了package机制之后，类名将要加上完整的包名才是完整的类名</p>
<p><code>com.ganto.www.Test</code></p>
<p>两个类在同一个软件包中，可以只写类名，可以省略包名。如果不再同一个软件包中，可以使用import将软件包引入后，也可以只写类名，也可以省略包名。</p>
<p>com/ganto/www/demo/Demo.java</p>
<pre><code class="language-java">package com.ganto.www.demo;

public class Demo {
    public void console() {
        System.out.println(&quot;com.ganto.www.demo.Demo&quot;);
    }
}

</code></pre>
<p>com/ganto/www/Test.java</p>
<pre><code class="language-java">package com.ganto.www
  
import com.ganto.www.demo.Demo;
// import com.ganto.www.demo.*;

public class Test {
    public static void main(String[] args) {
        Demo d = new Demo();
        d.console();
    }
}

</code></pre>
<p>import需要写在package之下class之上。</p>
<h1>访问控制权限</h1>
<p>1、访问控制权限修饰符来控制元素的访问范围。</p>
<p>2、访问控制权限修饰符包括：</p>
<table>
<thead>
<tr>
<th>修饰符</th>
<th>说明</th>
</tr>
</thead>
<tbody>
<tr>
<td>public</td>
<td>表示公开，在任何位置都可以访问</td>
</tr>
<tr>
<td>protected</td>
<td>表示受保护的，本类、同包下、子类可以访问</td>
</tr>
<tr>
<td>缺省</td>
<td>表示默认，本类、同包可以访问</td>
</tr>
<tr>
<td>private</td>
<td>表示私有的，只能在本类中访问</td>
</tr>
</tbody>
</table>
<p>protected和缺省：同一个包下都可以访问；不同的包且没有继承关系都不可以访问；不同的包必须继承后protected才能访问，缺省不能访问。</p>
<p>3、访问控制权限修饰符可以修饰类、变量、方法...</p>
<p>4、当某个数据希望子类使用，使用protected进行修饰。</p>
<p>5、修饰符的权限关系：<code>private &amp;lt; 缺省 &lt; protected &lt; public</code></p>
<p>6、类、接口只能采用public和缺省(default)的修饰符进行修饰。（内部类除外）</p>
<h1>基础👆</h1>
<h1>-----------------------------------</h1>
<h1>进阶👇</h1>
<p>汽车例子：</p>
<pre><code class="language-java">package com.ganto.www;

public class Test {
    public static void main(String[] args) {
        // 通过无参数构造方法创造对象
        Vehicle v = new Vehicle();
        v.setSpeed(0);
        v.setSize(5);
        // 通过偶有参数的构造方法创建对象
        // Vehicle v1 = new Vehicle(70, 5);

        v.move();

        System.out.println(v.getSpeed());
        System.out.println(v.getSize());

        // 调用加速方法
        v.speedUp(10);
        System.out.println(v.getSpeed());

        // 调用减速方法
        v.speedDown(10);
        System.out.println(v.getSpeed());
    }
}

/**
 * 交通工具
 */
class Vehicle {
    // 速度
    private int speed;
    // 体积
    private int size;

    public Vehicle() {

    }

    public Vehicle(int speed, int size) {
        this.speed = speed;
        this.size = size;
    }

    public int getSpeed() {
        return speed;
    }

    public void setSpeed(int speed) {
        this.speed = speed;
    }

    public int getSize() {
        return size;
    }

    public void setSize(int size) {
        this.size = size;
    }

    /**
     * 交通工具的移动方法
     */
    public void move() {
        System.out.println(&quot;汽车开始行驶了！&quot;);
    }

    /**
     * 加速方法
     */
    public void speedUp(int addSpeed) {
        // speed++;
        this.setSpeed(this.getSpeed() + addSpeed);
    }

    /**
     * 减速方法
     */
    public void speedDown(int subSpeed) {
        // speed++;
        if(this.getSpeed()&lt;=0) {
            return;
        }
        this.setSpeed(this.getSpeed() - subSpeed);
    }
}

</code></pre>
<h1>抽象类</h1>
<blockquote>
<p>类到对象是实例化；对象到类是抽象。</p>
<p>抽象类：</p>
<p>1、什么是抽象类？</p>
<p>类和类之间具有共同特征，将这些共同特征提取出来，形成的就是抽象类。</p>
<p>类本身是不存在的，所以抽象类无法创建对象（无法实例化）。</p>
<p>2、抽象类属于什么类型？</p>
<p>抽象类也属于引用数据类型。</p>
<p>3、抽象类怎么定义？</p>
<p>语法：<code>[修饰符列表] abstract class 类名 { 类体; }</code></p>
<p>4、抽象类是无法实例化的，无法创建对象的，所以抽象类是用来被子类继承的。</p>
<p>5、final和abstract不能联合使用，这两个关键字是对立的。</p>
<p>6、抽象类的子类还可以继续抽象。</p>
<p>7、抽象类虽然无法实例化，但是抽象类有构造方法，这个构造方法是供子类使用的。</p>
<p>8、抽象类关联到一个概念：抽象方法：抽象方法表示没有实现的方法，没有方法体的方法。</p>
<p><code>public abstract void doSome ();</code></p>
<p>（抽象方法所在的类必须是抽象类，子类继承了该抽象类，那么子类也必须是抽象类，因为子类继承了抽象类中的抽象方法）</p>
<p>抽象方法特点是：</p>
<p>特点1：没有方法体，以分号结尾；</p>
<p>特点2：前面修饰符列表中有abstract关键字。</p>
<p>9、抽象类中不一定有抽象方法，抽象方法必须出现在抽象类中。</p>
<p>10、重要结论：一个非抽象的类继承抽象类，必须将抽象类中的抽象方法实现了。这是java语法强行规定的，不然编译器会报错。这里的覆盖/重写，也可以叫做实现（对抽象的实现）。</p>
</blockquote>
<pre><code class="language-java">package com.ganto.www;

public class Test {
    public static void main(String[] args) {
        Account c = new CreditAccount(); // 这就是面向抽象编程
        c.doSome();
    }
}
abstract class Account{
    public abstract void doSome();
}
class CreditAccount extends Account{
    public void doSome() {
        System.out.println(&quot;子类在飞翔&quot;);
    }
}

</code></pre>
<h1>接口</h1>
<h2>接口中的基础语法</h2>
<blockquote>
<p>1、接口也是一种引用数据类型。编译之后也是一个class字节码文件。</p>
<p>2、接口是完全抽象的。抽象类是半抽象的。或者说接口是特殊的抽象类。</p>
<p>3、接口怎么定义，语法：<code>[修饰符列表] interface 接口名 { }</code></p>
<p>4、接口可以继承，并且接口支持多继承，一个接口可以继承多个接口。<code>interface C extends A, B{ }</code></p>
<p>5、接口中只包含两部分内容：一部分是常量、一部分是抽象方法。接口中没有其他内容了。</p>
<p>6、接口中所有的元素都是<code>public</code>修饰的。（都是公开的）</p>
<p>7、接口中的抽象方法定义时，因为接口中只有抽象方法，并且接口中的所有元素都是<code>public</code>修饰的，那么接口中的方法<code>public abstract</code>修饰符可以省略。</p>
<pre><code class="language-java">interface MyMath{
  	// 抽象方法
    // public abstract int sum(int num1, int num2);
    int sum(int num1, int num2); // 两种抽象方法写法都正确
}

</code></pre>
<p>8、接口中的方法都是抽象方法，所以接口中的方法不能有方法体。</p>
<p>9、接口中定义常量可以省略<code>public static final</code>修饰符，因为接口中定义的变量为常量，常量一旦赋值无法修改。</p>
<pre><code class="language-java">package com.ganto.www;

public class Test {
    public static void main(String[] args) {
        System.out.println(MyMath.PI);
        // MyMath.PI = 3.14; // 因为接口中定义的变量为常量，常量一旦赋值无法修改。
    }
}
interface MyMath {
    // 常量
    // public static final double PI = 3.1415926;
    double PI = 3.1415926; // 两种常量写法都正确
}

</code></pre>
</blockquote>
<blockquote>
<p>类和类之间叫<code>继承</code>，类和接口之间叫做<code>实现</code>。</p>
<p>仍然可以将其看作<code>继承</code>。</p>
<p><code>继承</code>使用<code>extends</code>关键字完成。</p>
<p><code>实现</code>使用<code>implements</code>关键字完成。</p>
<p>当一个非抽象的类实现接口的话，必须将接口中的所有抽象方法全部实现（覆盖、重写）。</p>
<pre><code class="language-java">package com.ganto.www;

public class Test {
       public static void main(String[] args) {
           MyMath m = new MyMathImpl();
           System.out.println(m.PI);
           System.out.println(m.sum(5, 2));
           System.out.println(m.sub(5, 2));
       }
}

// 接口
interface MyMath {
       // 常量
       double PI = 3.1415926;
       // 抽象方法
       int sum(int a, int b);
       int sub(int a, int b);
}
// 类实现接口
class MyMathImpl implements MyMath{
       // 实现抽象方法
       public int sum(int a, int b) {
           return a + b;
       }
       public int sub(int a, int b) {
           return a - b;
       }
}

</code></pre>
<p>子类实现接口中的方法时，不能省略<code>public</code>关键字，因为接口中的抽象方法修饰符只能为<code>public</code>，而子类对接口中的抽象方法进行重写时，重写的方法的修饰符不能比接口中的抽象方法修饰符权限低。</p>
</blockquote>
<p>类和接口可以多实现</p>
<p>接口和接口支持多继承，那么类和接口也可以多实现。</p>
<pre><code class="language-java">package com.ganto.www;

public class Test {
    public static void main(String[] args) {
        MyMath m = new MyMathImpl();
        System.out.println(m.PI);
        System.out.println(m.sum(5, 2));
        System.out.println(m.sub(5, 2));
        A a = new MyMathImpl();
        System.out.println(a.add(5));
    }
}

// 接口
interface MyMath {
    // 常量
    double PI = 3.1415926;
    // 抽象方法
    int sum(int a, int b);
    int sub(int a, int b);
}

interface A {
    int add(int anum);
}

// 类实现接口
class MyMathImpl implements MyMath, A{
    // 实现抽象方法
    public int sum(int a, int b) {
        return a + b;
    }
    public int sub(int a, int b) {
        return a - b;
    }
    public int add(int anum) {
        return anum;
    }
}

</code></pre>
<p>继承和实现同时存在，继承extends在前，实现implements在后</p>
<pre><code class="language-java">package com.ganto.www;

public class Test {
    public static void main(String[] args) {
        Flyable f = new Cat();
        f.fly();
    }
}
class Animal{

}
interface Flyable{
    void fly();
}
class Cat extends Animal implements Flyable{
    public void fly() {
        System.out.println(&quot;猫有了翅膀&quot;);
    }
}

</code></pre>
<h2>接口在开发中的作用</h2>
<blockquote>
<p>接口在开发中的作用，类似于多态在开发中的作用。</p>
</blockquote>
<p>经典例子：厨师、菜单、顾客</p>
<p>菜单 FoodMenu.java</p>
<pre><code class="language-java">package com.ganto.www;
// 菜单接口
interface FoodMenu {
    // 西红柿炒鸡蛋
    void xihongshichaojidan();
    // 鱼香肉丝
    void yuxiangrousi();
}

</code></pre>
<p>中餐厨师 ChinaCooker.java</p>
<pre><code class="language-java">package com.ganto.www;
// 中餐厨师类
public class ChinaCooker implements FoodMenu{
  	// 实现接口中的抽象方法
    @Override
    public void xihongshichaojidan() {
        System.out.println(&quot;中餐师傅的西红柿炒鸡蛋做好了&quot;);
    }

    @Override
    public void yuxiangrousi() {
        System.out.println(&quot;中餐师傅的鱼香肉丝做好了&quot;);
    }
}

</code></pre>
<p>西餐厨师 AmericCooker.java</p>
<pre><code class="language-java">package com.ganto.www;
// 西餐厨师类
public class AmericCooker implements FoodMenu{
  	// 实现接口中的抽象方法
    @Override
    public void xihongshichaojidan() {
        System.out.println(&quot;西餐师傅的西红柿炒鸡蛋做好了&quot;);
    }

    @Override
    public void yuxiangrousi() {
        System.out.println(&quot;西餐师傅的鱼香肉丝做好了&quot;);
    }
}

</code></pre>
<p>顾客 Customer.java</p>
<pre><code class="language-java">package com.ganto.www;
// 顾客类
public class Customer {
		// 定义了一个私有的FoodMenu类型的引用
    private FoodMenu menu;
		
  	// 无参构造方法
    public Customer() { }
		// 有参构造方法
    public Customer(FoodMenu menu) {
        this.menu = menu;
    }
		
  	// getter setter方法
    public FoodMenu getMenu() {
        return menu;
    }

    public void setMenu(FoodMenu menu) {
        this.menu = menu;
    }
	
  	// 点菜
    public void order() {
        menu.xihongshichaojidan();
        menu.yuxiangrousi();
    }
}

</code></pre>
<p>测试类 Test.java</p>
<pre><code class="language-java">package com.ganto.www;
// 测试类
public class Test {
    public static void main(String[] args) {
        // 实例化厨师
        FoodMenu f = new ChinaCooker();
        // 实例化顾客
        Customer zhangsan = new Customer(f);
				// 点菜
        zhangsan.order();
    }
}

</code></pre>
<h1>is a、has a、like a类型与类型之间的关系</h1>
<h2>is a</h2>
<p>Cat is a Animal（猫是一个动物），凡是能满足is a的，表示“继承关系”</p>
<pre><code class="language-css">A extends B

</code></pre>
<h2>has a</h2>
<p>I has a Pen（我有一支笔），凡是能满足has a关系的，表示“关联关系”，关联关系通常以“属性”的形式存在。</p>
<pre><code class="language-css">A{
	B b;
}

</code></pre>
<h2>like a</h2>
<p>Cooker like a FoodMenu（厨师像一个菜单一样），凡是能满足like a关系的，表示“实现关系”，实现关系通常是：类实现接口。</p>
<pre><code class="language-css">A implements B

</code></pre>
<h1>抽象类和接口有什么区别？</h1>
<p>在这里我们只说一下抽象类和接口在语法上的区别。</p>
<p>至于以后抽象类和接口应该怎么进行选择，通过后面的项目去体会/学习。</p>
<blockquote>
<p>抽象类是半抽象的。</p>
<p>接口是完全抽象的。</p>
</blockquote>
<blockquote>
<p>抽象类中有构造方法。</p>
<p>接口中没有构造方法。</p>
</blockquote>
<blockquote>
<p>接口和接口之间支持多继承。</p>
<p>类和类之间只能单继承。</p>
</blockquote>
<blockquote>
<p>一个类可以同时实现多个接口。</p>
<p>一个抽象类只能继承一个类（单继承）。</p>
</blockquote>
<blockquote>
<p>接口中只允许出现常量和抽象方法。</p>
</blockquote>
<p>以后接口使用的比抽象类多。一般抽象类使用的比较少。</p>
<p>接口一般都是对“行为”的抽象。</p>
<h1>Scanner</h1>
<p>输入内容</p>
<pre><code class="language-java">java.util.*;
public class Test {
  public static void main(String[] args) {
    Scanner s = new Scanner(System.in);
    String str = s.next();
    System.out.println(&quot;输入的内容：&quot; + str);
  }
}

</code></pre>
<p><code>java.lang.*</code>这个包是Java默认自动导入的，如String、System等 都是java.lang包下的模块。</p>
<h1>Object类</h1>
<p>JDK类库中的根类：Object</p>
<p>1、这个老祖宗类中的方法我们需要先研究一下，因为这些方法都是所有子类通用的。任何一个类默认继承Object。就算没有直接继承，最终也会间接继承。</p>
<p>2、Object类中有哪些常用的方法？</p>
<p>我们去哪里找这些方法呢？</p>
<p>第一种：去源码中找。但是这种方式比较麻烦，源代码比较难懂。</p>
<p>第二种：去查阅java的类库的帮助文档。</p>
<p>目前为止我们只需要知道这几个方法即可：</p>
<ul>
<li>protected Object clone() // 负责对象克隆的</li>
<li>int hashCode() // 获取对象哈希值的一个方法</li>
<li>boolean equals(Object obj) // 判断两个对象是否相等</li>
<li>String toString() // 将对象转换成字符串形式</li>
<li>protected void finalize() // 垃圾回收器负责调用的方法</li>
</ul>
<h2>关于Object类中的toString()方法</h2>
<p>1、源代码</p>
<pre><code class="language-java">public String toString() {
  	return getClass().getName() + &quot;@&quot; + Integer.toHexString(hashCode());
}

</code></pre>
<p>源代码上toString()方法的默认实现是：类名@对象的内存地址转换为十六进制的形式。</p>
<p>toString方法需要自己重写。</p>
<pre><code class="language-java">package com.ganto.www;

public class Test {
    public static void main(String[] args) {
        MyTime time = new MyTime(1949, 10, 01);
        System.out.println(time.toString());
        System.out.println(time); // 会自动调用toString方法，和上方代码一样的效果
    }
}
class MyTime {
    int year;
    int month;
    int day;
    public MyTime() {}
    public MyTime(int year, int month, int day) {
        this.year = year;
        this.month = month;
        this.day = day;
    }

    // 重写toString()方法
    public String toString() {
        return this.year+&quot;年&quot;+this.month+&quot;月&quot;+this.day+&quot;日&quot;;
    }

}

</code></pre>
<p>如上代码，如果直接打印对象，会自动调用实例化对象类中的toString()方法。</p>
<h2>关于Object类中的equals()方法</h2>
<p>1、源代码</p>
<pre><code class="language-java">public boolean equals(Object obj) {
	return(this == obj);
}

</code></pre>
<p>判断基本数据类型是否相等，可以使用<code>==</code>，因为基本数据类型使用<code>==</code>是比较的两个变量的值。</p>
<p>判断两个java对象是否相等不能使用<code>==</code>，因为java中<code>==</code>是比较两个对象的内存地址。</p>
<p>所以源码使用了<code>==</code>，所以不能用源码中的equals()方法进行比较对象是否相等。所以需要我们重写equals()方法。</p>
<p>相同的返回值类型、相同的方法名、相同的形式参数列表。</p>
<pre><code class="language-java">package com.ganto.www;

import java.util.Objects;

public class Test {
    public static void main(String[] args) {
        MyTime time1 = new MyTime(1949, 10, 1);
        MyTime time2 = new MyTime(1949, 10, 1);
        System.out.println(time1.equals(time2));
    }
}
class MyTime {
    int year;
    int month;
    int day;
    public MyTime() {}
    public MyTime(int year, int month, int day) {
        this.year = year;
        this.month = month;
        this.day = day;
    }

    @Override
    public boolean equals(Object o) {
        /**
         * 这里重写的equals方法中进行了三次判断
         * 1、粗略判断两个对象内存地址是否相等，如果相等则直接可以确定两个对象相等，如果不相等则走第2步
         * 2、判断传过来的对象是否是MyTime类型，如果不是则直接false，只有两者都是MyTime对象才有比较的意义，第2步是为第3步做准备
         * 3、判断两个对象中的参数的值是否相等，如果全部相等则才能证明两个对象相等。
         */
        if (this == o) return true;
        if (!(o instanceof MyTime)) return false;
        MyTime myTime = (MyTime) o;
        // 当年、月、日 都相等时，表示两个日期相等，即两个对象相等。
        return year == myTime.year &amp;&amp; month == myTime.month &amp;&amp; day == myTime.day;
    }
}

</code></pre>
<p>以上的equals()方法是IDEA生成的，感觉写的很好。</p>
<h2>java.lang.String源码中重写了toString、equals方法</h2>
<p>java中的字符串java.lang.String类中也重写了toString方法和equals方法。</p>
<pre><code class="language-java">package com.ganto.www;

public class Test {
    public static void main(String[] args) {
        // 大部分情况下，我们采用s1、s2这两个变量的形式来进行创建字符串对象
        String s1 = &quot;hello&quot;;
        String s2 = &quot;hello&quot;;
        System.out.println(s1 == s2); // true

        // 实际上String也是一个类，不属于基本数据类型
        // 既然String是一个类，那么一定存在构造方法
        String s3 = new String(&quot;hello&quot;);
        String s4 = new String(&quot;hello&quot;);
        System.out.println(s3 == s4); // false
        System.out.println(s3.equals(s4)); // true
    }
}


</code></pre>
<p>所以如果方法中存在String类型变量，重写equals方法时判断String类型的变量要使用String方法中的equals方法进行判断比较好一些。</p>
<blockquote>
<p>总结：</p>
<ul>
<li>java中的基本数据类型比较使用<code>==</code>。</li>
<li>java中的所有的引用数据类型统一使用<code>equals()</code>方法来判断是否相等。</li>
</ul>
</blockquote>
<h2>finalize()方法 （看看了解就好，新版本被弃用了）</h2>
<p>1、这个方法是protected修饰的，在Object类中的源代码：</p>
<pre><code class="language-java">protected void finalize() throws Throwable{ }

</code></pre>
<p>2、这个方法只有一个方法体，里面没有代码，而且这个方法是protected修饰的。</p>
<p>3、这个方法不需要程序员手动调用，JVM的垃圾回收器负责调用这个方法。</p>
<p>4、finalize()方法的执行时机：当一个java对象即将被垃圾回收器回收的时候，垃圾回收器负责调用finalize()方法。</p>
<p>5、finalize()方法实际上是SUN公司为java程序员准备的一个时机，垃圾销毁时机。如果希望在对象销毁时机执行一段代码的话，这段代码就要写在finalize()方法当中。</p>
<p>6、静态代码块：静态代码块是在类加载时刻执行，并且只执行一次。</p>
<pre><code class="language-java">// 静态代码块在类加载时执行，并且只执行一次。
static{
  	...
}

</code></pre>
<p>这就是一个SUN公司准备的时机。</p>
<p>finalize()方法同样也是SUN公司为程序员准备的一个时机。这个时机是垃圾回收时机。</p>
<pre><code class="language-java">package com.ganto.www;

public class Test {
    public static void main(String[] args) {
        for(int i = 0; i &lt; 10000000; i++){ // 多制造点垃圾，垃圾回收器才能启动
            Person p = new Person();
            p = null;
        }
    }
}
class Person {
    // 重写finalize方法
    protected void finalize() throws Throwable {
        System.out.println(&quot;即将销毁&quot;);
    }
}

</code></pre>
<p>System.gc();建议垃圾回收器启动。</p>
<pre><code class="language-java">package com.ganto.www;

public class Test {
    public static void main(String[] args) {
            Person p = new Person();
            p = null;
            System.gc();
    }
}
class Person {
    // 重写finalize方法
    protected void finalize() throws Throwable {
        System.out.println(&quot;即将销毁&quot;);
    }
}

</code></pre>
<h2>hashCode方法</h2>
<p>在Object中的hashCode方法是<code>public native int hashCode();</code>，这个方法不是抽象方法，带有native关键字，底层调用C++程序。</p>
<p>hashCode()方法返回的是哈希码/哈希值：实际上就是一个java对象的内存地址，经过哈希算法，得出的一个值。所以hashCode()方法的执行结果可以等同看做一个java对象的内存地址。</p>
<pre><code class="language-java">package org.example;

public class Main {
    public static void main(String[] args) {
        Object o = new Object();
        int hashCodeValue = o.hashCode();
        System.out.println(hashCodeValue); // 1163157884

        myClass mc = new myClass();
        System.out.println(mc.hashCode()); // 1956725890
    }
}
class myClass{

}

</code></pre>
<h1>内部类</h1>
<p>1、内部类：在类的内部又定义了一个新的类。被称为内部类。</p>
<p>2、内部类的分类：</p>
<ul>
<li>实例内部类：类似于实例变量</li>
<li>静态内部类：类似于静态变量</li>
<li>局部内部类：类似于局部变量
<ul>
<li>匿名内部类：是局部内部类中的一种，因为这个类没有名字，所以叫匿名内部类</li>
</ul>
</li>
</ul>
<pre><code class="language-java">class Test01{
  // 该类在类的内部，所以称为内部类
  // 由于前面有static，所以称为“静态内部类”
  static class Inner1{
    
  }
  
  // 该类在类的内部，所以称为内部类
  // 没有static叫做实例内部类
  class Inner2{
    
  }
  
  public void doSome() {
    // 局部变量
    int i = 100;
    // 该类在类的内部，所以称为内部类
    // 局部内部类
    class Inner3{
      
    }
  }
}

</code></pre>
<p>例子：</p>
<pre><code class="language-java">package org.example;

public class Main {
    public static void main(String[] args) {
        MyMath mm = new MyMath();
        mm.mySum(new ComputeImpl(),12,12);
    }
}

// 负责计算的接口
interface Compute {
    int sum(int a, int b);
}

// Compute接口的实现类
class ComputeImpl implements Compute {
    public int sum(int a, int b) {
        return a + b;
    }
}

// 数学类
class MyMath {
    public void mySum(Compute c, int x, int y) {
        System.out.println(c.sum(x,y));
    }
}

</code></pre>
<p>匿名内部类对其改造：</p>
<pre><code class="language-java">package org.example;

public class Main {
    public static void main(String[] args) {
        MyMath mm = new MyMath();
        mm.mySum(new Compute() {
            public int sum(int a, int b) {
                return a + b;
            }
        },12,12);
    }
}

// 负责计算的接口
interface Compute {
    int sum(int a, int b);
}

// 数学类
class MyMath {
    public void mySum(Compute c, int x, int y) {
        System.out.println(c.sum(x,y));
    }
}

</code></pre>
<h1>数组</h1>
<p>1、Java中的数组是一种引用数据类型，不属于基本数据类型。数组的父类是Object。</p>
<p>2、数组实际上是一个容器，可以同时容纳多个元素。</p>
<p>3、数组当中可以存储“基本数据类型”的数据，也可以存储“引用数据类型”的数据。</p>
<p>4、数组因为是引用类型，所以数组对象是堆内存当中的。（数组是存储在堆当中的）</p>
<p>5、数组当中入股存储的是“Java对象”的话，实际上存储的是对象的“引用（内存地址）”，数组中不能直接存储Java对象。</p>
<p>6、数组一旦创建，在Java中规定，长度不可变。（数组长度不可变）</p>
<p>7、数组的分类：一维数组、二维数组、三维数组、多维数组...</p>
<p>8、所有的数组对象都有length属性（Java自带的属性），用来获取数组中元素的个数。</p>
<p>9、Java中的数组要求数组中元素的类型统一。比如int类型数组只能存储int类型，Person类型数组只能存储Person类型。</p>
<p>10、数组在内存方面存储的时候，数组中的元素内存地址（存储的每一个元素都是有规则的挨着排列的）是连续的。内存地址连续这是数组存储元素的特点/特色。数组实际上是一种简单的数据结构。</p>
<p>11、所有的数组都是用第一个元素的内存地址当作整个数组对象的内存地址</p>
<p>12、数组中每一个元素都有下标，下标从0开始，以1递增。最后一个元素的下标为length-1</p>
<h2>定义数组</h2>
<pre><code class="language-java">int[] arr1;
double[] arr2;
boolean[] arr3;
String[] arr4;
Object[] arr5;

</code></pre>
<h2>初始化数组</h2>
<h3>静态初始化一维数组</h3>
<pre><code class="language-java">int[] arr = {1,2,3,4};
int[] arr1 = new int[]{1,2,3,4};

</code></pre>
<h3>动态初始化一维数组</h3>
<pre><code class="language-java">int[] arr = new int[5]; // 这里的5表示数组的元素个数，初始化一个5个长度int类型的数组，每个元素默认为0

String[] names = new String[3]; // 初始化一个3个长度String类型的数组，每个元素默认为null

</code></pre>
<table>
<thead>
<tr>
<th>数据类型</th>
<th>默认值</th>
</tr>
</thead>
<tbody>
<tr>
<td>byte</td>
<td>0</td>
</tr>
<tr>
<td>short</td>
<td>0</td>
</tr>
<tr>
<td>int</td>
<td>0</td>
</tr>
<tr>
<td>long</td>
<td>0L</td>
</tr>
<tr>
<td>float</td>
<td>0.0F</td>
</tr>
<tr>
<td>double</td>
<td>0.0</td>
</tr>
<tr>
<td>boolean</td>
<td>false</td>
</tr>
<tr>
<td>char</td>
<td>\u0000</td>
</tr>
<tr>
<td>引用数据类型</td>
<td>null</td>
</tr>
</tbody>
</table>
<pre><code class="language-java">package org.example;

public class Main {
    public static void main(String[] args) {
        int[] arr = {11,22,33,44,50};
        arr[4] = 55;
        System.out.println(arr[4]);

        String[] arr1 = new String[2];
        arr1[0] = &quot;xixi&quot;;
        System.out.println(arr1[0]);
    }
}

</code></pre>
<h2>main方法上面的String[] args有什么用？</h2>
<p>通过命令行执行java程序</p>
<pre><code class="language-sh">javac *.java
java Main admin admin

</code></pre>
<pre><code class="language-java">package org.example;

public class Main {
    public static void main(String[] args) {
        System.out.println(args.length);

        if(args.length != 2) {
            System.out.println(&quot;请输入账号密码&quot;);
            return;
        }

        String username = args[0];
        String password = args[1];
				// &quot;admin&quot;.equals(username)这样的写法，可以避免空指针异常
        if(&quot;admin&quot;.equals(username) &amp;&amp; &quot;admin&quot;.equals(password)){
            System.out.println(&quot;登录成功&quot;);
        }else{
            System.out.println(&quot;登录失败&quot;);
        }
    }
}

</code></pre>
<p>IDEA通过点击run-Edit Configurations-Program arguments配置参数</p>
<h2>数组中存储引用数据类型</h2>
<pre><code class="language-java">package org.example;

public class Main {
    public static void main(String[] args) {
        Animal a1 = new Animal();
        Animal a2 = new Animal();
        Animal a3 = new Cat();
        Animal[] animals = {a1, a2, a3};

        for(int i = 0; i &lt; animals.length; i++) {
            animals[i].move();
        }
    }
}

class Animal {
    public void move() {
        System.out.println(&quot;Animal move...&quot;);
    }
}

class Cat extends Animal {
    public void move() {
        System.out.println(&quot;猫在move...&quot;);
    }
}

</code></pre>
<h2>数组扩容</h2>
<p>在Java开发中，数组长度一旦确定不可变，那么数组满了，就需要对数组进行扩容。Java中的数组扩容是先新建一个大容量的数组，然后将小容量数组中的数据一个一个拷贝到大数组当中。</p>
<h3>数组拷贝</h3>
<p>System.arraycopy()</p>
<pre><code class="language-java">package org.example;

public class Main {
    public static void main(String[] args) {
        int[] a = {1,2,3,4};
        int[] b = new int[10];
        System.arraycopy(a, 1, b, 0, 2); // 5个参数：源数组、源数组开始下标、目标数组、目标数组开始下标、拷贝数组长度
        System.out.println(b[0]);
    }
}


</code></pre>
<h2>二维数组</h2>
<p>二维数组是特殊的一维数组，特殊在这个一维数组当中的每一个元素是一个一维数组。</p>
<h3>二维数组静态初始化</h3>
<pre><code class="language-java">package org.example;

public class Main {
    public static void main(String[] args) {
        int[][] arr = {{1, 2}, {3, 4, 5, 6}, {7}};
        for(int i = 0; i &lt; arr.length; i++) {
            for (int j = 0; j &lt; arr[i].length; j++) {
                System.out.print(arr[i][j] + &quot; &quot;);
            }
            System.out.println();
        }
    }
}

</code></pre>
<h3>二维数组动态初始化</h3>
<pre><code class="language-java">package org.example;

public class Main {
    public static void main(String[] args) {
        int[][] arr = new int[2][2];
        for(int i = 0; i &lt; arr.length; i++) {
            for (int j = 0; j &lt; arr[i].length; j++) {
                System.out.print(arr[i][j] + &quot; &quot;);
            }
            System.out.println();
        }
    }
}

</code></pre>
<p>实例：</p>
<pre><code class="language-java">package org.example;

public class Main {
    public static void main(String[] args) {
        int[][] arr = {{1,2,3}, {4,5}, {6}};
        printArr(arr);

        int[][] arr1 = new int[3][];
        arr1[0] = new int[]{1, 2, 3};
        arr1[1] = new int[]{4, 5};
        arr1[2] = new int[]{6};
        printArr(arr1);

        printArr(new int[][]{{1,2,3}, {4,5}, {6}});
    }

    public static void printArr(int[][] array) {
        for(int i = 0; i &lt; array.length; i++) {
            for (int j = 0; j &lt; array[i].length; j++) {
                System.out.print(array[i][j] + &quot; &quot;);
            }
            System.out.println();
        }
        System.out.println(&quot;=====&quot;);
    }
}

</code></pre>
<h2>作业</h2>
<h3>使用一维数组，模拟栈数据结构</h3>
<p><strong>要求：</strong></p>
<p>1、这个栈可以存储Java中的任何引用类型的数据。</p>
<p>2、在栈中提供push方法模拟压栈。（栈满了，要有提示信息）</p>
<p>3、在栈中提供pop方法模拟弹栈。（栈空了，也有提示信息）</p>
<p>4、编写测试程序，new栈对象，调用push pop方法来模拟压栈弹栈的动作。</p>
<p>5、假设栈的默认初始化容量是10.（请注意无参数构造方法的编写方式。）</p>
<p>代码</p>
<pre><code class="language-java">package org.example;

public class MyStack {
    private Object[] elements;

    // 栈帧，永远指向栈顶部元素
    // 默认初始值是0，最初的栈是空的，一个元素都没有
    private int index;

    public MyStack() {
        this.elements = new Object[10];
        this.index = -1;
    }

    public Object[] getElements() {
        return elements;
    }

    public void setElements(Object[] elements) {
        this.elements = elements;
    }

    public int getIndex() {
        return index;
    }

    public void setIndex(int index) {
        this.index = index;
    }

    // 压栈方法push
    public void push(Object o) {
        if(this.index &gt;= this.elements.length-1) {
            System.out.println(&quot;栈满！压栈失败！&quot;);
            return;
        }
        this.index++;
        this.elements[this.index] = o;
        // 所有System.out.println()方法执行时，如果输出引用的话，会自动调用引用的toString()方法
        // System.out.println(&quot;压栈&quot; + o.toString() + &quot;元素成功，栈帧指向&quot; + this.index);
        System.out.println(&quot;压栈&quot; + o + &quot;元素成功，栈帧指向&quot; + this.index);
    }

    // 弹栈方法pop
    public Object pop() {
        if(this.index &lt; 0) {
            System.out.println(&quot;栈空！弹栈失败！&quot;);
            return null;
        }
        System.out.print(&quot;弹栈&quot; + this.elements[this.index] + &quot;元素成功，&quot;);
        this.elements[this.index] = null;
        this.index--;
        System.out.println(&quot;栈帧指向&quot; + this.index);
        return null;
    }
}

</code></pre>
<p>测试程序</p>
<pre><code class="language-java">package org.example;

public class Main {
    public static void main(String[] args) {
        MyStack stack = new MyStack();
        stack.push(new Animal());
        stack.pop();
        stack.pop();
    }
}

class Animal {

}

</code></pre>
<h3>酒店</h3>
<p>酒店管理系统，模拟订房、退房、打印所有房间状态。</p>
<p>1、该系统的用户是：酒店前台。</p>
<p>2、酒店使用一个二位数组来模拟。<code>Room[][] romms</code></p>
<p>3、酒店中的每一个房间应该是一个Java对象：Room</p>
<p>4、每一个房间Room应该有：房间编号、房间类型、房间是否空闲</p>
<p>5、系统应该对外提供的功能：</p>
<ul>
<li>可以预定房间：用户输入房间编号，订房。</li>
<li>可以退房：用户输入房间编号，退房。</li>
<li>可以查看所有房间的状态：用户输入某个指令应该可以查看所有房间状态。</li>
</ul>
<p>代码：</p>
<p>Room.java</p>
<pre><code class="language-java">package org.example.homework;

/**
 * 房间类
 */
public class Room {
    /**
     * 房间编号
     * 1楼：101 102
     * 2楼：201 202
     * 3楼：301 302
     */
    private int no;
    /**
     * 房间类型：标准间、单人间、总统套房
     */
    private String type;
    /**
     * 房间状态
     * true 空闲
     * false 占用
     */
    private boolean status;

    public Room() {
    }

    public Room(int no, String type, boolean status) {
        this.no = no;
        this.type = type;
        this.status = status;
    }

    public int getNo() {
        return no;
    }

    public void setNo(int no) {
        this.no = no;
    }

    public String getType() {
        return type;
    }

    public void setType(String type) {
        this.type = type;
    }

    public boolean getStatus() {
        return status;
    }

    public void setStatus(boolean status) {
        this.status = status;
    }

    @Override
    public String toString() {
        return &quot;Room{&quot; +
                &quot;no=&quot; + no +
                &quot;, type='&quot; + type + '\'' +
                &quot;, status=&quot; + (status ? &quot;'空闲'&quot; : &quot;'占用'&quot;) +
                '}';
    }

    @Override
    public boolean equals(Object o) {
        if (this == o) return true;
        if (!(o instanceof Room)) return false;
        Room room = (Room) o;
        return no == room.no &amp;&amp; status == room.status &amp;&amp; type.equals(room.type);
    }

}

</code></pre>
<p>Hotel.java</p>
<pre><code class="language-java">package org.example.homework;

import java.util.Arrays;

/**
 * 酒店类
 */
public class Hotel {
    private Room[][] rooms;

    public Hotel() {
        this.rooms = new Room[3][10];
        for(int i = 0; i &lt; rooms.length; i++) {
            for (int j = 0; j &lt; rooms[i].length; j++) {
                this.rooms[i][j] = new Room();

                this.rooms[i][j].setNo(((i+1)*100)+(j+1));
                if(i == 0) {
                    this.rooms[i][j].setType(&quot;单人间&quot;);
                }else if(i == 1) {
                    this.rooms[i][j].setType(&quot;标准间&quot;);
                }else {
                    this.rooms[i][j].setType(&quot;总统套房&quot;);
                }
                this.rooms[i][j].setStatus(true);
            }
        }
    }

    public Hotel(Room[][] rooms) {
        this.rooms = rooms;
    }

    public Room[][] getRooms() {
        return rooms;
    }

    public void setRooms(Room[][] rooms) {
        this.rooms = rooms;
    }

    // 打印所有房间状态
    public void print() {
        for (int i = 0; i &lt; this.getRooms().length; i++) {
            for (int j = 0; j &lt; this.getRooms()[i].length; j++) {
                System.out.println(this.getRooms()[i][j]);
            }
        }
    }

    // 订房
    public void order(int roomNo) {
        for (int i = 0; i &lt; this.getRooms().length; i++) {
            for (int j = 0; j &lt; this.getRooms()[i].length; j++) {
                if(this.getRooms()[i][j].getNo() == roomNo) {
                    this.getRooms()[i][j].setStatus(false);
                    System.out.println(roomNo + &quot;已订房！&quot;);
                }
            }
        }
    }

    // 退房
    public void exit(int roomNo) {
        for (int i = 0; i &lt; this.getRooms().length; i++) {
            for (int j = 0; j &lt; this.getRooms()[i].length; j++) {
                if(this.getRooms()[i][j].getNo() == roomNo) {
                    this.getRooms()[i][j].setStatus(true);
                    System.out.println(roomNo + &quot;已退房！&quot;);
                }
            }
        }
    }
}

</code></pre>
<p>HotelMgtSystem.java</p>
<pre><code class="language-java">package org.example.homework;

import java.util.Scanner;

public class HotelMgtSystem {
    public static void main(String[] args) {
//        Hotel h = new Hotel();
//        h.order(101);
//        h.print();
//        h.exit(101);
//        h.print();
        Hotel h = new Hotel();
        System.out.println(&quot;******欢迎使用！******&quot;);
        System.out.println(&quot;[1]查看房间列表；[2]订房；[3]退房；[0]退出。&quot;);
        Scanner s = new Scanner(System.in);
        while (true) {
            System.out.print(&quot;请输入功能编号：&quot;);
            int i = s.nextInt();
            switch (i) {
                case 1:
                    h.print();
                    break;
                case 2:
                    System.out.print(&quot;请输入订房房间号：&quot;);
                    int ii = s.nextInt();
                    h.order(ii);
                    break;
                case 3:
                    System.out.print(&quot;请输入退房房间号：&quot;);
                    int iii = s.nextInt();
                    h.exit(iii);
                    break;
                case 0:
                    return;
                default:
                    System.out.println(&quot;输入错误！请重新输入...&quot;);
            }
        }
    }
}

</code></pre>
<h2>冒泡排序算法（排序算法）</h2>
<pre><code class="language-java">package org.example;

/**
 * 冒泡排序算法
 */
public class Main {
    public static void main(String[] args) {
        int[] arr = {2,5,4,3,1};

        for(int i = 0; i &lt; arr.length - 1; i++) {
            for(int j = 0; j &lt; arr.length - i - 1; j++) {
                if(arr[j] &gt; arr[j+1]) {
                    int b = arr[j];
                    arr[j] = arr[j+1];
                    arr[j+1] = b;
                }
            }
        }
        for (int i = 0; i &lt; arr.length; i++) {
            System.out.print(arr[i] + &quot; &quot;);
        }
    }
}

</code></pre>
<pre><code class="language-java">package org.example;

/**
 * 冒泡排序算法
 */
public class Main {
    public static void main(String[] args) {
        int[] arr = {2,5,4,3,1};

        for(int i = arr.length - 1; i &gt; 0; i--) {
            for(int j = 0; j &lt; i; j++) {
                if(arr[j] &gt; arr[j+1]) {
                    int b = arr[j];
                    arr[j] = arr[j+1];
                    arr[j+1] = b;
                }
            }
        }
        for (int i = 0; i &lt; arr.length; i++) {
            System.out.print(arr[i] + &quot; &quot;);
        }
    }
}

</code></pre>
<h2>选择排序算法（排序算法）</h2>
<pre><code class="language-java">package org.example;

/**
 * 选择排序算法
 */
public class Main {
    public static void main(String[] args) {
        int[] arr = {2, 5, 4, 7, 6, 1, 3};
        for(int i = 0; i &lt; arr.length-1; i++){
            System.out.println(i);
            for(int j = i+1; j &lt; arr.length; j++) {
                System.out.println(&quot;==&gt;&quot;+j);
                if(arr[i] &gt; arr[j]) {
                    int a = arr[j];
                    arr[j] = arr[i];
                    arr[i] = a;
                }
            }
        }
        for(int i = 0; i &lt; arr.length; i++) {
            System.out.print(arr[i] + &quot; &quot;);
        }
    }
}

</code></pre>
<h2>二分法查找（查找算法）</h2>
<p>二分法查找是建立在排序过后的数据上，才可以使用的算法。</p>
<pre><code class="language-java">package org.example;

/**
 * 选择排序算法
 */
public class Main {
    public static void main(String[] args) {
        int[] arr = {11, 22, 55, 66, 77, 99, 111, 333};

        int a = binarySearch(arr, 333);
        System.out.println(a);
    }
    public static int binarySearch(int[] arr, int dest) {
        int begin = 0;
        int end = arr.length - 1;
        while (begin &lt;= end) {
            int mid = (begin + end) / 2;
            if(arr[mid] == dest) {
                return mid;
            } else if(arr[mid] &lt; dest) {
                begin = mid + 1;
            } else {
                end = mid - 1;
            }
        }
        return -1;
    }
}

</code></pre>
<h2>Arrays工具类</h2>
<p>即：java.util.Arrays工具类</p>
<p>Arrays.sort()</p>
<pre><code class="language-java">package org.example;

import java.util.Arrays;

public class Main {
    public static void main(String[] args) {
        int[] arr = {11,2,13};
        Arrays.sort(arr);
        for (int i = 0; i &lt; arr.length; i++) {
            System.out.println(arr[i]);
        }
    }
}

</code></pre>
<h1>常用类</h1>
<h2>String</h2>
<p>1、String表示字符串类型，属于引用数据类型，不属于基本数据类型</p>
<p>2、在Java中随便使用双引号括起来的都是String对象。</p>
<p>3、Java中规定，双引号括起来的字符串，是不可变的。</p>
<p>4、在JDK当中双引号括起来的字符串，&quot;abc&quot;、&quot;你好&quot;、&quot;Hello World!&quot;都是直接存储在方法区的字符串常量池当中的。而new String(&quot;xy&quot;)，是先在方法区的字符串常量池中有一份，然后堆内存中保存常量池中的内存地址，栈内存保存堆内存中的内存地址。</p>
<pre><code class="language-java">package org.example;

public class Main {
    public static void main(String[] args) {
        String s1 = &quot;123&quot;;
        String s2 = &quot;123&quot;;
        System.out.println(s1 == s2); // true

        String x = new String(&quot;1&quot;);
        String y = new String(&quot;1&quot;);
        System.out.println(x == y); // false
	      System.out.println(x.equals(y)); // true

    }
}

</code></pre>
<blockquote>
<p>以上代码证明，字符串之间的比较不能使用<code>==</code>，使用equals比较保险，因为String比较特殊，使用简易的方式定义 和 使用对象的方式定义 情况有所不同，简易方式定义是栈内存直接保存方法区常量池中的值的内存地址；而对象方式定义是堆内存保存方法区常量池中的值的内存地址，然后栈内存保存堆内存的内存地址。</p>
<p>==String类中的equals()方法是官方已经重写过的，所以不需要再重写，可以直接使用。</p>
</blockquote>
<h3>String类中的构造方法</h3>
<p>将byte数组中的元素全部转换成字符串</p>
<p>将byte数组中的一部分元素转换成字符串 第二个参数是从哪个下标开始 第三个参数是元素长度</p>
<pre><code class="language-java">package org.example;

public class Main {
    public static void main(String[] args) {
        byte[] bytes = {97,98,99}; // 97是a, 98是b，99是c
        String s1 = new String(bytes); // abc
	      String s2 = new String(bytes, 1, 2); // bc 这里的1是offset参数，2是length参数
        /**
         * 前面说过：输出一个引用的时候，会自动调用toString()方法，默认继承自Object中的toString()方法，会自动输出对象的内存地址。
         * 而以下代码会输出”abc“，则可以说明，官方也将String类中的toString()方法进行了重写。
         */
        System.out.println(s1); // abc
	      System.out.println(s1.toString()); // abc
      	System.out.println(s2); // bc
    }
}

</code></pre>
<p>将char数组中的元素全部转换成字符串</p>
<p>将char数组中的一部分元素转换成字符串 第二个参数是从哪个下标开始 第三个参数是元素长度</p>
<pre><code class="language-java">package org.example;

public class Main {
    public static void main(String[] args) {
        char[] chars = {'I', '❤', 'J', 'A', 'V', 'A'};
        String s1 = new String(chars); // I❤JAVA
        String s2 = new String(chars, 2, 4); // JAVA

        System.out.println(s1); // I❤JAVA
        System.out.println(s2); // JAVA
    }
}

</code></pre>
<p><img src="images%5CJava%5CString%E4%B8%AD%E7%9A%84%E6%9E%84%E9%80%A0%E6%96%B9%E6%B3%95.png" alt="" /></p>
<h3>String类中的常用方法</h3>
<h4>1、char charAt(int index)</h4>
<p><strong>返回某个下标的字符</strong></p>
<pre><code class="language-java">package org.example;

public class Main {
    public static void main(String[] args) {
	      // &quot;中国人&quot;是一个String对象，只要是对象就可以通过`.`的形式调用特有的方法。
        char c = &quot;中国人&quot;.charAt(1);
        System.out.println(c); // 国
    }
}

</code></pre>
<h4>2、int compareTo(String anotherString)</h4>
<p><strong>两个字符串按照字典的顺序进行比较</strong></p>
<pre><code class="language-java">package org.example;

public class Main {
    public static void main(String[] args) {
        System.out.println(&quot;abc&quot;.compareTo(&quot;abc&quot;)); // 0 前后一致 10-10=0
        System.out.println(&quot;abcd&quot;.compareTo(&quot;abce&quot;)); // -1 前小后大 8-9=-1
        System.out.println(&quot;abce&quot;.compareTo(&quot;abcd&quot;)); // 1 前大后小 9-8=1
    }
}

</code></pre>
<blockquote>
<p>比较规则是，相同下标的字符先进行比较，从下标零开始，如果没有比较出大小，则继续下标加一进行比较，比较出来大小后，则返回比较相同下标的两个字符的字典顺序的相减的值。</p>
</blockquote>
<h4>3、boolean contains</h4>
<p><strong>判断前面的内容是否包含后面的内容，返回Boolean值</strong></p>
<pre><code class="language-java">package org.example;

public class Main {
    public static void main(String[] args) {
        System.out.println(&quot;hello java&quot;.contains(&quot;java&quot;)); // true
    }
}

</code></pre>
<h4>4、boolean endsWith(String suffix)</h4>
<p><strong>判断当前字符串是否以某个字符串结尾</strong></p>
<pre><code class="language-java">package org.example;

public class Main {
    public static void main(String[] args) {
        System.out.println(&quot;hello java&quot;.endsWith(&quot;java&quot;)); // true
    }
}

</code></pre>
<h4>5、boolean equals(Object anObject)</h4>
<p><strong>比较两个字符串必须使用equals方法，不能使用<code>==</code></strong></p>
<pre><code class="language-java">package org.example;

public class Main {
    public static void main(String[] args) {
        System.out.println(&quot;hello java&quot;.equals(&quot;hello java&quot;)); // true
    }
}

</code></pre>
<h4>6、boolean equalsIgnoreCase(String anotherString)</h4>
<p><strong>判断两个字符串是否相等，并且同时忽略大小写</strong></p>
<pre><code class="language-java">package org.example;

public class Main {
    public static void main(String[] args) {
        System.out.println(&quot;Hello Java&quot;.equalsIgnoreCase(&quot;hello java&quot;)); // true
    }
}

</code></pre>
<h4>7、byte[] getBytes()</h4>
<p><strong>将字符串对象转换成字节数组</strong></p>
<pre><code class="language-java">package org.example;

public class Main {
    public static void main(String[] args) {
        byte[] bytes = &quot;abcdef&quot;.getBytes();
        for(int i = 0; i &lt; bytes.length; i++) {
            System.out.println(bytes[i]);
        }
    }
}

</code></pre>
<h4>8、int indexOf(String str)</h4>
<p><strong>判断某个子字符串在当前字符串中第一次出现处的索引，如果没有该子字符串则返回<code>-1</code></strong></p>
<pre><code class="language-java">package org.example;

public class Main {
    public static void main(String[] args) {
        System.out.println(&quot;123456&quot;.indexOf(&quot;6&quot;)); // 5
        System.out.println(&quot;123456&quot;.indexOf(&quot;7&quot;)); // -1
    }
}

</code></pre>
<h4>9、boolean isEmpty()</h4>
<p><strong>判断某个字符串是否为空</strong></p>
<pre><code class="language-java">package org.example;

public class Main {
    public static void main(String[] args) {
        System.out.println(&quot;&quot;.isEmpty()); // true
        System.out.println(&quot;hello&quot;.isEmpty()); // false
    }
}

</code></pre>
<h4>10、int length()</h4>
<p><strong>返回字符串的长度</strong></p>
<pre><code class="language-java">package org.example;

public class Main {
    public static void main(String[] args) {
        System.out.println(&quot;hello java yes good java&quot;.length()); // 24
    }
}

</code></pre>
<h4>11、int lastIndexOf(String str)</h4>
<p><strong>判断某个子字符串在当前字符串中最后一次出现的索引</strong></p>
<pre><code class="language-java">package org.example;

public class Main {
    public static void main(String[] args) {
        System.out.println(&quot;hello java yes good java&quot;.lastIndexOf(&quot;java&quot;)); // 20
    }
}

</code></pre>
<h4>12、String replace(CharSequence target, CharSequence replacement)</h4>
<p><strong>String的父接口就是CharSequence；将字符串中的某个子字符串进行替换操作</strong></p>
<pre><code class="language-java">package org.example;

public class Main {
    public static void main(String[] args) {
        String newString = &quot;http://ganto.cn&quot;.replace(&quot;http://&quot;, &quot;https://&quot;);
        System.out.println(newString);
    }
}

</code></pre>
<h4>13、String[] split(String regex)</h4>
<p><strong>以某个字符或者字符串进行拆分字符串成字符串数组</strong></p>
<pre><code class="language-java">package org.example;

public class Main {
    public static void main(String[] args) {
        String[] strArr = &quot;2023-1-3&quot;.split(&quot;-&quot;);
        for(int i = 0; i &lt; strArr.length; i++) {
            System.out.println(strArr[i]);
        }
    }
}

</code></pre>
<h4>14、boolean startsWith(String prefix)</h4>
<p><strong>判断某个字符串是否以某个子字符串开始</strong></p>
<pre><code class="language-java">package org.example;

public class Main {
    public static void main(String[] args) {
        System.out.println(&quot;https://ganto.cn&quot;.startsWith(&quot;https://&quot;)); // true
    }
}

</code></pre>
<h4>15、String substring(int beginIndex)</h4>
<p><strong>截取字符串，参数为起始下标（包含），截取到最后</strong></p>
<pre><code class="language-java">package org.example;

public class Main {
    public static void main(String[] args) {
        System.out.println(&quot;https://ganto.cn&quot;.substring(8)); // ganto.cn
    }
}

</code></pre>
<h4>16、String substring(int beginIndex, int endIndex)</h4>
<p><strong>截取字符串，第一个参数是起始下标（包含），第二个参数为结束下标（不包含）。包前不包后，左闭右开</strong></p>
<pre><code class="language-java">package org.example;

public class Main {
    public static void main(String[] args) {
        System.out.println(&quot;https://ganto.cn&quot;.substring(8, 13)); // ganto
    }
}

</code></pre>
<h4>17、char[] toCharArray()</h4>
<p><strong>将字符串转换成char数组</strong></p>
<pre><code class="language-java">package org.example;

public class Main {
    public static void main(String[] args) {
        char[] chars = &quot;你好Java&quot;.toCharArray();
        for (int i = 0; i &lt; chars.length; i++) {
            System.out.println(chars[i]);
            /**
             * 你
             * 好
             * J
             * a
             * v
             * a
             */
        }
    }
}

</code></pre>
<h4>18、String toLowerCase()</h4>
<p><strong>全部转换成小写</strong></p>
<pre><code class="language-java">package org.example;

public class Main {
    public static void main(String[] args) {
        System.out.println(&quot;JAVA&quot;.toLowerCase()); // java
    }
}

</code></pre>
<h4>19、String toUpperCase()</h4>
<p><strong>全部转换成大写</strong></p>
<pre><code class="language-java">package org.example;

public class Main {
    public static void main(String[] args) {
        System.out.println(&quot;java&quot;.toUpperCase()); // JAVA
    }
}

</code></pre>
<h4>20、String trim()</h4>
<p><strong>去除字符串前后空白，中间的空白不会去除</strong></p>
<pre><code class="language-java">package org.example;

public class Main {
    public static void main(String[] args) {
        System.out.println(&quot;   j  a  v a    &quot;.trim());
    }
}

</code></pre>
<h4>21、String.valueOf()</h4>
<p><strong>String中只有一个方法是静态的，不需要new对象，将非字符串转换成字符串</strong></p>
<pre><code class="language-java">package org.example;

public class Main {
    public static void main(String[] args) {
        String s = String.valueOf(100); // 数字转换成字符串
        System.out.println(s);
    }
}

</code></pre>
<p>如果传入对象，System.out.println()打印的话，会自动调用对象的toString()方法，如果对象中没有重写toString()方法，则会调用父类Object中的toString()方法</p>
<pre><code class="language-java">package org.example;

public class Main {
    public static void main(String[] args) {
        String s = String.valueOf(new Customer());
        System.out.println(s); // Customer{}
    }
}

class Customer{
    public String toString() {
        return &quot;Customer{}&quot;;
    }
}

</code></pre>
<h2>StringBuffer</h2>
<p>因为方法区字符串常量池的特性是一旦创建无法修改，会导致频繁拼字符串而占用大量的常量池空间，从而导致常量池浪费。</p>
<p>如果以后需要进行大量的字符串拼接操作，建议使用JDK中自带的：java.lang.StringBuffer、java.lang.StringBuilder</p>
<p><em>StringBuffer</em></p>
<pre><code class="language-java">package org.example;

public class Main {
    public static void main(String[] args) {
        /**
         * StringBuffer默认初始化容量是16个byte[]数组
         * 可以手动初始化容量 new StringBuffer(50);
         */
        StringBuffer stringBuffer = new StringBuffer();
        stringBuffer.append(&quot;j&quot;);
        stringBuffer.append(&quot;a&quot;);
        stringBuffer.append(&quot;v&quot;);
        stringBuffer.append(&quot;a&quot;);
        System.out.println(stringBuffer);
    }
}

</code></pre>
<p><em>StringBuilder</em></p>
<pre><code class="language-java">package org.example;

public class Main {
    public static void main(String[] args) {
        StringBuilder stringBuilder = new StringBuilder();
        stringBuilder.append(&quot;j&quot;);
        stringBuilder.append(&quot;a&quot;);
        stringBuilder.append(&quot;v&quot;);
        stringBuilder.append(&quot;a&quot;);
        System.out.println(stringBuilder);
    }
}

</code></pre>
<blockquote>
<p><em><strong>StringBuffer</strong></em>和<em><strong>StringBuilder</strong></em>的区别：</p>
<p><em><strong>StringBuffer</strong></em>中的方法都有：<em><strong>synchronized</strong></em>关键字修饰。表示<em><strong>StringBuffer</strong></em>在多线程环境下运行是安全的。</p>
<p><em><strong>StringBuilder</strong></em>中的方法都没有：<em><strong>synchronized</strong></em>关键字修饰。表示<em><strong>StringBuilder</strong></em>在多线程环境下运行是不安全的。</p>
<p><em><strong>StringBuffer</strong></em>是线程安全的。</p>
<p><em><strong>StringBuilder</strong></em>是非线程安全的。</p>
</blockquote>
<h2>8个基本数据类型对应的8个包装类</h2>
<table>
<thead>
<tr>
<th>数据类型</th>
<th>默认值</th>
</tr>
</thead>
<tbody>
<tr>
<td>byte</td>
<td>0</td>
</tr>
<tr>
<td>short</td>
<td>0</td>
</tr>
<tr>
<td>int</td>
<td>0</td>
</tr>
<tr>
<td>long</td>
<td>0L</td>
</tr>
<tr>
<td>float</td>
<td>0.0F</td>
</tr>
<tr>
<td>double</td>
<td>0.0</td>
</tr>
<tr>
<td>boolean</td>
<td>false</td>
</tr>
<tr>
<td>char</td>
<td>\u0000</td>
</tr>
<tr>
<td>引用数据类型</td>
<td>null</td>
</tr>
</tbody>
</table>
<p>Java中为8种基本数据类型又对应准备了8种包装类型。8装包装类属于引用数据类型，父类是Object。</p>
<p>引：有一种需求，如下代码，调用doSome()方法的时候需要传入一个数字进去。但是数字属于基本数据类型，而doSome()方法参数的类型是Object。可见doSome()方法无法接受基本数据类型的参数。可以传入一个基本数据类型对应的包装类进去，来解决这个问题。</p>
<p>Main.java</p>
<pre><code class="language-java">package org.example;

public class Main {
    public static void main(String[] args) {
        MyInt myInt = new MyInt(100);
        doSome(myInt);
    }

    public static void doSome(Object obj) {
        System.out.println(obj);
    }
}

</code></pre>
<p>MyInt.java</p>
<pre><code class="language-java">package org.example;

public class MyInt {
    int value;
    public MyInt() {

    }
    public MyInt(int value) {
        this.value = value;
    }

    @Override
    public String toString() {
        return String.valueOf(value);
    }
}

</code></pre>
<p>以上代码只是来通过自己写的包装类来演示这个过程。8个基本包装类并不需要我们自己手动写，因为官方已经为我们写好，我们只需要调用即可。</p>
<table>
<thead>
<tr>
<th>数据类型</th>
<th>默认值</th>
<th>包装类型</th>
<th>父类</th>
</tr>
</thead>
<tbody>
<tr>
<td>byte</td>
<td>0</td>
<td>java.lang.Byte</td>
<td>java.lang.Number</td>
</tr>
<tr>
<td>short</td>
<td>0</td>
<td>java.lang.Short</td>
<td>java.lang.Number</td>
</tr>
<tr>
<td>int</td>
<td>0</td>
<td>java.lang.Integer</td>
<td>java.lang.Number</td>
</tr>
<tr>
<td>long</td>
<td>0L</td>
<td>java.lang.Long</td>
<td>java.lang.Number</td>
</tr>
<tr>
<td>float</td>
<td>0.0F</td>
<td>java.lang.Float</td>
<td>java.lang.Number</td>
</tr>
<tr>
<td>double</td>
<td>0.0</td>
<td>java.lang.Double</td>
<td>java.lang.Number</td>
</tr>
<tr>
<td>boolean</td>
<td>false</td>
<td>java.lang.Boolean</td>
<td>java.lang.Object</td>
</tr>
<tr>
<td>char</td>
<td>\u0000</td>
<td>java.lang.Character</td>
<td>java.lang.Object</td>
</tr>
</tbody>
</table>
<p>以java.lang.Integer为例：</p>
<pre><code class="language-java">package org.example;

public class Main {
    public static void main(String[] args) {
        /**
         * 123这个基本数据类型，进行构造方法的包装达到了：基本数据类型向引用数据类型的转换。
         * 基本数据类型 -（转换为）-&amp;gt; 引用数据类型（装箱）
         */
        Integer integer = new Integer(123);

        // 将引用数据类型 -（转换为）-&amp;gt; 基本数据类型（拆箱）
        float f = integer .floatValue();
        System.out.println(f);

        // 将引用数据类型 -（转换为）-&amp;gt; 基本数据类型（拆箱）
        int i = integer.intValue();
        System.out.println(i);
    }
}

</code></pre>
<p>Integer类、Byte类的最大值、最小值</p>
<pre><code class="language-java">package org.example;

public class Main {
    public static void main(String[] args) {
        System.out.println(Integer.MIN_VALUE);
        System.out.println(Integer.MAX_VALUE);
        System.out.println(Byte.MIN_VALUE);
        System.out.println(Byte.MAX_VALUE);
    }
}

</code></pre>
<h3>在JDK1.5之后，支持自动装箱和自动拆箱。</h3>
<p>自动装箱：基本数据类型自动转换成包装类。</p>
<p>自动拆箱：包装类自动转换成基本数据类型。</p>
<pre><code class="language-java">package org.example;

public class Main {
    public static void main(String[] args) {
        Integer integer = 100; // 自动装箱
        int i = integer; // 自动拆箱
        System.out.println(i);
    }
}

</code></pre>
<pre><code class="language-java">package org.example;

public class Main {
    public static void main(String[] args) {
        Integer a = 128;
        Integer b = 128;
        System.out.println(a == b); // false

        Integer x = 127;
        Integer y = 127;
        System.out.println(x == y); // true
    }
}

</code></pre>
<p>以上代码的说明：</p>
<blockquote>
<p>Java中为了提高程序的执行效率，将[-128,127)之间所有的包装对象提前创建好，</p>
<p>放到了一个方法区的 “整数型常量池” 当中了，目的是只要用这个区间的数据，则不需要再new对象了，直接从 “整数型常量池” 中取出来。</p>
<p>原理：x变量中保存的对象的内存地址和y变量中保存的对象的内存地址是一样的。</p>
</blockquote>
<h3>Integer常用方法</h3>
<h4>int intValue()</h4>
<p><strong>以 int 类型返回该 Integer 的值</strong></p>
<pre><code class="language-java">package org.example;

public class Main {
    public static void main(String[] args) {
        Integer integer = new Integer(&quot;123&quot;);
        int i = integer.intValue();
        System.out.println(i);
    }
}

</code></pre>
<h4>static int parseInt(String s)</h4>
<p><strong>将字符串参数作为有符号的十进制整数进行解析</strong></p>
<pre><code class="language-java">package org.example;

public class Main {
    public static void main(String[] args) {
        int i = Integer.parseInt(&quot;123&quot;);
        System.out.println(i + 199);

        double d = Double.parseDouble(&quot;3.1415&quot;);
        System.out.println(d + 1);

        float f = Float.parseFloat(&quot;2.0&quot;);
        System.out.println(f + 1);
    }
}

</code></pre>
<h2>String int Integer之间的互相转换</h2>
<pre><code class="language-java">package org.example;

public class Main {
    public static void main(String[] args) {
        // String =&gt; int
        String s = &quot;123&quot;;
        int i = Integer.parseInt(&quot;123&quot;);

        // int =&gt; String
        System.out.println(123 + &quot;&quot;);

        System.out.println(String.valueOf(123));

        // int =&gt; Integer
        Integer integer = new Integer(123);
        System.out.println(integer);

        Integer integer1 = 123;
        System.out.println(integer1);

        // Integer =&gt; int
        Integer integer2 = 123;
        int i1 = integer2;
        System.out.println(i1);

        // String =&gt; Integer
        String s1 = &quot;123&quot;;
        Integer integer3 = Integer.valueOf(s1);

        // Integer =&gt; String
        String s2 = String.valueOf(new Integer(&quot;123&quot;));
    }
}

</code></pre>
<h2>Java对日期的处理</h2>
<p>java.util.Date类的toString()方法已经被官方重写了，输出的是一个日期字符串，但是不符合中国人的阅读习惯~</p>
<pre><code class="language-java">package org.example;

import java.util.Date;

public class Main {
    public static void main(String[] args) {
        Date nowTime = new Date();
        System.out.println(nowTime);
    }
}

</code></pre>
<h3>java.text.SimpleDateFormat</h3>
<h3>format()</h3>
<p>Date =&gt; String</p>
<p>如果需要将日期格式化使用<code>SimpleDateFormat</code></p>
<pre><code class="language-java">package org.example;

import java.text.SimpleDateFormat;
import java.util.Date;

public class Main {
    public static void main(String[] args) {
        Date nowTime = new Date();
        System.out.println(nowTime);

        /**
         * yyyy 年 是四位
         * MM 月 是两位
         * dd 日 是两位
         * HH 时 是两位
         * mm 分 是两位
         * ss 秒 是两位
         * SSS 毫秒 是三位
         */
        SimpleDateFormat sdf = new SimpleDateFormat(&quot;yyyy-MM-dd HH:mm:ss:SSS&quot;);
        System.out.println(sdf.format(nowTime));
    }
}

</code></pre>
<h3>parse()</h3>
<p>String =&gt; Date</p>
<p>日期字符串String转换成Date类型</p>
<pre><code class="language-java">package org.example;

import java.text.SimpleDateFormat;

public class Main {
    public static void main(String[] args) throws Exception {
        String time = &quot;2023-01-05 00:00:00:000&quot;;
        // 以下格式要与字符串日期格式一致
        SimpleDateFormat sdf = new SimpleDateFormat(&quot;yyyy-MM-dd HH:mm:ss:SSS&quot;);
        System.out.println(sdf.parse(time));
    }
}

</code></pre>
<h2>数字格式化</h2>
<p>java.text.DecimalFormat专门负责数字格式化</p>
<p>DecimalFormat df = new DecimalFormat(&quot;数字格式&quot;);</p>
<p>数字格式：<code># 代表任意数字</code> <code>, 代表千分位</code> <code>. 小数位</code> <code>0 不够位数自动补0</code></p>
<p>例子</p>
<pre><code class="language-java">package org.example;

import java.text.DecimalFormat;

public class Main {
    public static void main(String[] args) throws Exception {
        DecimalFormat df = new DecimalFormat(&quot;###,###.##&quot;);
        String s = df.format(1234.567);
        System.out.println(s); // 1,234.56
    }
}

</code></pre>
<pre><code class="language-java">package org.example;

import java.text.DecimalFormat;

public class Main {
    public static void main(String[] args) throws Exception {
        DecimalFormat df = new DecimalFormat(&quot;###,###.0000&quot;);
        String s = df.format(1234.567);
        System.out.println(s); // 1,234.5670
    }
}

</code></pre>
<h2>BigDecimal</h2>
<p>java.math.BigDecimal</p>
<p>BigDecimal属于大数据，精度极高。不属于基本数据类型，属于java对象（引用数据类型），这是官方提供的一个类。专门用在财务软件当中。</p>
<p>注意：财务软件中double是不够用的。</p>
<pre><code class="language-java">package org.example;

import java.math.BigDecimal;

public class Main {
    public static void main(String[] args) throws Exception {
        BigDecimal v1 = new BigDecimal(100);
        BigDecimal v2 = new BigDecimal(200);
        BigDecimal v3 = v1.add(v2);
        System.out.println(v3);
    }
}

</code></pre>
<p>如上例代码中所示，声明了两个精度极高的引用数据类型的数据，两者如果需要相加不能像基本数据类型那样相加，要通过.add()方法进行相加。</p>
<hr />
<p>add() 加法</p>
<p>subtract() 减法</p>
<p>multiply() 乘法</p>
<p>divide() 除法</p>
<hr />
<h2>随机数</h2>
<p>java.util.Random</p>
<p>nextInt()内不传入参数，则表示产生int类型范围内的随机数。</p>
<pre><code class="language-java">package org.example;

import java.util.Random;

public class Main {
    public static void main(String[] args) throws Exception {
        Random random = new Random();
        int num = random.nextInt();
        System.out.println(num);
    }
}

</code></pre>
<p>nextInt(101)内传入参数，则表示产生[0, 101)之间的随机数整数，也就是0-100之间的整数</p>
<pre><code class="language-java">package org.example;

import java.util.Random;

public class Main {
    public static void main(String[] args) throws Exception {
        Random random = new Random();
        int num = random.nextInt(101);
        System.out.println(num);
    }
}

</code></pre>
<p>案例：产生5个不同的随机数放进数组中</p>
<pre><code class="language-java">package org.example;

import java.util.Random;

public class Main {
    public static void main(String[] args) throws Exception {
        int[] arr = new int[5];

        Random random = new Random();
        int num;

        int count = 0;


        while (count &lt; 5) {
            num = random.nextInt(5);
            int count1 = 0;
            if(count == 0) {
                arr[count] = num;
                count++;
            }
            for (int i = 0; i &lt; count; i++) {
                if(num == arr[i]) {
                    count1++;
                }
            }
            if(count1 == 0) {
                arr[count] = num;
                count++;
            }
        }
        for (int i = 0; i &lt; arr.length; i++) {
            System.out.println(arr[i]);
        }
    }
}

</code></pre>
<h2>enum枚举</h2>
<blockquote>
<p>枚举也是一种引用数据类型。</p>
<p>枚举中的每一个值，可以看做是“常量”，即使用全大写。</p>
<p>如果只有两种情况可以使用布尔类型，多于两种情况，可以使用枚举。</p>
</blockquote>
<blockquote>
<pre><code class="language-java">enum Result{
  SUCCESS, FAIL
}

</code></pre>
</blockquote>
<p>例子：</p>
<p>Main.java</p>
<pre><code class="language-java">package org.example;

public class Main {
    public static void main(String[] args) throws Exception {
        Result returnNum = divide(1, 2);
        System.out.println(returnNum == Result.SUCCESS ? &quot;计算成功&quot; : &quot;计算失败&quot;);
    }

    /*
    enum Result{
        SUCCESS, FAIL
    }
    */
    public static Result divide(int a, int b) {
        try {
            int c = a / b;
            return Result.SUCCESS;
        } catch (Exception e) {
            return Result.FAIL;
        }
    }
}

</code></pre>
<p>Result.java</p>
<pre><code class="language-java">package org.example;

public enum Result {
    SUCCESS, FAIL
}


</code></pre>
<h1>异常处理</h1>
<p>Java中异常以类和对象形式存在</p>
<pre><code class="language-java">package org.example;

public class Main {
    public static void main(String[] args) throws Exception {
        NumberFormatException nfe = new NumberFormatException(&quot;数字格式化异常！&quot;);
        System.out.println(nfe);

        NullPointerException npe = new NullPointerException(&quot;空指针异常！&quot;);
        System.out.println(npe);
    }
}

</code></pre>
<p>在以下代码中，如果除数为0，Java虚拟机则会自动new出来异常对象：<code>ArithmeticException(&quot;/ by zero&quot;)</code>。</p>
<p>代码：</p>
<pre><code class="language-java">package org.example;

public class Main {
    public static void main(String[] args) throws Exception {
        int a = 10;
        int b = 0;
        int c = a / b; // new ArithmeticException()
        System.out.println(a + &quot; / &quot; + b + &quot; = &quot; + c);
    }
}

</code></pre>
<p>异常打印：</p>
<pre><code class="language-x86asm">Exception in thread &quot;main&quot; java.lang.ArithmeticException: / by zero
	at org.example.Main.main(Main.java:7)

</code></pre>
<p>所有的异常都是发生在运行阶段的。</p>
<p>代码：</p>
<pre><code class="language-java">package org.example;

public class Main {
    public static void main(String[] args) {
        // main方法中调用doSome方法
        // 因为doSome方法声明位置上有：throws ClassNotFoundException
        // 我们在调用doSome方法的时候，必须对这种异常进行预先的处理，如果不处理则编译器就报错
        // 直接调用doSome，编译器会报错：未处理 异常: java.lang.ClassNotFoundException
        doSome();
    }

    /**
     * doSome方法在方法声明的位置上使用了：throws ClassNotFoundException
     * 这个代码表示doSome方法在执行过程中，有可能会出现ClassNotFoundException异常
     * 叫做类没找到异常。这个异常直接父类是：Exception，所以ClassNotFoundException属于编译时异常。
     * @throws ClassNotFoundException
     */
    public static void doSome() throws ClassNotFoundException{
        System.out.println(&quot;doSome!!!&quot;);
    }
}

</code></pre>
<p>第一种处理方法：在方法声明的位置上继续使用<code>throws</code>，来完成异常的继续上抛，抛给调用者。</p>
<pre><code class="language-java">package org.example;

public class Main {
    public static void main(String[] args) throws ClassNotFoundException {
        doSome();
    }

    public static void doSome() throws ClassNotFoundException{
        System.out.println(&quot;doSome!!!&quot;);
    }
}

</code></pre>
<p>第二种处理方法：try...catch进行捕捉</p>
<pre><code class="language-java">package org.example;

public class Main {
    public static void main(String[] args) {
        try {
            doSome();
        } catch (ClassNotFoundException e) {
						// throw new RuntimeException(e);
            e.printStackTrace();
        }
    }

    public static void doSome() throws ClassNotFoundException{
        System.out.println(&quot;doSome!!!&quot;);
    }
}

</code></pre>
<h2>上抛</h2>
<p>处理异常的第一种方式：在方法声明的位置上使用<code>throws</code>关键字抛出，谁调用我这个方法，我就抛给谁。抛给调用者来处理。</p>
<pre><code class="language-java">package org.example;

import java.io.FileInputStream;
import java.io.FileNotFoundException;
import java.io.IOException;

public class Main {
    public static void main(String[] args) throws IOException {
        System.out.println(&quot;main begin&quot;);
        m1();
        System.out.println(&quot;main over&quot;);
    }
    // 上抛,可以抛相同的异常,也可以抛父类异常
    public static void m1() throws IOException {
        System.out.println(&quot;m1 begin&quot;);
        m2();
        System.out.println(&quot;m1 over&quot;);
    }
    // 异常可以上抛多个
    private static void m2() throws ClassCastException, FileNotFoundException {
        System.out.println(&quot;m2 begin&quot;);
        m3();
        System.out.println(&quot;m2 over&quot;);
    }
    private static void m3() throws FileNotFoundException {
        // 调用SUN JDK中某个类的构造方法
        // 这个类暂时还没接触过，后期I/O流的时候就知道了。
        // 我们只是借助这个类学习一下异常处理机制。

        // 创建一个输入流对象，该流指向一个文件
        new FileInputStream(&quot;C:\\Users\\ganto\\Desktop\\test.txt&quot;);
    }
}

</code></pre>
<h2>捕捉</h2>
<pre><code class="language-java">package org.example;

import java.io.FileInputStream;
import java.io.FileNotFoundException;
import java.io.IOException;

public class Main {
    public static void main(String[] args) {
        System.out.println(&quot;main begin&quot;);
        try {
            m1();
        } catch (IOException e) {
            throw new RuntimeException(e);
        }
        System.out.println(&quot;main over&quot;);
    }
    // 上抛,可以抛相同的异常,也可以抛父类异常
    public static void m1() throws IOException {
        System.out.println(&quot;m1 begin&quot;);
        m2();
        System.out.println(&quot;m1 over&quot;);
    }
    // 异常可以上抛多个
    private static void m2() throws ClassCastException, FileNotFoundException {
        System.out.println(&quot;m2 begin&quot;);
        m3();
        System.out.println(&quot;m2 over&quot;);
    }
    private static void m3() throws FileNotFoundException {
        // 调用SUN JDK中某个类的构造方法
        // 这个类暂时还没接触过，后期I/O流的时候就知道了。
        // 我们只是借助这个类学习一下异常处理机制。

        // 创建一个输入流对象，该流指向一个文件
        new FileInputStream(&quot;C:\\Users\\ganto\\Desktop\\test.txt&quot;);
    }
}

</code></pre>
<p>深入try...catch：</p>
<blockquote>
<p>1、catch后面的小括号中的类型可以是具体的异常类型，也可以是该异常类型的夫类型。</p>
<p>2、catch可以写多个。建议catch的时候，精确的一个一个处理。这样有利于程序的调试。</p>
<p>3、catch写多个的时候，从上到下必须遵循从小到大的原则。</p>
</blockquote>
<p>JDK8的新特性，可以用<code>|</code> (或) 的符号进行捕获多个异常</p>
<pre><code class="language-java">try{
  ...
} catch(FileNotFoundException | ArithmeticException | NullPointerException e) {
  ...
}

</code></pre>
<h2>异常对象的常用方法</h2>
<p>异常对象有两个非常重要的方法：</p>
<ul>
<li>获取异常简单的描述信息：String msg = exception.getMessage();</li>
<li>打印异常追踪的堆栈信息：exception.printStackTrace();</li>
</ul>
<pre><code class="language-java">package org.example;

public class Main {
    public static void main(String[] args) {
        NullPointerException e = new NullPointerException(&quot;空指针异常&quot;);
        String msg = e.getMessage();
        System.out.println(msg);

        // java后台打印异常堆栈追踪信息的时候，采用了异步线程的方式打印的。
        e.printStackTrace(); // 在实际开发中，建议使用这行代码，来打印异常信息。养成好习惯！

        System.out.println(&quot;=========&quot;);
    }
}

</code></pre>
<p>异常追踪信息的查看方式：异常追踪信息，从上往下一行一行的看；SUN公司官方代码不用看，可以直接跳过，因为官方的代码不会有问题；主要看自己编写的代码出现什么问题；看自己的代码报错的第一行，因为往往是第一个异常，导致的后续的异常。</p>
<h2>finally</h2>
<ul>
<li>在finally子句中的代码是最后执行的，并且是一定会执行的，即使try语句块中的代码出现了异常。finally子句必须和try一起出现，不能单独编写。</li>
</ul>
<pre><code class="language-java">package org.example;

import java.io.FileInputStream;
import java.io.FileNotFoundException;
import java.io.IOException;

public class Main {
    public static void main(String[] args) {
        FileInputStream fis = null;
        try {
            fis = new FileInputStream(&quot;C:\\Users\\ganto\\Desktop\\test.txt&quot;);

            String s = null;
            s.toString(); // 这里一定会出现空指针异常！

            // 流使用完需要关闭，因为流是占用资源的。
            // 即使以上代码出现了异常，流也需要被关闭！
            // 放在这里，有可能会因为上方代码异常，导致流无法被执行，从而无法关闭流。
            // 所以以下两行代码写在finally子句中比较好
            // System.out.println(&quot;关闭流&quot;);
            // fis.close();
        } catch (FileNotFoundException e) {
            e.printStackTrace();
        } catch (IOException e) {
            e.printStackTrace();
        } catch (NullPointerException e) {
            e.printStackTrace();
        } finally {
            // 这里需要判断fis不为空，避免空指针异常
            if(fis != null) {
                try {
                    System.out.println(&quot;关闭流&quot;);
                    fis.close();
                } catch (IOException e) {
                    e.printStackTrace();
                }
            }
        }

        System.out.println(&quot;Over&quot;);
    }
}

</code></pre>
<p>以下代码执行顺序是：先try然后finally最后return。所以以下代码中的finally中的语句会执行。</p>
<pre><code class="language-java">package org.example;

public class Main {
    public static void main(String[] args) {
        try {
            System.out.println(&quot;try...&quot;);
            return;
        } finally {
            System.out.println(&quot;finally...&quot;);
        }
    }
}

</code></pre>
<p>以下代码中的finally中的语句则不会执行，因为java虚拟机退出会中断finally语句</p>
<pre><code class="language-java">package org.example;

public class Main {
    public static void main(String[] args) {
        try {
            System.out.println(&quot;try...&quot;);
            System.exit(0);
        } finally {
            System.out.println(&quot;finally...&quot;);
        }
    }
}

</code></pre>
<h2>final finally finalize 之间的区别</h2>
<h3>final</h3>
<p>final是一个关键字，用于修饰常量、方法、类。<a href="#final%E5%85%B3%E9%94%AE%E5%AD%97">详情</a></p>
<pre><code class="language-java">package org.example;

public class Main {
    public static void main(String[] args) {
        final int i = 10;
        i = 11; // 报错 final修饰的变量无法被修改
    }
}

</code></pre>
<h3>finally</h3>
<p>finally也是一个关键字，和try联合使用，使用在异常处理机制中，在finally语句块中的代码是一定会被执行的</p>
<pre><code class="language-java">try{
  ...
} finally {
  System.out.printlnj(&quot;一定会执行到这里&quot;);
}

</code></pre>
<h3>finalize</h3>
<p>finalize()是Object类中的一个方法.作为方法名出现。所以finalize是标识符。</p>
<h2>自定义异常</h2>
<p>SUN官方提供的JDK内置的异常肯定是不够用的。在实际开发中，有很多业务，这些业务出现异常之后，JDK中都是没有的。和业务挂钩的异常程序员可以自己定义。</p>
<p>自定义异常：</p>
<ul>
<li>第一步：编写一个类继承Exception或者RuntimeException</li>
<li>第二步：提供两个构造方法，一个无参数的，一个带有String参数的</li>
</ul>
<pre><code class="language-java">package org.example;

public class MyException extends Exception{ // 编译时异常
    public MyException() {

    }
    public MyException(String s) {
        super(s);
    }
}

// 或者

//public class MyException extends RuntimeException{ // 运行时异常
//    public MyException() {
//
//    }
//    public MyException(String s) {
//        super(s);
//    }
//}


</code></pre>
<p>测试自定义异常类：</p>
<pre><code class="language-java">package org.example;

public class Main {
    public static void main(String[] args) {
        // 创建异常对象（只new了异常对象，并没有手动抛出）
        MyException e = new MyException(&quot;用户名不能为空！&quot;);
        // 打印异常堆栈信息
        e.printStackTrace();

        String msg = e.getMessage();
        System.out.println(msg);
    }
}

</code></pre>
<h2>自定义异常在实际开发中的使用：</h2>
<p>MyStackOperationException.java</p>
<pre><code class="language-java">package org.example;

/**
 * 栈操作异常
 */
public class MyStackOperationException extends Exception {
    public MyStackOperationException() {
    }
    public MyStackOperationException(String s) {
        super(s);
    }
}


</code></pre>
<p>MyStack.java</p>
<pre><code class="language-java">package org.example;

public class MyStack {
    private Object[] elements;

    // 栈帧，永远指向栈顶部元素
    // 默认初始值是0，最初的栈是空的，一个元素都没有
    private int index;

    public MyStack() {
        this.elements = new Object[10];
        this.index = -1;
    }

    public Object[] getElements() {
        return elements;
    }

    public void setElements(Object[] elements) {
        this.elements = elements;
    }

    public int getIndex() {
        return index;
    }

    public void setIndex(int index) {
        this.index = index;
    }

    // 压栈方法push
    public void push(Object o) throws MyStackOperationException {
        if(this.index &gt;= this.elements.length-1) {
            // System.out.println(&quot;栈满！压栈失败！&quot;);
            // return;

            // 创建异常对象
            MyStackOperationException e = new MyStackOperationException(&quot;栈满！压栈失败！&quot;);
            // 手动将异常抛出去
            throw e; // 这里如果使用捕捉的话,没有实际意义 栈已满这个信息需要传递出去,也就是这里使用上抛

            // 上方两行代码可以合并成一条
            // throw new MyStackOperationException(&quot;栈满！压栈失败！&quot;);
        }
        this.index++;
        this.elements[this.index] = o;
        // 所有System.out.println()方法执行时，如果输出引用的话，会自动调用引用的toString()方法
        // System.out.println(&quot;压栈&quot; + o.toString() + &quot;元素成功，栈帧指向&quot; + this.index);
        System.out.println(&quot;压栈&quot; + o + &quot;元素成功，栈帧指向&quot; + this.index);
    }

    // 弹栈方法pop
    public Object pop() throws MyStackOperationException {
        if(this.index &lt; 0) {
            // System.out.println(&quot;栈空！弹栈失败！&quot;);
            // return null;

             throw new MyStackOperationException(&quot;栈空！弹栈失败！&quot;);
        }
        System.out.print(&quot;弹栈&quot; + this.elements[this.index] + &quot;元素成功，&quot;);
        this.elements[this.index] = null;
        this.index--;
        System.out.println(&quot;栈帧指向&quot; + this.index);
        return null;
    }
}

</code></pre>
<p>Main.java</p>
<pre><code class="language-java">package org.example;

public class Main {
    public static void main(String[] args) {
        // 创建异常对象（只new了异常对象，并没有手动抛出）
        MyStack stack = new MyStack();
        try {
            stack.push(new Animal());
        } catch (MyStackOperationException e) {
            e.printStackTrace();
            System.out.println(e.getMessage());
        }

        try {
            stack.pop();
            stack.pop();
        } catch (MyStackOperationException e) {
            e.printStackTrace();
            System.out.println(e.getMessage());
        }
    }
}

class Animal{
}

</code></pre>
<h2>异常与方法的覆盖</h2>
<p>之前在讲解方法覆盖的时候，当时遗留了一个问题？</p>
<ul>
<li>重写之后的方法<em>不能</em>比重写之前的方法抛出更多（更宽泛）的异常，可以更少（范围更小）。</li>
</ul>
<h2>总结</h2>
<p>总结异常中的关键字：</p>
<p>异常捕获：</p>
<p>try</p>
<p>catch</p>
<p>finally</p>
<p>throws 在方法声明位置上使用，表示上报异常信息给调用者</p>
<p>throw 手动抛出异常</p>
<pre><code class="language-java">package org.example;

class Animal {
    public void doSome() {

    }

    public void doOther() throws Exception {

    }
}

class Cat extends Animal {

    // 特殊情况，父类方法没有抛出任何异常，但是子类重写方法可以抛出RuntimeException异常
    // 编译正常
    public void doSome() throws RuntimeException {

    }

    // 重写的doSome方法抛出了更多的异常，所以会编译报错
//    public void doSome() throws Exception {
//
//    }

    // 重写的doOther方法抛出了更少的异常，所以编译正常
//    public void doOther() {
//
//    }

    // 重写的doOther方法抛出了相同的异常，所以编译正常
//    public void doOther() throws Exception {
//
//    }
}

</code></pre>
<p>在实际开发中，父类方法抛出什么异常，子类重写的方法也抛出一样的异常。</p>
<h2>异常作业</h2>
<p>IllegalNameException.java</p>
<pre><code class="language-java"> package com.ganto.homework;
 /**
  * 自定义异常
  */
 public class IllegalNameException extends Exception {
     public IllegalNameException() {
         
     }
     public IllegalNameException(String s) {
         super(s);
     }
 }

</code></pre>
<p>UserService.java</p>
<pre><code class="language-java"> package com.ganto.homework;
 /**
  * 用户业务类，处理用户相关的业务：例如登录、注册等功能。
  */
 public class UserService throws IllegalNameException {
     /**
      * 用户注册
      * @param username 用户名
      * @param password 密码
      * @throws IllegalNameException 当前用户名为null，或者用户名长度小于6，或者用户名长度大于14，会出现该异常！
      */
     public void register(String username, String password) {
         // 引用等于null的这个判断，最好放到所有条件的最前面。避免空指针异常的发生。
         // 尽可能将null放在前面，写成&quot;null == username&quot;，避免手误将其写成&quot;username = null&quot;，这样会将username引用赋值为空，导致程序出错误。
         if(null == username || username.length() &lt; 6 || username.length() &gt; 14) {
             throw new IllegalNameException(&quot;用户名不合法，长度必须在6-14位之间&quot;);
         }
         // 程序能执行到此处，说明用户名合法
         System.out.println(&quot;注册成功，欢迎[&quot;+ username +&quot;]&quot;);
     }
 }

</code></pre>
<p>测试类Test.java</p>
<pre><code class="language-java"> package com.ganto.homework;
 
 public class Test {
     public static void main(String[] args) {
         // 创建UserService对象
         UserService userService = new UserService();
         // 用户名和密码就不再从控制台接收了
         try {
             userService.register(&quot;gantooo&quot;, &quot;123&quot;);
         } catch (IllegalNameException e) {
             System.out.println(e.getMessage());
         }
     }
 }

</code></pre>
<h2>其他作业</h2>
<p>Moveable.java</p>
<pre><code class="language-java">package org.example.homework;

/**
 * 可移动的接口
 */
public interface Moveable {
    /**
     * 移动的方法（移动行为）
     */
    void move();
}


</code></pre>
<p>Shootable.java</p>
<pre><code class="language-java">package org.example.homework;

/**
 * 可射击的接口
 */
public interface Shootable {
    /**
     * 射击的方法（射击行为）
     */
    void shoot();
}


</code></pre>
<p>Weapon.java</p>
<pre><code class="language-java">package org.example.homework;

/**
 * 所有武器的父类（武器类）
 */
public class Weapon {

    public String toString() {
        return &quot;&quot;;
    }
}

</code></pre>
<p>Tank.java</p>
<pre><code class="language-java">package org.example.homework;

/**
 * 坦克是一个武器，可移动，可射击。
 */
public class Tank extends Weapon implements Moveable, Shootable {
    public void move() {
        System.out.println(&quot;坦克移动&quot;);
    }
    public void shoot() {
        System.out.println(&quot;坦克开炮&quot;);
    }

    @Override
    public String toString() {
        return &quot;坦克&quot;;
    }
}

</code></pre>
<p>GaoShePao.java</p>
<pre><code class="language-java">package org.example.homework;

/**
 * 高射炮是一个武器，不可移动，可射击。
 */
public class GaoShePao extends Weapon implements Shootable {
    public void shoot() {
        System.out.println(&quot;高射炮开炮&quot;);
    }

    @Override
    public String toString() {
        return &quot;高射炮&quot;;
    }
}

</code></pre>
<p>Fighter.java</p>
<pre><code class="language-java">package org.example.homework;

/**
 * 战斗机是一个武器，可移动，可射击。
 */
public class Fighter extends Weapon implements Moveable, Shootable {
    public void move() {
        System.out.println(&quot;战斗机起飞&quot;);
    }
    public void shoot() {
        System.out.println(&quot;战斗机开炮&quot;);
    }

    @Override
    public String toString() {
        return &quot;战斗机&quot;;
    }
}

</code></pre>
<p>WuZiFeiJi.java</p>
<pre><code class="language-java">package org.example.homework;

/**
 * 物资飞机是一个武器，可移动，不可射击。
 */
public class WuZiFeiJi extends Weapon implements Moveable {
    public void move() {
        System.out.println(&quot;物资飞机起飞&quot;);
    }

    @Override
    public String toString() {
        return &quot;物资飞机&quot;;
    }
}

</code></pre>
<p>Army.java</p>
<pre><code class="language-java">package org.example.homework;

/**
 * 军队
 */
public class Army {
    // 武器数组
    private Weapon[] weapons;
    /**
     * 创建军队的构造方法。
     * @param count 武器数量
     */
    public Army(int count) {
        // 动态初始化数组中的每一个元素，默认值是null
        // 武器数组是有了，但是武器数组中没有放武器
        weapons = new Weapon[count];
    }
    /**
     * 将武器加入数组
     * @param weapon
     */
    public void addWeapon(Weapon weapon) throws AddWeaponException {
        for(int i = 0; i &lt; weapons.length; i++) {
            if(null == weapons[i]) {
                weapons[i] = weapon;
                System.out.println(weapon + &quot;武器，添加成功！&quot;);
                return;
            }
        }
        // 程序如果执行到此处，说明武器没有添加成功
        throw new AddWeaponException(&quot;武器已经达到上限&quot;);
    }
    /**
     * 所有可攻击的武器攻击。
     */
    public void attackAll() {
        // 遍历数组
        for (int i = 0; i &lt; weapons.length; i++) {
            if(weapons[i] instanceof Shootable) {
                // 调用子类中特有的方法，向下转型。
                Shootable shootable = (Shootable) weapons[i];
                shootable.shoot();
            }
        }
    }
    /**
     * 所有可移动的武器移动
     */
    public void moveAll() {
        // 遍历数组
        for (int i = 0; i &lt; weapons.length; i++) {
            if(weapons[i] instanceof Moveable) {
                // 调用子类中特有的方法，向下转型。
                Moveable moveable = (Moveable) weapons[i];
                moveable.move();
            }
        }
    }
}

</code></pre>
<blockquote>
<p>注意：以上代码中，在父类型转换成接口类型的时候，父类和接口不需要存在继承关系，Java语法可以直接转换成接口类型，但一定要先判断该类是该接口<code>instanceof</code>。</p>
</blockquote>
<p>AddWeaponException.java</p>
<pre><code class="language-java">package org.example.homework;

/**
 * 添加武器异常
 */
public class AddWeaponException extends Exception {
    public AddWeaponException() {

    }
    public AddWeaponException(String s) {
        super(s);
    }
}

</code></pre>
<p>测试类Test.java</p>
<pre><code class="language-java">package org.example.homework;

/**
 * 测试程序Test
 */
public class Test {
    public static void main(String[] args) {
        // 构建一个军队
        Army army = new Army(4); // 军队只有四个武器
        // 创建武器对象
        Fighter fighter = new Fighter();
        Tank tank = new Tank();
        WuZiFeiJi wuZiFeiJi = new WuZiFeiJi();
        GaoShePao gaoShePao = new GaoShePao();
        GaoShePao gaoShePao2 = new GaoShePao();
        // 添加武器
        try {
            army.addWeapon(fighter);
            army.addWeapon(tank);
            army.addWeapon(wuZiFeiJi);
            army.addWeapon(gaoShePao);
            army.addWeapon(gaoShePao2);
        } catch (AddWeaponException e) {
            System.out.println(e.getMessage());
        }

        // 让所有可移动的移动
        army.moveAll();

        // 让所有可攻击的攻击
        army.attackAll();
    }
}


</code></pre>
<h1>集合</h1>
<h2>集合概述</h2>
<p>1.1、数组其实就是一个集合。集合实际上就是一个容器。可以来容纳其他类型的数据。</p>
<p>集合为什么说在开发中使用较多？</p>
<p>集合是一个容器，是一个载体，可以一次容纳多个对象。</p>
<p>在实际开发中，假设链接数据库，数据库当中有10条记录。</p>
<p>那么假设把这10条记录查询出来，在java程序中会将10条数据封装成10个java对象，</p>
<p>然后将10个java对象放到某一个集合当中，将集合传到前端，然后遍历集合，</p>
<p>将数据一个一个的展示出来。</p>
<p>1.2、集合不能直接存储基本数据类型，另外集合也不能直接存储java对象，集合当中存储的都是java对象的内存地址。（或者说集合中存储的引用。）</p>
<p>集合在java中本事是一个容器，是一个对象。</p>
<p>集合中任何时候存储的都是引用。</p>
<p>1.3、在java中每一个不同的集合，底层会对应不同的数据结构。往不同的集合中存储元素，等于将数据放到了不同的数据结构当中。数据存储的结构就是数据结构。不同的数据结构，数据存储方式不同。</p>
<p>例如：数组、二叉树、链表、哈希表...</p>
<p>以上这些都是常见的数据结构。</p>
<p>你往集合c1中放数据，可能是放到了数组上了。</p>
<p>你往集合c2中放数据，可能是放到了二叉树上了。</p>
<p>...</p>
<p>使用不同的集合等同于使用了不同的数据结构。</p>
<p>1.4、集合在java JDK中的<code>java.util.*</code>包下。</p>
<p>所有的集合类的集合接口都在<code>java.util</code>包下。</p>
<p>1.5、集合的继承结构图</p>
<p>集合整个这个体系是怎样的一个结构，需要有印象。</p>
<p>1.6、在java中集合分为两大类：</p>
<ul>
<li>
<p>一类是单个方式存储元素：单个凡是存储元素，这一类集合中超级父接口：java:util.Collection;</p>
</li>
<li>
<p>一类是以键值对的方式存储元素：以键值对的方式存储元素，这一类集合中超级父接口：java.util.Map;</p>
</li>
</ul>
<h2>Collection</h2>
<pre><code class="language-java">package com.ganto;

import java.util.ArrayList;
import java.util.Collection;

/**
 * 关于java.util.Collection接口中常用的方法
 *
 * 1.Collection中能存放什么元素？
 * - 没有使用“泛型”之前，Collection中可以存储Object的所有子类型。
 * - 使用了“泛型”之后，Collection中只能存储某个具体的类型。
 * - 集合后期会学习“泛型”语法。目前先不用管。Collection中什么都能村。
 * - 只要是Object的子类型就行。（集合中不能直接存储基本数据类型，也不能存java对象，只能存储java对象的内存地址）
 *
 * 2.Collection中的常用方法
 * - boolean add(Object e) 向集合中添加元素
 * - int size() 获取集合中元素的个数
 * - void clear() 清空集合
 * - boolean contains(Object o) 判断当前集合中是否包含元素o，包含返回true，不包含返回false
 * - boolean remove(Object o) 删除集合中的某个元素
 * - boolean isEmpty() 判断该集合中元素的个数是否为0
 * - Object[] toArray() 调用这个方法可以把集合转换成数组
 *
 */
public class CollectionTest01 {
    public static void main(String[] args) {
        // 创建一个集合对象
        // Collection c = new Collection(); // 接口是抽象的，无法实例化对象
        // 多态
        Collection c = new ArrayList();
        // 测试Collection接口中的常用方法
        c.add(1200); // 自动装箱，实际上是放进去了一个对象的内存地址。Integer x = new Integer();
        c.add(3.14);
        c.add(new Object());
        c.add(new Stu());
        c.add(true);

        // 获取集合中元素的个数
        System.out.println(&quot;集合中元素的个数：&quot; + c.size());

        // 清空集合
        c.clear();
        System.out.println(&quot;集合中元素的个数：&quot; + c.size());

        // 判断集合中是否包含”绿巨人“
        c.add(&quot;绿巨人&quot;);
        boolean flag = c.contains(&quot;绿巨人&quot;);
        System.out.println(flag);
        System.out.println(&quot;集合中元素的个数：&quot; + c.size());

        // 删除集合中某个元素
        c.remove(&quot;绿巨人&quot;);
        System.out.println(&quot;集合中元素的个数：&quot; + c.size());

        // 判断该集合中元素的个数是否为0
        System.out.println(c.isEmpty());

        // 集合转换成数组
        c.add(&quot;嘻嘻&quot;);
        c.add(&quot;哈哈&quot;);
        c.add(&quot;嘿嘿&quot;);
        c.add(&quot;羞羞&quot;);
        c.add(&quot;呲呲&quot;);
        Object[] arr = c.toArray();
        for (int i = 0; i &lt; arr.length; i++) {
            System.out.println(arr[i]);
        }
    }
}

class Stu {

}

</code></pre>
<h3>boolean contains(Object o)</h3>
<p>判断当前集合中是否包含元素o，包含返回true，不包含返回false</p>
<pre><code class="language-java">package com.ganto;

import java.util.ArrayList;
import java.util.Collection;

/**
 * 深入Collection集合的contains方法
 */
public class Main {
    public static void main(String[] args) {
        // 创建集合对象
        Collection c = new ArrayList();

        // 向集合中存储元素
        String s1 = new String(&quot;abc&quot;);
        c.add(s1);
        String s2 = new String(&quot;def&quot;);
        c.add(s2);

        // 集合中元素的个数
        System.out.println(c.size());

        String x = new String(&quot;abc&quot;);
        System.out.println(c.contains(x)); // true
    }
}

</code></pre>
<p>以上代码中的contains会返回true，因为contains源码是使用String的equals进行比较的，而String的equals是官方重写过的，只比较内容，不比较内存地址。</p>
<p>根据以上内容，可以得出结论：放在集合里的元素需要重写equals方法</p>
<h3>boolean remove(Object o)</h3>
<p>删除集合中的某个元素</p>
<pre><code class="language-java">package com.ganto;

import java.util.ArrayList;
import java.util.Collection;

/**
 * 深入Collection集合的contains方法
 */
public class Main {
    public static void main(String[] args) {
        // 创建集合对象
        Collection c = new ArrayList();

        // 创建字符串对象
        String s1 = new String(&quot;abc&quot;);
        // 存储s1
        c.add(s1);
        // 创建一个新的字符串对象
        String x = new String(&quot;abc&quot;);
        // 删除x
        c.remove(x);

        // 集合中元素的个数
        System.out.println(c.size()); // 0

    }
}

</code></pre>
<p>以上代码打印为0，因为remove依然是调用equals方法，而s1.equals(x)是返回true的。</p>
<h2>集合遍历（迭代）</h2>
<p><img src="images%5CJava%5C%E8%BF%AD%E4%BB%A3%E5%99%A8%E6%89%A7%E8%A1%8C%E5%8E%9F%E7%90%86.png" alt="" /></p>
<pre><code class="language-java">package com.ganto;

import java.util.ArrayList;
import java.util.Collection;
import java.util.Iterator;

/**
 * 关于集合遍历（迭代）专题 ※※※※※
 */
public class Main {
    public static void main(String[] args) {
        // 注意：以下讲解的遍历方式/迭代方式，是所有Collection通用的一种方式。
        // 在Map集合中不能用。在所有的Collection以及子类中使用。

        // 创建集合对象
        Collection c = new ArrayList(); // 后面的集合无所有，主要是看前面的Collection接口怎么遍历/迭代
        // 添加元素
        c.add(&quot;abc&quot;);
        c.add(&quot;def&quot;);
        c.add(122);
        c.add(new Object());
        // 对集合Collection进行遍历/迭代
        // 第一步：获取集合对象的迭代器对象Iterator
        Iterator it = c.iterator();
        // 第二部：通过以上获取的迭代器对象开始遍历/迭代集合。
        /**
         * 以下两个方法是迭代器对象Iterator中的方法：
         * - boolean hasNext() 如果仍有元素可以迭代，则返回true
         * - Object next() 返回迭代的下一个元素
         */

//        boolean hasNext = it.hasNext();
//        if(hasNext) {
//            // 不管存进去的是什么，取出来统一都是Object
//            Object obj = it.next();
//            System.out.println(obj);
//        }

        while (it.hasNext()) {
            Object obj = it.next();
            System.out.println(obj);
        }
    }
}

</code></pre>
<pre><code class="language-java">package com.ganto;

import java.util.ArrayList;
import java.util.Collection;
import java.util.Iterator;

public class Main {
    public static void main(String[] args) {
        Collection c = new ArrayList();
      
        Iterator it = c.iterator();
      
        c.add(100);
        c.add(200);
        c.add(300);
        c.add(400);
        c.add(100);

        while (it.hasNext()) {
            Object obj = it.next();
            System.out.println(obj);
        }
    }
}

</code></pre>
<p>以上代码中，如果先<code>Iterator it = c.iterator();</code>再进行<code>c.add(200);</code>，会出现异常<code>java.util.ConcurrentModificationException</code>。</p>
<p>注意：此时获取的迭代器，指向的是那个集合中没有元素状态下的迭代器。</p>
<p>一定要注意：集合结构只要发生改变，迭代器必须重新获取。</p>
<pre><code class="language-java">package com.ganto;

import java.util.ArrayList;
import java.util.Collection;
import java.util.Iterator;

public class Main {
    public static void main(String[] args) {
        Collection c = new ArrayList();
        c.add(100);
        c.add(200);
        Iterator it = c.iterator();
        while (it.hasNext()) {
            Object obj = it.next();
            c.remove(obj);  // 出异常
            System.out.println(obj);
        }
    }
}

</code></pre>
<p>以上代码，也印证了，集合结构只要发生改变，迭代器必须重新获取。以上代码删除过程，就使集合结构发生了变化。可以通过迭代器删除，以避免出错。</p>
<pre><code class="language-java">package com.ganto;

import java.util.ArrayList;
import java.util.Collection;
import java.util.Iterator;

public class Main {
    public static void main(String[] args) {
        Collection c = new ArrayList();
        c.add(100);
        c.add(200);
        Iterator it = c.iterator();
        while (it.hasNext()) {
            Object obj = it.next();
            it.remove(); // 关键代码（从迭代器指向的collection中移除迭代器返回的最后一个元素（可选操作））
            System.out.println(obj);
        }
        System.out.println(c.size());
    }
}

</code></pre>
<h2>List接口</h2>
<p>List接口中常用方法：</p>
<ul>
<li>
<p>List集合存储元素特点：有序可重复</p>
<p>有序：List集合中的元素有下标</p>
<p>从0开始，以1递增</p>
<p>可重复：存储一个1，还可以再存储1</p>
</li>
<li>
<p>List既然是Collection接口的子接口，那么肯定List接口有自己“特色”的方法</p>
<p>以下只列出List接口特有的常用的方法：</p>
<ul>
<li>void add(int index, Object element)</li>
<li>Object set(int index, Object element)</li>
<li>Object get(int index)</li>
<li>int indexOf(Object o)</li>
<li>int lastIndexOf(Object o)</li>
<li>Object remove(int index)</li>
</ul>
</li>
</ul>
<pre><code class="language-java">package com.ganto;

import java.util.ArrayList;
import java.util.Iterator;
import java.util.List;

public class Main {
    public static void main(String[] args) {
        // 创建List类型的集合
        List myList = new ArrayList();

        // 添加元素 默认都是向集合的末尾添加元素
        myList.add(&quot;A&quot;);
        myList.add(&quot;B&quot;);

        // 在列表的指定位置插入指定元素（第一个参数是下标）
        myList.add(1, &quot;KING&quot;);

        // 修改指定位置的元素
        myList.set(1, &quot;HAHA&quot;);

        // 迭代
        Iterator it = myList.iterator();
        while (it.hasNext()){
            Object obj = it.next();
            System.out.println(obj);
        }

        // 根据下标获取元素
        Object el = myList.get(1);
        System.out.println(el);

        // 因为有下标，所以List集合有自己比较特殊的遍历方法
        // 通过下标遍历。【List集合特有的方式，Set没有。】
        for (int i = 0; i &lt; myList.size(); i++) {
            Object obj = myList.get(i);
            System.out.println(obj);
        }

        // 获取指定对象第一次出现处的索引
        System.out.println(myList.indexOf(&quot;KING&quot;));

        // 获取指定对象最后一次出现处的索引
        System.out.println(myList.lastIndexOf(&quot;B&quot;));

        // 删除指定下标位置的元素
        myList.remove(0);
        System.out.println(myList.size());

    }
}

</code></pre>
<h3>ArrayList</h3>
<p>ArrayList集合底层采用了数组这种数据结构。</p>
<p>ArrayList集合是非线程安全的。</p>
<p>1、ArrayList集合默认初始化容量是10（底层先创建了一个长度为0的数组，当添加第一个元素的时候，初始化容量10）</p>
<p>2、ArrayList集合底层是Object类型的数组Object[]</p>
<p>3、构造方法：</p>
<ul>
<li>new ArrayList();</li>
<li>new ArrayList(20);</li>
</ul>
<p>4、ArrayList集合的扩容：</p>
<ul>
<li>原容量的1.5倍</li>
<li>ArrayList集合底层是数组，尽可能少的扩容。因为数组扩容效率比较低，建议在使用ArrayList集合的时候预估元素的个数，给定一个初始化容量</li>
</ul>
<p>5、数组优点：检索效率比较高（每个元素占用空间大小相同，内存地址是连续的，知道首元素的内存地址，然后知道下标，通过数学表达式计算出元素的内存地址，所以检索效率最高。）</p>
<p>6、数组缺点：随即增删元素效率比较低、数组无法存储大数据量，因为很难找到一块非常巨大的连续的内存空间。</p>
<p>7、向数组末尾添加元素，效率很高，不受影响</p>
<p>8、这么多的集合中，用ArrayList集合比较多，因为往数组末尾添加元素，效率不受影响，日常开发中往往都是向数组末尾添加元素。</p>
<p>9、ArrayList集合是非线程安全的。</p>
<pre><code class="language-java">package com.ganto;

import java.util.ArrayList;
import java.util.List;

public class Main {
    public static void main(String[] args) {
        // 默认初始化容量是10
        List list1 = new ArrayList();
        list1.add(new Object());
        // 集合的size()方法是获取当前集合中元素的个数。不是获取集合的容量
        System.out.println(list1.size()); // 1
        
        // 指定初始化容量20
        List list2 = new ArrayList(20);
        // 集合的size()方法是获取当前集合中元素的个数。不是获取集合的容量
        System.out.println(list2.size()); // 0
    }
}

</code></pre>
<h4>ArrayList的构造方法</h4>
<pre><code class="language-java">package com.ganto;

import java.util.ArrayList;
import java.util.Collection;
import java.util.HashSet;
import java.util.List;

public class Main {
    public static void main(String[] args) {
        // 默认初始化容量10
        List list1 = new ArrayList();

        // 指定初始化容量100
        List list2 = new ArrayList(20);

        // 创建一个HashSet集合
        Collection c = new HashSet();
        c.add(100);
        c.add(200);
        // 通过这个构造方法就可以将HashSet集合转换成List集合
        List list3 = new ArrayList(c);
        for (int i = 0; i &lt; list3.size(); i++) {
            System.out.println(list3.get(i));
        }
    }
}

</code></pre>
<h3>单项链表数据结构</h3>
<p>单链表中的节点</p>
<p>节点是单向链表中基本的单元</p>
<p>每一个节点Node都有两个属性：</p>
<ul>
<li>一个属性是存储的数据</li>
<li>另一个属性是下一个节点的内存地址</li>
</ul>
<p>Node.java</p>
<pre><code class="language-java">package com.ganto;

/**
 * 节点类
 */
public class Node {
    // 存储的数据
    Object element;

    // 下一个节点的内存地址
    Node next;

    public Node() {

    }

    public Node(Object element, Node next) {
        this.element = element;
        this.next = next;
    }
}

</code></pre>
<p>Link.java</p>
<pre><code class="language-java">package com.ganto;

/**
 * 链表类
 */
public class Link {
    // 头节点
    Node header = null;

    int size = 0;

    public int size() {
        return size;
    }

    // 向链表中添加元素的方法（向末尾添加）
    public void add(Object data) {
        // 创建一个新的节点对象
        // 让之前单链表的末尾节点next指向新节点对象
        // 有可能这个元素是第一个，也可能是第二个，也可能是第三个
        if(header == null) {
            // 能进来，说明没有节点，new一个新的节点对象，作为头节点对象
            // 这个时候的头节点既是一个头节点，又是一个末尾节点
            header = new Node(data, null);
        } else {
            // 说明头节点不是空，头节点已经存在了，找出当前末尾节点，让当前末尾节点的next是新节点
            Node currentLastNode = findLast(header);
            currentLastNode.next = new Node(data, null);
        }
        size++;
    }

    // 专门查找末尾节点的方法
    private Node findLast(Node node) {
        if(node.next == null) {
            // 如果一个节点的next是null，说明这个节点就是末尾节点
            return node;
        }
        // 程序能够到这里说明：node不是末尾节点
        return findLast(node.next);
    }

    // 删除链表中某个数据的方法
    public void remove(Object obj) {

    }

    // 修改链表中某个元素的方法
    public void modify(Object newObj){

    }

    // 查找链表中某个元素的方法
    public int find(Object obj) {
        return 1;
    }
}

</code></pre>
<p>Test.java</p>
<pre><code class="language-java">package com.ganto;

public class Test {
    public static void main(String[] args) {
        // 创建了一个集合对象
        Link link = new Link();
        // 往集合中添加元素
        link.add(100);
        link.add(200);
        link.add(300);
        // 获取元素个数
        System.out.println(link.size());
    }
}

</code></pre>
<p>链表优点：随机增删元素效率较高，因为增删元素不会涉及到大量元素位移</p>
<p>链表缺点：查询效率较低，每一次查找某个元素的时候都需要从头节点开始往下遍历</p>
<p><img src="images%5CJava%5C%E5%8D%95%E5%90%91%E9%93%BE%E8%A1%A8.png" alt="" /></p>
<h3>双向链表数据结构</h3>
<p>双向链表中的节点</p>
<p>节点是双向链表中基本的单元</p>
<p>每一个节点Node都有三个属性：</p>
<ul>
<li>一个属性是上一个节点的内存地址</li>
<li>一个属性是存储的数据</li>
<li>一个属性是下一个节点的内存地址</li>
</ul>
<p><img src="images%5CJava%5C%E5%8F%8C%E5%90%91%E9%93%BE%E8%A1%A8.png" alt="" /></p>
<h4>LinkedList</h4>
<pre><code class="language-java">package com.ganto;

import java.util.LinkedList;
import java.util.List;

/**
 * 链表的优点：
 *  由于链表上的元素在空间存储上内存地址不连续
 *  所以随机增删元素的时候不会有大量元素位移，因此随机增删效率比较高
 *  在以后的开发中，如果遇到随机增删集合中元素的业务比较多时，建议使用LinkedList
 *
 * 链表的缺点：
 *  不能通过数学表达式计算被查找元素的内存地址，每一次查找都是从头节点开始遍历，知道找到为止。所以LinkedList集合检索/查找的效率较低。
 */
public class Main {
    public static void main(String[] args) {
        // LinkedList集合底层也是有下标的。
        // 注意：ArrayList之所以检索效率比较高，不是单纯因为下标的原因
        // 是因为底层数组发挥的作用。
        // LinkedList集合照样有下标，但是检索/查找某个元素的时候效率比较低，因为只能从头节点开始一个一个遍历
        List list = new LinkedList();
        list.add(&quot;a&quot;);
        list.add(&quot;b&quot;);
        list.add(&quot;c&quot;);
        for (int i = 0; i &lt; list.size(); i++) {
            System.out.println(list.get(i));
        }
    }
}

</code></pre>
<p>LinkedList集合没有初始化容量，最初这个链表中没有任何元素。</p>
<p>first和last引用都是null。</p>
<p>不管是LinkedList还是ArrayList，以后写代码时不需要关心具体是哪个集合。因为我们要面向接口编程，调用的方法都是接口中的方法。</p>
<pre><code class="language-java">// List list = new ArrayList(); // 这样写表示底层用了数组
List list = new LinkedList(); // 这样写表示底层用了双向链表

list.add(&quot;1&quot;);
list.add(&quot;2&quot;);
list.add(&quot;3&quot;);
for(int i = 0; i &lt; list.size(); i++) {
  System.out.println(list.get(i));
}

</code></pre>
<h2>Vector</h2>
<ul>
<li>底层也是一个数组</li>
<li>初始化容量：10</li>
<li>扩容之后是当前容量的2倍</li>
<li>ArrayList集合扩容是原容量1.5倍</li>
<li>Vector中所有的方法都是线程同步的，都带有synchronized关键字，是线程安全的。效率比较低，使用的比较少。</li>
</ul>
<pre><code class="language-java">package com.ganto;

import java.util.Iterator;
import java.util.List;
import java.util.Vector;

public class Main {
    public static void main(String[] args) {
        // 创建一个Vector集合
        // Vector vector = new Vector();
        List vector = new Vector();

        // 添加元素
        // 默认容量10
        vector.add(1);
        vector.add(2);
        vector.add(3);
        vector.add(4);
        vector.add(5);
        vector.add(6);
        vector.add(7);
        vector.add(8);
        vector.add(9);
        vector.add(10);

        // 满了之后自动扩容到之前容量的2倍
        vector.add(11);

        // 迭代器
        Iterator it = vector.iterator();
        while (it.hasNext()) {
            Object obj = it.next();
            System.out.println(obj);
        }
    }
}

</code></pre>
<p>使用集合工具类：java.util.Collectioins，将线程不安全的ArrayList集合转换成线程安全的</p>
<p>java.util.Collection 是集合接口</p>
<p>java.util.Collections 是集合工具类</p>
<pre><code class="language-java">package com.ganto;

import java.util.*;

public class Main {
    public static void main(String[] args) {
        // 以下以后要使用
        List myList = new ArrayList(); // 非线程安全的
        // 变成线程安全的 myList集合就是线程安全的了
        Collections.synchronizedList(myList);

        myList.add(&quot;111&quot;);
        myList.add(&quot;222&quot;);
        myList.add(&quot;333&quot;);
    }
}

</code></pre>
<h2>HashSet集合</h2>
<ul>
<li>存储时顺序和取出的顺序不同</li>
<li>不可重复</li>
<li>放到HashSet集合中的元素实际上是放到了HashMap集合的key部分了</li>
</ul>
<pre><code class="language-java">package com.ganto;

import java.util.HashSet;
import java.util.Set;

public class Main {
    public static void main(String[] args) {
        Set&lt;String&gt; stringSet = new HashSet&lt;&gt;();
        stringSet.add(&quot;a&quot;);
        stringSet.add(&quot;b&quot;);
        stringSet.add(&quot;c&quot;);
        stringSet.add(&quot;d&quot;);
        stringSet.add(&quot;d&quot;);
        for (String s: stringSet) {
            System.out.println(s);
        }
    }
}

</code></pre>
<h2>TreeSet集合</h2>
<ul>
<li>TreeSet集合底层实际上是一个TreeMap</li>
<li>TreeMap集合底层是一个二叉树</li>
<li>放到TreeSet集合中的元素，等同于放到TreeMap集合key部分了</li>
<li>TreeSet集合中的元素：无序不可重复，但是可以按照元素的大小顺序自动排序，称为：可排序结合</li>
</ul>
<p>无序：指的是存进去的顺序和取出来的顺序不同，没有下标</p>
<pre><code class="language-java">package com.ganto;

import java.util.TreeSet;

public class Main {
    public static void main(String[] args) {
        // 创建一个TreeSet&lt;String&amp;gt;集合
        TreeSet&lt;String&gt; treeset = new TreeSet&lt;&gt;();
        // 添加String
        treeset.add(&quot;zhangsan&quot;);
        treeset.add(&quot;lisi&quot;);
        treeset.add(&quot;wangwu&quot;);
        treeset.add(&quot;zhaoliu&quot;);
        // 遍历
        for (String name: treeset) {
            // 按照字典顺序 升序（中文不行）
            System.out.println(name);
        }
        // 创建一个TreeSet&lt;Integer&amp;gt;集合
        TreeSet&lt;Integer&gt; treeset1 = new TreeSet&lt;&gt;();
        // 添加String
        treeset1.add(123);
        treeset1.add(934);
        treeset1.add(666);
        treeset1.add(12);
        // 遍历
        for (Integer num: treeset1) {
            // 按照数字大小顺序 升序
            System.out.println(num);
        }
    }
}

</code></pre>
<p>自定义类型，TreeSet则无法排序，中文也不支持排序</p>
<p>需要指定规则</p>
<h2>Map接口</h2>
<p>java.util.Map接口:</p>
<ul>
<li>Map和Collection没有继承关系</li>
<li>Map集合以key和value的方式存储数据（键值对）
<ul>
<li>key和value都是引用数据类型</li>
<li>key和value都是存储对象的内存地址</li>
<li>key起到主导的地位，value是key的一个附属品</li>
</ul>
</li>
<li>Map接口中常用方法：
<ul>
<li>V put(K key, V value) // 向Map集合中添加键值对</li>
<li>V get(Object key) // 通过key获取value</li>
<li>void clear() // 清空Map集合</li>
<li>boolean containsKey(Object key) // 判断Map中是否包含某个key</li>
<li>boolean containsValue(Object value) // 判断Map中是否包含某个value</li>
<li>boolean isEmpty() // 判断Map集合中元素个数是否为0</li>
<li>Set keySet() // 获取Map集合所有的key（所有的键是一个set集合）</li>
<li>V remove(Object key) // 通过key删除键值对</li>
<li>int size() // 获取Map集合中键值对的个数</li>
<li>Collection values() // 获取Map集合中所有的value，返回一个Collection</li>
<li>Set&lt;Map.Entry&lt;K,V&gt;&gt; entrySet() // 将Map集合转换成Set集合</li>
</ul>
</li>
</ul>
<h3>常用方法</h3>
<pre><code class="language-java">package com.ganto;

import java.util.Collection;
import java.util.HashMap;
import java.util.Map;

public class Main {
    public static void main(String[] args) {
        Map&lt;Integer, String&gt; map = new HashMap&lt;&gt;();
        map.put(1, &quot;a&quot;);
        map.put(2, &quot;b&quot;);
        map.put(3, &quot;c&quot;);
        map.put(4, &quot;d&quot;);
        // 通过key删除key-value
        map.remove(2);
        // 获取map中的键值对数量
        System.out.println(&quot;map中的键值对个数：&quot; + map.size());
        // 通过key获取value
        System.out.println(&quot;取出map中key为1的value：&quot; + map.get(1));
        // contains方法底层调用的都是equals进行比对的，所以自定义的类型需要重写equals方法
        // 判断是否包含某个key
        System.out.println(&quot;map中是否包含key为1的键值对：&quot; + map.containsKey(1));
        // 判断是否包含某个value
        System.out.println(&quot;map中是否包含value为b的键值对：&quot; + map.containsValue(&quot;b&quot;));
        // 获取所有的value
        Collection&lt;String&gt; values = map.values();
        for(String s:values) {
            System.out.println(s);
        }
        // 清空map集合
        map.clear();
        // 判断是否为空
        System.out.println(map.isEmpty());
    }
}

</code></pre>
<h3>Map集合的遍历</h3>
<p>第一种方式：获取所有的key，通过遍历key，来遍历value</p>
<pre><code class="language-java">package com.ganto;

import java.util.HashMap;
import java.util.Iterator;
import java.util.Map;
import java.util.Set;

public class Main {
    public static void main(String[] args) {
        Map&lt;Integer, String&gt; map = new HashMap&lt;&gt;();
        map.put(1, &quot;a&quot;);
        map.put(2, &quot;b&quot;);
        map.put(3, &quot;c&quot;);
        map.put(4, &quot;d&quot;);
        Set&lt;Integer&gt; keys = map.keySet();

        //迭代器
        Iterator&lt;Integer&gt; it = keys.iterator();
        while (it.hasNext()){
            Integer key = it.next();
            System.out.println(key + &quot;=&quot; + map.get(key));
        }

        // foreach
        for (Integer key: keys) {
            System.out.println(key + &quot;=&quot; + map.get(key));
        }
    }
}

</code></pre>
<p>第二种方式：通过<code>Set&lt;Map.Entry&lt;K,V&gt;&gt; entrySet()</code>将Map集合转变成Set集合</p>
<pre><code class="language-java">package com.ganto;

import java.util.HashMap;
import java.util.Iterator;
import java.util.Map;
import java.util.Set;

public class Main {
    public static void main(String[] args) {
        Map&lt;Integer, String&gt; map = new HashMap&lt;&gt;();
        map.put(1, &quot;a&quot;);
        map.put(2, &quot;b&quot;);
        map.put(3, &quot;c&quot;);
        map.put(4, &quot;d&quot;);
        Set&lt;Map.Entry&lt;Integer, String&gt;&gt; set = map.entrySet();

        // 迭代器
        Iterator&lt;Map.Entry&lt;Integer,String&gt;&gt; it = set.iterator();
        while (it.hasNext()) {
            Map.Entry&lt;Integer,String&gt; node = it.next();
            Integer key = node.getKey();
            System.out.println(key + &quot;=&quot; + map.get(key));
        }

        // foreach
        // 这种方式效率比较高，因为获取key和value都是直接从node对象中获取的属性值
        // 这种方式比较适合于大数据量
        for (Map.Entry&lt;Integer, String&gt; node: set) {
            System.out.println(node.getKey() + &quot;=&quot; + node.getValue());
        }
    }
}

</code></pre>
<h3>哈希表数据结构</h3>
<p>HashMap集合：</p>
<ul>
<li>HashMap结合底层使哈希表/散列表的数据结构</li>
<li>哈希表是一个数组和单向链表的结合体：
<ul>
<li>数组：在查询方面效率很高，随机增删方面效率很低</li>
<li>单向链表：在随机增删方面效率很高，在查询方面效率很低</li>
<li>哈希表将以上的两种数据结构融合在一起，充分发挥它们各自的优点</li>
</ul>
</li>
</ul>
<h3>HashMap</h3>
<p>HashMap集合key部分允许为null，但是HashMap集合的key为null的值只能有一个</p>
<pre><code class="language-java">package com.ganto;

import java.util.HashMap;
import java.util.Map;

public class Main {
    public static void main(String[] args) {
        Map map = new HashMap&lt;&gt;();
        map.put(null, null);
        map.put(null, 100);
        System.out.println(map.size());
        System.out.println(map.get(null));
    }
}

</code></pre>
<h3>Hashtable</h3>
<p>Hashtable的key和value都不可以为null，否则会报空指针异常</p>
<p>Hashtable方法都带有synchronized：线程安全的</p>
<p>线程安全有其它的方案，这个Hashtable对线程的处理导致效率低，使用较少了</p>
<p>Hashtable和HashMap一样，底层都是哈希表数据结构</p>
<p>Hashtable的初始化容量是：11，默认加载因子：0.75f</p>
<p>Hashtable的扩容：原容量 * 2 + 1</p>
<h3>Properties</h3>
<p>目前只需要掌握Properties属性类对象的相关方法即可</p>
<p>Properties是一个Map集合，继承Hashtable，Properties的key和value都是String类型</p>
<p>Properties被称为属性类对象</p>
<p>Properties是线程安全的</p>
<pre><code class="language-java">package com.ganto;

import java.util.Properties;

public class Main {
    public static void main(String[] args) {
        // 创建一个Properties对象
        Properties pro = new Properties();
        // 需要掌握Properties的两个方法，一个存，一个取
        pro.setProperty(&quot;url&quot;, &quot;jdbc:mysql://localhost:3306/ganto&quot;);
        pro.setProperty(&quot;driver&quot;, &quot;com.mysql.jdbc.Driver&quot;);
        pro.setProperty(&quot;username&quot;, &quot;root&quot;);
        pro.setProperty(&quot;password&quot;, &quot;123&quot;);
        // 通过key获取value
        System.out.println(pro.getProperty(&quot;url&quot;));
    }
}

</code></pre>
<h1>泛型机制</h1>
<p>JDK5.0之后推出的新特性：泛型</p>
<h2>不使用泛型</h2>
<p>不使用泛型机制，分析程序存在的缺点</p>
<pre><code class="language-java">package com.ganto;

import java.util.ArrayList;
import java.util.Iterator;
import java.util.List;

/**
 * JDK5.0之后推出的新特性：泛型
 */
public class Main {
    public static void main(String[] args) {
        // 不使用泛型机制，分析程序存在的缺点

        // 创建一个集合
        List myList = new ArrayList();
        // 准备对象
        Cat c = new Cat();
        Bird b = new Bird();
        // 将对象添加到集合当中
        myList.add(c);
        myList.add(b);
        // 遍历集合，取出Cat让它抓老鼠，取出Brid让它飞
        Iterator it = myList.iterator();
        while (it.hasNext()) {
            // 通过迭代器去除的obj就是Object类型，不用泛型的话下面必须强转
            Object obj = it.next();
            if(obj instanceof Animal) {
                ((Animal) obj).move();
            }
        }
    }
}
class Animal {
    public void move() {
        System.out.println(&quot;动物在移动！&quot;);
    }
}
class Cat extends Animal {
    public void catchMouse() {
        System.out.println(&quot;猫抓老鼠！&quot;);
    }
}
class Bird extends Animal {
    public void fly() {
        System.out.println(&quot;鸟儿在飞翔！&quot;);
    }
}

</code></pre>
<h2>使用泛型</h2>
<pre><code class="language-java">package com.ganto;

import java.util.ArrayList;
import java.util.Iterator;
import java.util.List;

/**
 * JDK5.0之后推出的新特性：泛型
 */
public class Main {
    public static void main(String[] args) {
        // 使用泛型机制

        // 使用泛型之后,表示List集合中只允许存储Animal类型的数据
        // 用泛型来指定集合中存储的数据类型
        List&lt;Animal&gt; myList = new ArrayList&lt;Animal&gt;();

        // 指定了List集合中只能存储Animal,那么存储String就会编译报错
        // 这样用了泛型之后,集合中元素的数据类型更加统一
        // myList.add(&quot;123&quot;); // 报错 需要的类型: Animal 提供的类型: String

        Cat c = new Cat();
        Bird b = new Bird();
        myList.add(c);
        myList.add(b);

        // 获取迭代器
      	// 这个表示迭代器迭代的是Animal类型
        Iterator&lt;Animal&gt; it = myList.iterator();
        while (it.hasNext()) {
          	// 使用泛型之后，每次迭代返回的数据都是Animal类型
            Animal a = it.next();
          	// 这里就不需要进行强制类型转换了
            a.move();
          	// 调用子类特有的方法还是避免不了要向下转型
          	if(a instanceof Cat) {
              	((Cat) a).catchMouse();
            } else if(a instanceof Bird) {
              	((Bird) a).fly();
            }
        }
    }
}
class Animal {
    public void move() {
        System.out.println(&quot;动物在移动！&quot;);
    }
}
class Cat extends Animal {
    public void catchMouse() {
        System.out.println(&quot;猫抓老鼠！&quot;);
    }
}
class Bird extends Animal {
    public void fly() {
        System.out.println(&quot;鸟儿在飞翔！&quot;);
    }
}

</code></pre>
<p>使用泛型的好处：</p>
<ul>
<li>第一：集合中存储的元素类型统一</li>
<li>第二：从集合中取出的元素类型是泛型指定的类型，不需要进行大量的向下转型</li>
</ul>
<p>泛型的缺点：</p>
<ul>
<li>导致集合中存储的元素缺乏多样性</li>
</ul>
<p>大多数业务中，集合中元素的类型是统一的，所以泛型使用的很多</p>
<p>JDK8之后引入了自动类型推断机制。（又称为钻石表达式）</p>
<p><code>List&lt;Animal&gt; myList = new ArrayList&lt;&gt;();</code></p>
<h2>自定义泛型</h2>
<pre><code class="language-java">package com.ganto;

public class Main {
    public static void main(String[] args) {
        // 实例化对象的时候,定义了String泛型
        Animal&lt;String&gt; a = new Animal&lt;&gt;();
        String a1 = a.doSome(&quot;1&quot;); // 这里只能传入String类型的参数
        // String a2 = a.doSome(1); // 报错 类型不匹配
        System.out.println(a1);
    }
}

class Animal&lt;T&gt; {
    public T doSome(T t) {
        return t;
    }
}

</code></pre>
<h1>for each</h1>
<pre><code class="language-java">package com.ganto;

public class Main {
    public static void main(String[] args) {
        // 定义int类型数组
        int[] arr = {1,2,3,4};
        // 遍历数组 普通for循环
        for (int i = 0; i &lt; arr.length; i++) {
            System.out.println(arr[i]);
        }
        // 遍历数组 foreach
        for(int data: arr) {
            System.out.println(data);
        }
    }
}

</code></pre>
<pre><code class="language-java">package com.ganto;

import java.util.ArrayList;
import java.util.Iterator;
import java.util.List;

public class Main {
    public static void main(String[] args) {
        List&lt;String&gt; stringList = new ArrayList&lt;&gt;();
        stringList.add(&quot;1&quot;);
        stringList.add(&quot;2&quot;);
        stringList.add(&quot;3&quot;);
        stringList.add(&quot;4&quot;);
        // 使用迭代器遍历集合
        Iterator&lt;String&gt; it = stringList.iterator();
        while (it.hasNext()){
            String data = it.next();
            System.out.println(data);
        }
        // 使用普通for循环遍历数组
        for (int i = 0; i &lt; stringList.size(); i++) {
            System.out.println(stringList.get(i));
        }
        // 使用foreach遍历集合
        for (String data: stringList) {
            System.out.println(data);
        }
    }
}


</code></pre>
<h1>IO流</h1>
<p><img src="images%5CJava%5CIO%E6%B5%81.png" alt="" /></p>
<p>IO流</p>
<ul>
<li>I：Input</li>
<li>O：Output</li>
<li>通过IO可以完成硬盘文件的读和写</li>
</ul>
<h2>IO流的分类：</h2>
<p>有多种分类方式：</p>
<ul>
<li>
<p>一种方式是按照流的方向进行分类：</p>
<ul>
<li>以内存作为参照物，往内存中去，叫做输入（Input），或者叫做读（Read）</li>
<li>以内存作为参照物，从内存中出，叫做输出（Output），或者叫做写（Write）</li>
</ul>
</li>
<li>
<p>另一种方式是按照读取数据方式不同进行分类：</p>
<ul>
<li>有的流是按照字节的方式读取数据，一次读取1个字节byte，等同于一次读取8个二进制位。这种流是万能的，什么类型的文件都可以读取。包括：文本文件、图片、声音文件、视频文件等...
<ul>
<li>假如文件file.txt（a哈希bc张三），采用字节流的话是这样读的：
<ul>
<li>第一次读：一个字节，正好读到'a'</li>
<li>第二次读：一个字节，正好读到'中'字符的一半</li>
<li>第三次读：一个字节，正好读到'中'字符的另一半</li>
</ul>
</li>
</ul>
</li>
<li>有的流是按照字符的方式读取数据的，一次读取一个字符，这种流是为了方便读取普通文本文件而存在的。这些流不能读取：图片、声音、视频等文件。只能读取纯文本文件，连word文件都无法读取。
<ul>
<li>假如文件file.txt（a哈希bc张三），采用字符流的话是这样读的：
<ul>
<li>第一次读：'a'字符（a字符在windows系统中占用1个字节）</li>
<li>第二次读：'中'字符（'中'字符在windows系统中占用2个字节）</li>
</ul>
</li>
</ul>
</li>
</ul>
</li>
</ul>
<p>综上所述，流的分类：输入流、输出流、字节流、字符流</p>
<p>Java中的IO流都已经写好了，我们程序员不需要关心，我们最主要还是掌握，在Java中已经提供了哪些流，每个流的特点是什么，每个流对象上的常用方法有哪些？</p>
<p>java中所有的流都是在：java.io.* 这个包下</p>
<p>java中主要还研究：怎么new流对象，调用流对象的哪个方法是读，哪个方法是写</p>
<h2>Java IO流四大家族</h2>
<p>四大家族的首领<em>都是抽象类</em></p>
<p>java.io.InputStream // 字节输入流</p>
<p>java.io.OutputStream // 字节输出流</p>
<p>java.io.Reader // 字符输入流</p>
<p>java.io.Writer // 字符输出流</p>
<p><strong>注意：在Java中只要类名以Stream结尾的都是字节流；以Reader/Writer结尾的都是字符流</strong></p>
<p>所有的流都实现了：java.io.Closeable接口，都是可关闭的，都有close()方法。</p>
<p>流毕竟是一个管道，这个是内存和硬盘之间的通道，用完之后一定要关闭，不然会耗费（占用）很多资源。养成好习惯，用完流一定要关闭。</p>
<p>所有的输出流都实现了：java.io.Flushable接口，都是可刷新的，都有flush()方法。</p>
<p>养成一个好习惯，输出流在最终输出之后，一定要记得flush()刷新以下。这个刷新表示将通道/管道当中剩余未输出的数据强行输出完（清空管道），刷新的作用就是清空管道。</p>
<p>注意：如果没有flush()可能会导致丢失数据。</p>
<h2>重要的流</h2>
<p>java.io包下需要掌握的流有16个</p>
<h3>文件专属</h3>
<p>java.io.FileInputStream</p>
<p>java.io.FileOutputStream</p>
<p>java.io.FileReader</p>
<p>java.io.FileWriter</p>
<h3>转换流</h3>
<p>将字节转换成字符</p>
<p>java.io.InputStreamReader</p>
<p>java.io.OutputStreamWriter</p>
<h3>缓冲流专属</h3>
<p>java.io.BufferedReader</p>
<p>java.io.BufferedWriter</p>
<p>java.io.BufferedInputStream</p>
<p>java.io.BufferedOutputStream</p>
<h3>数据流专属</h3>
<p>java.io.DataInputStream</p>
<p>java.io.DataOutputStream</p>
<h3>标准输出流</h3>
<p>java.io.PrintWriter</p>
<p>java.io.PrintStream</p>
<h3>对象专属流</h3>
<p>java.io.ObjectInputStream</p>
<p>java.io.ObjectOutputStream</p>
<h2>java.io.FileInputStream</h2>
<p>重点掌握</p>
<ul>
<li>文件字节输入流，万能的，任何类型的文件都可以采用这个流来读。</li>
<li>字节的方式，完成输入的操作，完成读的操作（硬盘 --&gt; 内存）</li>
</ul>
<p>读取本地文件</p>
<pre><code class="language-java">package com.ganto;

import java.io.FileInputStream;
import java.io.FileNotFoundException;
import java.io.IOException;

public class Main {
    public static void main(String[] args) {
        FileInputStream fileInputStream = null;
        try {
            // 创建文件字节输入流对象
            fileInputStream = new FileInputStream(&quot;C:/Users/ganto/Desktop/file&quot;);

            // 开始读
            int readData = fileInputStream.read(); // 这个方法的返回值是读取字节本身
            System.out.println(readData);// 97

            readData = fileInputStream.read();
            System.out.println(readData);// 98

            readData = fileInputStream.read();
            System.out.println(readData);// 99

            readData = fileInputStream.read();
            System.out.println(readData);// 100

            readData = fileInputStream.read();
            System.out.println(readData);// 101

            readData = fileInputStream.read();
            System.out.println(readData);// 102

            readData = fileInputStream.read();
            System.out.println(readData);// -1 到不末尾，没有数据了就返回-1

        } catch (FileNotFoundException e) {
            e.printStackTrace();
        } catch (IOException e) {
            throw new RuntimeException(e);
        } finally {
            // 在finally语句块当中确保流一定关。
            if(fileInputStream != null) { // 避免空指针异常。关闭流的前提是：流不是空。流是null的时候没必要关闭
                try {
                    fileInputStream.close();
                } catch (IOException e) {
                    e.printStackTrace();
                }
            }
        }
    }
}

</code></pre>
<p>改进</p>
<pre><code class="language-java">package com.ganto;

import java.io.FileInputStream;
import java.io.FileNotFoundException;
import java.io.IOException;

public class Main {
    public static void main(String[] args) {
        FileInputStream fileInputStream = null;
        try {
            // 创建文件字节输入流对象
            fileInputStream = new FileInputStream(&quot;C:/Users/ganto/Desktop/file&quot;);

            // 开始读
            while(true) {
                int readData = fileInputStream.read(); // 这个方法的返回值是读取字节本身
                if(readData == -1) {
                    break;
                }
                System.out.println(readData);
            }

            // 改造while
            int readData = 0;
            while((readData = fileInputStream.read()) != -1) {
                System.out.println(readData);
            }
        } catch (FileNotFoundException e) {
            e.printStackTrace();
        } catch (IOException e) {
            throw new RuntimeException(e);
        } finally {
            // 在finally语句块当中确保流一定关。
            if(fileInputStream != null) { // 避免空指针异常。关闭流的前提是：流不是空。流是null的时候没必要关闭
                try {
                    fileInputStream.close();
                } catch (IOException e) {
                    e.printStackTrace();
                }
            }
        }
    }
}

</code></pre>
<p>int read(byte[] b)</p>
<p>一次最多读取b.length个字节</p>
<p>减少硬盘和内存的交互，提高程序的执行效率</p>
<p>往byte[]数组当中读</p>
<pre><code class="language-java">package com.ganto;

import java.io.FileInputStream;
import java.io.FileNotFoundException;
import java.io.IOException;

public class Main {
    public static void main(String[] args) {
        FileInputStream fis = null;
        try {
            // IDEA默认的当前路径是工程Project的根，就是IDEA的默认当前路径是Project的根
            fis = new FileInputStream(&quot;C:\\Users\\ganto\\Desktop\\file&quot;);
            // 开始读，采用byte数组，一次读取多个字节。最多读取”数组.length“个字节
            byte[] bytes = new byte[4];
            // 这个方法的返回值是：读取到的字节数量。（不是字节本身）
            int readCount = fis.read(bytes);
            System.out.println(readCount); // 读取到4个字节
            // System.out.println(new String(bytes)); // abcd 将bytes数组转全部换成字符串
            System.out.println(new String(bytes, 0, readCount));

            readCount = fis.read(bytes);
            System.out.println(readCount); // 读取到2个字节
            // System.out.println(new String(bytes)); // efcd 第二次读取，ef会覆盖ab 所以不应该转换所有数组，应该读取到多少转换多少个
            System.out.println(new String(bytes, 0, readCount));

            readCount = fis.read(bytes);
            System.out.println(readCount); // 没有读到字节，返回-1

        } catch (FileNotFoundException e) {
            throw new RuntimeException(e);
        } catch (IOException e) {
            throw new RuntimeException(e);
        } finally {
            if(fis != null) {
                try {
                    fis.close();
                } catch (IOException e) {
                    throw new RuntimeException(e);
                }
            }
        }
    }
}

</code></pre>
<p>改造-最终版 需要掌握</p>
<pre><code class="language-java">package com.ganto;

import java.io.FileInputStream;
import java.io.FileNotFoundException;
import java.io.IOException;

public class Main {
    public static void main(String[] args) {
        FileInputStream fis = null;
        try {
            fis = new FileInputStream(&quot;C:\\Users\\ganto\\Desktop\\file&quot;);
            byte[] bytes = new byte[4];

            int readCount = 0;
            while((readCount = fis.read(bytes)) != -1) {
                System.out.print(new String(bytes, 0, readCount));
            }
        } catch (FileNotFoundException e) {
            throw new RuntimeException(e);
        } catch (IOException e) {
            throw new RuntimeException(e);
        } finally {
            if(fis != null) {
                try {
                    fis.close();
                } catch (IOException e) {
                    throw new RuntimeException(e);
                }
            }
        }
    }
}

</code></pre>
<h3>其他常用方法</h3>
<ul>
<li>int available() // 返回流当中剩余的没有读到的字符数量</li>
<li>lolng skip(long n) // 跳过几个字节不读</li>
</ul>
<pre><code class="language-java">package com.ganto;

import java.io.FileInputStream;
import java.io.FileNotFoundException;
import java.io.IOException;

public class Main {
    public static void main(String[] args) {
        FileInputStream fis = null;
        try {
            fis = new FileInputStream(&quot;C:\\Users\\ganto\\Desktop\\file&quot;);
            System.out.println(&quot;总字节数: &quot; + fis.available());
//            int readByte = fis.read();
//            System.out.println(&quot;剩下多少个字节没有读: &quot; + fis.available());
						// 一次性读取全部文件,但是这种方式不适合大文件,因为byte[]数组不能太大
            byte[] bytes = new byte[fis.available()];
            int readCount = fis.read(bytes);
            System.out.print(new String(bytes));
        } catch (FileNotFoundException e) {
            throw new RuntimeException(e);
        } catch (IOException e) {
            throw new RuntimeException(e);
        } finally {
            if(fis != null) {
                try {
                    fis.close();
                } catch (IOException e) {
                    throw new RuntimeException(e);
                }
            }
        }

    }
}

</code></pre>
<p>skip跳过几个字节不读,这个方法也可能以后会用</p>
<pre><code class="language-java">package com.ganto;

import java.io.FileInputStream;
import java.io.FileNotFoundException;
import java.io.IOException;

public class Main {
    public static void main(String[] args) {
        FileInputStream fis = null;
        try {
            fis = new FileInputStream(&quot;C:\\Users\\ganto\\Desktop\\file&quot;);
            fis.skip(3);
            System.out.println(fis.read());
        } catch (FileNotFoundException e) {
            throw new RuntimeException(e);
        } catch (IOException e) {
            throw new RuntimeException(e);
        } finally {
            if(fis != null) {
                try {
                    fis.close();
                } catch (IOException e) {
                    throw new RuntimeException(e);
                }
            }
        }

    }
}

</code></pre>
<h2>java.io.FileOutputStream</h2>
<p>重点掌握</p>
<p>文件字节输出流,负责写</p>
<p>从内存到硬盘</p>
<pre><code class="language-java">package com.ganto;

import java.io.FileNotFoundException;
import java.io.FileOutputStream;
import java.io.IOException;

public class Main {
    public static void main(String[] args) {
        FileOutputStream fos = null;
        try {
            // 这种方式谨慎使用,这种方式会将原文件清空,然后重新写入
            // fos = new FileOutputStream(&quot;C:\\Users\\ganto\\Desktop\\file.text&quot;);
            // 以追加的方式在文件末尾写入.不会清空源文件内容.
            fos = new FileOutputStream(&quot;C:\\Users\\ganto\\Desktop\\file.text&quot;, true);
            // 开始写 myfile文件不存在的时候会自动新建
            byte[] bytes = {97, 98, 99, 121};
            // 将byte数组全部写出
            fos.write(bytes);
            // 将byte数组部分写出
            fos.write(bytes, 0, 2); // 再写出97/a 98/b
            // 写完之后,最好一定要刷新
            fos.flush();
        } catch (FileNotFoundException e) {
            throw new RuntimeException(e);
        } catch (IOException e) {
            throw new RuntimeException(e);
        } finally {
            if(fos != null) {
                try {
                    fos.close();
                } catch (IOException e) {
                    throw new RuntimeException(e);
                }
            }
        }
    }
}

</code></pre>
<pre><code class="language-java">package com.ganto;

import java.io.FileNotFoundException;
import java.io.FileOutputStream;
import java.io.IOException;

public class Main {
    public static void main(String[] args) {
        FileOutputStream fos = null;
        try {
            fos = new FileOutputStream(&quot;C:\\Users\\ganto\\Desktop\\file.text&quot;, true);
            String s = &quot;Java开发&quot;;
            byte[] bytes = s.getBytes(); // 将字符串转换成byte[]数组
            fos.write(bytes);
            fos.flush();
        } catch (FileNotFoundException e) {
            throw new RuntimeException(e);
        } catch (IOException e) {
            throw new RuntimeException(e);
        } finally {
            if(fos != null) {
                try {
                    fos.close();
                } catch (IOException e) {
                    throw new RuntimeException(e);
                }
            }
        }
    }
}

</code></pre>
<h2>文件复制</h2>
<p>使用FileInputStream + FileOutputStream完成文件的拷贝</p>
<p>拷贝的过程应该是一边读，一边写</p>
<p>使用以上的字节流拷贝文件的时候，文件类型随意，什么样的文件都能拷贝</p>
<pre><code class="language-java">package com.ganto;

import java.io.FileInputStream;
import java.io.FileNotFoundException;
import java.io.FileOutputStream;
import java.io.IOException;

public class Main {
    public static void main(String[] args) {
        FileInputStream fis = null;
        FileOutputStream fos = null;
        try {
            // 创建一个输入流对象
            fis = new FileInputStream(&quot;C:\\Users\\ganto\\Desktop\\file.text&quot;);
            // 创建一个输出流对象
            fos = new FileOutputStream(&quot;D:\\file.text&quot;, true);
            // 一次拷贝10*1024个字节，也就是1兆
            byte[] bytes = new byte[10*1024];
            int readCount = 0;
            while ((readCount = fis.read(bytes)) != -1) {
                fos.write(bytes,0,readCount);
            }
            fos.flush();
        } catch (FileNotFoundException e) {
            throw new RuntimeException(e);
        } catch (IOException e) {
            throw new RuntimeException(e);
        } finally {
          	if(fis != null) {
								try {
                    fis.close();
                } catch (IOException e) {
                    throw new RuntimeException(e);
                }
            }
            if(fos != null) {
                
                try {
                    fos.close();
                } catch (IOException e) {
                    throw new RuntimeException(e);
                }
            }
        }
    }
}

</code></pre>
<h2>java.io.FileReader</h2>
<p>文件字符输入流，只能读取普通文本</p>
<p>读取文本内容时，比较方便，快捷</p>
<pre><code class="language-java">package com.ganto;

import java.io.FileNotFoundException;
import java.io.FileReader;
import java.io.IOException;

public class Main {
    public static void main(String[] args) {
        FileReader reader = null;
        try {
            // 创建文件字符输入流
            reader = new FileReader(&quot;C:\\Users\\ganto\\Desktop\\file.text&quot;);
            // 开始读
            char[] chars = new char[4]; // 一次读取4个字符
            int readCount = 0;
            while ((readCount = reader.read(chars)) != -1) {
                System.out.print(new String(chars, 0, readCount));
            }
        } catch (FileNotFoundException e) {
            throw new RuntimeException(e);
        } catch (IOException e) {
            throw new RuntimeException(e);
        } finally {
            if(reader != null) {
                try {
                    reader.close();
                } catch (IOException e) {
                    throw new RuntimeException(e);
                }
            }
        }
    }
}

</code></pre>
<h2>java.io.FileWriter</h2>
<p>文件字符输出流。写</p>
<p>只能输出普通文本</p>
<pre><code class="language-java">package com.ganto;

import java.io.FileNotFoundException;
import java.io.FileWriter;
import java.io.IOException;

public class Main {
    public static void main(String[] args) {
        FileWriter writer = null;
        try {
            writer = new FileWriter(&quot;C:\\Users\\ganto\\Desktop\\file.text&quot;, true);
            char[] chars = {'我', '是', 'J', 'a', 'v', 'a', '开', '发', '\n'};
            writer.write(chars);
            writer.write(chars, 2, 4);
            writer.write(&quot;我是java软件开发工程师！&quot;);
            writer.flush();
        } catch (IOException e) {
            throw new RuntimeException(e);
        } finally {
            if(writer != null) {
                try {
                    writer.close();
                } catch (IOException e) {
                    throw new RuntimeException(e);
                }
            }
        }
    }
}

</code></pre>
<h2>文件复制</h2>
<pre><code class="language-java">package com.ganto;

import java.io.FileNotFoundException;
import java.io.FileReader;
import java.io.FileWriter;
import java.io.IOException;

public class Main {
    public static void main(String[] args) {
        FileReader reader = null;
        FileWriter writer = null;
        try {
            reader = new FileReader(&quot;C:\\Users\\ganto\\Desktop\\file.text&quot;);
            writer = new FileWriter(&quot;D:\\file.text&quot;);
            char[] chars = new char[1024 * 512]; // 1MB
            int readCount = 0;
            while ((readCount = reader.read(chars)) != -1) {
                writer.write(chars, 0, readCount);
            }
            writer.flush();
        } catch (FileNotFoundException e) {
            throw new RuntimeException(e);
        } catch (IOException e) {
            throw new RuntimeException(e);
        } finally {
            if(reader != null) {
                try {
                    reader.close();
                } catch (IOException e) {
                    throw new RuntimeException(e);
                }
            }
            if(writer != null) {
                try {
                    writer.close();
                } catch (IOException e) {
                    throw new RuntimeException(e);
                }
            }
        }
    }
}

</code></pre>
<h2>java.io.BufferedReader</h2>
<p>带有缓冲区的字符输入流</p>
<p>使用这个流的时候不需要自定义char数组，或者说不需要自定义byte数组，自带缓冲</p>
<pre><code class="language-java">package com.ganto;

import java.io.BufferedReader;
import java.io.FileNotFoundException;
import java.io.FileReader;
import java.io.IOException;

public class Main {
    public static void main(String[] args) throws IOException {
        FileReader reader = new FileReader(&quot;C:\\Users\\ganto\\Desktop\\file.text&quot;);
        // 当一个流的构造方法中需要一个流的时候，这个被传进来的流叫做：节点流
        // 外部负责包装的这个流，叫做：包装流，还有一个名字叫做：处理流
        // 像当前这个程序来说：FileReader就是一个节点流；BufferedReader就是包装流/处理流
        BufferedReader br = new BufferedReader(reader);

        // 读一行
        // String firstLine = br.readLine(); // 读取一个文本行，但是不带换行符
        // System.out.println(firstLine);

        String s = null;
        while ((s = br.readLine()) != null) {
            System.out.println(s);
        }

        // 关闭流
        // 对于包装流来说，只需要关闭最外层流就行，里面的节点流会自动关闭。（可以看源代码）
        br.close();
    }
}

</code></pre>
<pre><code class="language-java">package com.ganto;

import java.io.BufferedReader;
import java.io.FileInputStream;
import java.io.InputStreamReader;

public class Main {
    public static void main(String[] args) throws Exception {
        // 字节流
        FileInputStream in = new FileInputStream(&quot;C:\\Users\\ganto\\Desktop\\file.text&quot;);

        // 通过转换流转换(InputStreamReander将字节流转换成字符流)
        // in是字节流，reader是包装流
        InputStreamReader reader= new InputStreamReader(in);

        // 这个构造方法只能传一个字符流，不能传字节流
        // reader是节点流，br是包装流
        BufferedReader br = new BufferedReader(reader);

        // 合并的写法
        // BufferedReader br = new BufferedReader(new InputStreamReader(new FileInputStream(&quot;C:\\Users\\ganto\\Desktop\\file.text&quot;)));

        // 读
        String line = null;
        while ((line = br.readLine()) != null) {
            System.out.println(line);
        }

        // 关闭最外层
        br.close();
    }
}

</code></pre>
<h2>java.io.BufferedWriter</h2>
<p>带有缓冲的字符输出流</p>
<pre><code class="language-java">package com.ganto;

import java.io.BufferedWriter;
import java.io.FileWriter;

public class Main {
    public static void main(String[] args) throws Exception {
        BufferedWriter bw = new BufferedWriter(new FileWriter(&quot;C:\\Users\\ganto\\Desktop\\file.text&quot;, true));
        bw.write(&quot;哈哈哈哈&quot;);
        bw.write(&quot;\n&quot;);
        bw.write(&quot;嘻嘻嘻嘻&quot;);
        bw.write(&quot;\n&quot;);
        bw.flush();
        bw.close();
    }
}

</code></pre>
<pre><code class="language-java">package com.ganto;

import java.io.BufferedWriter;
import java.io.FileOutputStream;
import java.io.OutputStreamWriter;

public class Main {
    public static void main(String[] args) throws Exception {
        BufferedWriter bw = new BufferedWriter(new OutputStreamWriter(new FileOutputStream(&quot;C:\\Users\\ganto\\Desktop\\file.text&quot;, true)));
        bw.write(&quot;哈哈哈哈&quot;);
        bw.write(&quot;\n&quot;);
        bw.write(&quot;嘻嘻嘻嘻&quot;);
        bw.write(&quot;\n&quot;);
        bw.flush();
        bw.close();
    }
}

</code></pre>
<h2>java.io.DataInputStream</h2>
<p>数据字节输入流</p>
<p>DataOutputStream写的文件只能通过DataInputStream去读</p>
<p>并且读的时候需要提前知道写入的顺序</p>
<p>读的顺序需要和写的顺序一致，才可以正常读取数据</p>
<pre><code class="language-java">package com.ganto;

import java.io.DataInputStream;
import java.io.FileInputStream;

public class Main {
    public static void main(String[] args) throws Exception {
        DataInputStream dis = new DataInputStream(new FileInputStream(&quot;data&quot;));

        // 开始读
        byte b = dis.readByte();
        short s = dis.readShort();
        int i = dis.readInt();
        long l = dis.readLong();
        float f = dis.readFloat();
        double d = dis.readDouble();
        boolean bl = dis.readBoolean();
        char c = dis.readChar();

        System.out.println(b);
        System.out.println(s);
        System.out.println(i);
        System.out.println(l);
        System.out.println(f);
        System.out.println(d);
        System.out.println(bl);
        System.out.println(c);

        dis.close();
    }
}

</code></pre>
<h2>java.io.DataOutputStream</h2>
<p>数据专属的流</p>
<p>这个流可以将数据联通数据的类型一并写入文件</p>
<p>注意：这个文件不是普通文本文档。（用记事本无法正确的浏览）；并且只能通过<code>java.io.DataInputStream</code>读出来</p>
<pre><code class="language-java">package com.ganto;

import java.io.DataOutputStream;
import java.io.FileOutputStream;

public class Main {
    public static void main(String[] args) throws Exception {
        // 创建数据专属的字节输出流
        DataOutputStream dos = new DataOutputStream(new FileOutputStream(&quot;data&quot;));
        // 写数据
        byte b = 100;
        short s = 200;
        int i = 300;
        long l = 400L;
        float f = 3.0F;
        double d = 3.14;
        boolean bl = false;
        char c = 'a';
        // 写
        // 把数据以及数据的类型一并写入到文件当中
        dos.writeByte(b);
        dos.writeShort(s);
        dos.writeInt(i);
        dos.writeLong(l);
        dos.writeFloat(f);
        dos.writeDouble(d);
        dos.writeBoolean(bl);
        dos.writeChar(c);
        // 刷新
        dos.flush();
        // 关系
        dos.close();
    }
}

</code></pre>
<h2>java.io.PrintStream</h2>
<p>重点掌握</p>
<p>标准的字节输出流，默认输出到控制台</p>
<pre><code class="language-java">package com.ganto;

import java.io.FileOutputStream;
import java.io.PrintStream;

public class Main {
    public static void main(String[] args) throws Exception {
        // 联合起来写
        System.out.println(&quot;Hello Java&quot;);

        // 分来写
        PrintStream ps = System.out;
        ps.println(&quot;Hello 张三&quot;);
        ps.println(&quot;Hello 李四&quot;);
        ps.println(&quot;Hello 王五&quot;);

        // 标准输出流不需要手动close()关闭

        // 可以改变标准输出流的输出方向
        /**
         * 这些是之前System类使用过的方法和属性：
         * System.gc();
         * System.currentTimeMillis();
         * PrintStream ps = System.out;
         * System.exit(0);
         * System.arraycopy(...);
         */
        // 标准输出流不再指向控制台，指向”log“文件
        PrintStream printStream = new PrintStream(new FileOutputStream(&quot;log&quot;));
        // 修改输出方向，将输出方向修改到”log“文件
        System.setOut(printStream);
        // 再进行输出
        System.out.println(&quot;xixixixixi&quot;);
        System.out.println(&quot;hahahahaha&quot;);
        System.out.println(&quot;hehehehehe&quot;);
    }
}

</code></pre>
<h3>日志工具</h3>
<p>Logger.java</p>
<pre><code class="language-java">package com.ganto;

import java.io.FileNotFoundException;
import java.io.FileOutputStream;
import java.io.PrintStream;
import java.text.SimpleDateFormat;
import java.util.Date;

public class Logger {
    // 记录日志的方法
    public static void log(String msg) {
        try {
            // 指向一个日志文件
            PrintStream out = new PrintStream(new FileOutputStream(&quot;log.txt&quot;, true));
            // 改变输出方向
            System.setOut(out);
            // 日期当前时间
            Date nowTime = new Date();
            SimpleDateFormat sdf = new SimpleDateFormat(&quot;yyyy-MM-dd HH:mm:ss SSS&quot;);
            String strTime = sdf.format(nowTime);
            System.out.println(strTime + &quot;：&quot; + msg);
        } catch (FileNotFoundException e) {
            throw new RuntimeException(e);
        }
    }
}

</code></pre>
<p>LogTest.java</p>
<pre><code class="language-java">package com.ganto;

public class LogTest {
    public static void main(String[] args) throws Exception {
        // 测试工具类是否好用
        Logger.log(&quot;调用了System类的gc()方法，建议启动垃圾回收&quot;);
        Logger.log(&quot;调用了UserService类的doSome()&quot;);
        Logger.log(&quot;用户尝试进行登录，验证失败&quot;);
    }
}

</code></pre>
<p>结果：log.txt</p>
<pre><code class="language-txt">2023-03-01 00:27:01 014：调用了System类的gc()方法，建议启动垃圾回收
2023-03-01 00:27:01 031：调用了UserService类的doSome()
2023-03-01 00:27:01 031：用户尝试进行登录，验证失败

</code></pre>
<h2>java.io.ObjectInputStream</h2>
<p>重点掌握</p>
<h2>java.io.ObjectOutputStream</h2>
<p>重点掌握</p>
<h2>java.io.File</h2>
<ul>
<li>
<p>File类和四大家族没有关系，所以File类不能完成文件的读和写</p>
</li>
<li>
<p>File对象代表：文件和目录路径名的抽象变现形式。一个File对象有可能对应的是目录，也可能是文件。File只是一个路径名的抽象表现形式。</p>
</li>
<li>
<p>需要掌握File类中常用的方法</p>
</li>
</ul>
<pre><code class="language-java">package com.ganto;

import java.io.File;

public class Main {
    public static void main(String[] args) throws Exception {
        File f1 = new File(&quot;D:/log&quot;);

        // 判断是否存在
        System.out.println(f1.exists());

        // 如果D盘下的log文件不存在，则以文件的形式创建出来
         /* if(!f1.exists()){
             // 以文件形式新建
             f1.createNewFile();
         } */

        // 如果D盘下的log不存在，则以目录的形式新建出来
        /* if(!f1.exists()) {
            // 以目录的形式新建
            f1.mkdir();
        } */

        File f2 = new File(&quot;D:/a/b/c/d/e/f&quot;);
        // 以多级目录的形式新建出来
        /* if(!f2.exists()) {
            // 创建多级目录
             f2.mkdirs();
        } */

        File f3 = new File(&quot;D:\\Development\\Java\\LearnCoding\\log.txt&quot;);
        // 获取文件的父路径
        String parentPath = f3.getParent();
        System.out.println(parentPath); // D:\Development\Java\LearnCoding

        File parentFile = f3.getParentFile();
        System.out.println(&quot;获取绝对路径：&quot; + parentFile.getAbsolutePath());

        File f4 = new File(&quot;log&quot;);
        System.out.println(&quot;绝对路径：&quot; + f4.getAbsolutePath()); // D:\Development\Java\LearnCoding\log
    }
}

</code></pre>
<pre><code class="language-java">package com.ganto;

import java.io.File;
import java.text.SimpleDateFormat;
import java.util.Date;

public class Main {
    public static void main(String[] args) throws Exception {
        File f1 = new File(&quot;D:\\Development\\Java\\LearnCoding\\log.txt&quot;);
        // 获取文件名
        System.out.println(f1.getName());

        // 判断是否是一个目录
        System.out.println(f1.isDirectory());

        // 判断是否是一个文件
        System.out.println(f1.isFile());

        // 获取文件最后一次修改时间
        long haoMiao = f1.lastModified(); // 这个毫秒是从1970年到现在的总毫秒数
        // 将总毫秒数转换成日期
        Date time = new Date(haoMiao);
        SimpleDateFormat sdf = new SimpleDateFormat(&quot;yyyy-MM-dd HH:mm:ss SSSS&quot;);
        String strTime = sdf.format(time);
        System.out.println(strTime);

        // 获取文件大小
        System.out.println(f1.length()); // 单位：字节
    }
}

</code></pre>
<pre><code class="language-java">package com.ganto;

import java.io.File;

public class Main {
    public static void main(String[] args) throws Exception {
        /**
         * File[] listFiles()
         * 获取当前目录下所有的子文件
         */
        File f1 = new File(&quot;D:\\Development\\Java\\LearnCoding&quot;);
        File[] files = f1.listFiles();
        for (File file: files) {
            System.out.println(file.getAbsolutePath());
            System.out.println(file.getName());
        }
    }
}

</code></pre>
<h1>进阶👆</h1>
<h1>Java中需要注意的点</h1>
<h2>命令行执行Java程序</h2>
<p>Hello.java</p>
<pre><code class="language-java">public class Hello
{
	public static void main(String[] args) {
		System.out.println(&quot;Hello Java!&quot;);
	}
}

</code></pre>
<p>命令行编译执行Hello.java程序</p>
<pre><code class="language-sh">javac Hello.java
java Hello

</code></pre>
<h2>Java中字符和字符串时两个类型</h2>
<p>char是字符，string是字符串</p>
<h2>常见异常</h2>
<h3>java.lang.NullPointerException</h3>
<p>空指针异常</p>
<h3>java.lang.ClassCastException</h3>
<p>强制类型转换异常</p>
<p>使用instanceof运算符可以避免出现，该运算符执行结果类型是布尔类型，结果可能是true/false；(a instanceof Animal)：true表示a这个引用指向的对象是一个Animal类型；false表示a这个引用指向的对象不是一个Animal类型。instanceof运算符语法：<code>引用 instanceof 数据类型</code>。</p>
<h3>java.lang.ArrayIndexOutOfBoundsException</h3>
<p>数组下标越界异常</p>
<h3>java.lang.NumberFormatException</h3>
<p>数字格式化异常，如下代码会报异常。</p>
<pre><code class="language-java">package org.example;

public class Main {
    public static void main(String[] args) {
        Integer integer = new Integer(&quot;中文&quot;);
        int i = integer.intValue();
        System.out.println(i);
    }
}

</code></pre>
<h2>面试题</h2>
<pre><code class="language-java">String s1 = new String(&quot;hello&quot;);
String s2 = new String(&quot;hello&quot;);

</code></pre>
<p>以上代码中，一共三个对象：在方法区常量池中有一个<code>&quot;hello&quot;</code>对象，堆内存当中有两个new出来的<code>String</code>对象。</p>
<p>判断数组长度和判断字符串长度不一样：判断数组长度使用length属性；判断字符串长度使用length()方法。</p>
<pre><code class="language-java">package org.example;

public class Main {
    public static void main(String[] args) {
        int[] arr = {1,2,3};
        System.out.println(arr.length);

        System.out.println(&quot;abc&quot;.length());
    }
}

</code></pre>
<h3>finally面试题</h3>
<pre><code class="language-java">package org.example;

public class Main {
    public static void main(String[] args) {
        int v = m();
        System.out.println(v);
    }
    public static int m() {
        int i = 100;
        try {
            // 这行代码出现在 int i = 100; 的下面，所以最终结果必须是返回100
            // return 语句还必须保证是最后执行的。一旦执行，整个方法结束
            return i;
        } finally {
            i++;
        }
    }
}

</code></pre>
<p>以上代码，虽然在finally那里已经讲过了，try...finally的执行顺序是：先try再finally最后return；但是也要遵循java中的一些铁定的规则，所以导致上述代码返回100，而不是101。</p>
<p>java语法规则（有一些规则是不能破坏的，一旦这么说了，就必须这么做！）：</p>
<ul>
<li>java中的有一条这样的规则：方法体中的代码必须遵循自上而下顺序依次逐行执行（亘古不变的语法）</li>
<li>java中还有一条语法规则：return语法一旦执行，整个方法必须结束（亘古不变的语法）</li>
</ul>
]]></content>
</entry>
<entry>
  <title>规范和快捷键</title>
  <link href="https://ganto.me/post/20230220-3"/>
  <id>https://ganto.me/post/20230220-3</id>
  <updated>2023-02-20T00:00:00+08:00</updated>
  <published>2023-02-20T00:00:00+08:00</published>
  <author><name>干徒</name></author>
  <summary><![CDATA[规范和快捷键 前端代码缩进2格 Java代码缩进4格 Golang代码缩进4格 通用快捷方式 快捷键 说明 Alt+/ 代码提示 Shift+Alt+↑ 或 Shift+Alt+↓ 复制整行 Alt+↑ 或 Alt+↓ 移动代码 Ctrl+/ 单行注释 Ctrl+Shift+/ 多行注释 Ctrl+c 复制（不选中任何字符，则复制整行） Ctrl+v 粘贴 Ctrl+x 剪切（不选中任何字符，则剪切整行） Ctrl+Shift+X 删除行 Ctrl+Alt+↑ 或 Ctrl+Alt+↓ 复制多个光标 Shift+Alt+F 格式化代码 Ctrl+F 搜索 Ctrl+D 选中下一个相同的内容 IntellJ IDEA快捷键 快捷键 说明 Ctrl Ctrl 运行 Shift+Backspace 删除最近的命令 Shift Shift 查找类、文件等 Ctrl+Shift+F10 执行Java程序 Alt+Shift+Ins 开启/关闭块编辑 Alt+Shift+鼠标左 块编辑 Alt+Shift+Z 错误描述 Alt+Shift+Enter 使用 try/catch 环绕 Alt+ins]]></summary>
  <content type="html"><![CDATA[<h1>规范和快捷键</h1>
<blockquote>
<p>前端代码缩进2格</p>
<p>Java代码缩进4格</p>
<p>Golang代码缩进4格</p>
</blockquote>
<h1>通用快捷方式</h1>
<table>
<thead>
<tr>
<th>快捷键</th>
<th>说明</th>
</tr>
</thead>
<tbody>
<tr>
<td>Alt+/</td>
<td>代码提示</td>
</tr>
<tr>
<td>Shift+Alt+↑ 或 Shift+Alt+↓</td>
<td>复制整行</td>
</tr>
<tr>
<td>Alt+↑ 或 Alt+↓</td>
<td>移动代码</td>
</tr>
<tr>
<td>Ctrl+/</td>
<td>单行注释</td>
</tr>
<tr>
<td>Ctrl+Shift+/</td>
<td>多行注释</td>
</tr>
<tr>
<td>Ctrl+c</td>
<td>复制（不选中任何字符，则复制整行）</td>
</tr>
<tr>
<td>Ctrl+v</td>
<td>粘贴</td>
</tr>
<tr>
<td>Ctrl+x</td>
<td>剪切（不选中任何字符，则剪切整行）</td>
</tr>
<tr>
<td>Ctrl+Shift+X</td>
<td>删除行</td>
</tr>
<tr>
<td>Ctrl+Alt+↑ 或 Ctrl+Alt+↓</td>
<td>复制多个光标</td>
</tr>
<tr>
<td>Shift+Alt+F</td>
<td>格式化代码</td>
</tr>
<tr>
<td>Ctrl+F</td>
<td>搜索</td>
</tr>
<tr>
<td>Ctrl+D</td>
<td>选中下一个相同的内容</td>
</tr>
<tr>
<td></td>
<td></td>
</tr>
</tbody>
</table>
<h1>IntellJ IDEA快捷键</h1>
<table>
<thead>
<tr>
<th>快捷键</th>
<th>说明</th>
</tr>
</thead>
<tbody>
<tr>
<td>Ctrl Ctrl</td>
<td>运行</td>
</tr>
<tr>
<td>Shift+Backspace</td>
<td>删除最近的命令</td>
</tr>
<tr>
<td>Shift Shift</td>
<td>查找类、文件等</td>
</tr>
<tr>
<td>Ctrl+Shift+F10</td>
<td>执行Java程序</td>
</tr>
<tr>
<td>Alt+Shift+Ins</td>
<td>开启/关闭块编辑</td>
</tr>
<tr>
<td>Alt+Shift+鼠标左</td>
<td>块编辑</td>
</tr>
<tr>
<td>Alt+Shift+Z</td>
<td>错误描述</td>
</tr>
<tr>
<td>Alt+Shift+Enter</td>
<td>使用 try/catch 环绕</td>
</tr>
<tr>
<td>Alt+inset</td>
<td>编辑生成方法</td>
</tr>
</tbody>
</table>
]]></content>
</entry>
<entry>
  <title>黑苹果</title>
  <link href="https://ganto.me/post/20230220"/>
  <id>https://ganto.me/post/20230220</id>
  <updated>2023-02-20T00:00:00+08:00</updated>
  <published>2023-02-20T00:00:00+08:00</published>
  <author><name>干徒</name></author>
  <summary><![CDATA[VMWare 【VMware安装原版macOS虚拟机，从此告别第三方封装镜像】 https://www.bilibili.com/video/BV1TP4y1i7kh/?share_source=copy_web&amp;vd_source=e5014f57b96061a4d1009d47c32b74e8 虚拟机利用苹果官方恢复工具自动下载安装官方最新MacOS13系统 安装VMWare17 https://www.vmware.com/products/workstation-pro.html 选择试用 下载安装包 并安装 VMware Workstation Pro 17激活码： 4A4RR-813DK-M81A9-4U35H-06KND NZ4RR-FTK5H-H81C1-Q30QH-1V2LA 4C21U-2KK9Q-M8130-4V2QH-CF810 MC60H-DWHD5-H80U9-6V85M-8280D JU090-6039P-08409-8J0QH-2YR7F 4Y09U-AJK97-089Z0-A3054-83KLA 输入激活码激活 unlocker 利用unloc]]></summary>
  <content type="html"><![CDATA[<h1>VMWare</h1>
<p>【VMware安装原版macOS虚拟机，从此告别第三方封装镜像】 <a href="https://www.bilibili.com/video/BV1TP4y1i7kh/?share_source=copy_web&amp;vd_source=e5014f57b96061a4d1009d47c32b74e8">https://www.bilibili.com/video/BV1TP4y1i7kh/?share_source=copy_web&amp;vd_source=e5014f57b96061a4d1009d47c32b74e8</a></p>
<p>虚拟机利用苹果官方恢复工具自动下载安装官方最新MacOS13系统</p>
<h2>安装VMWare17</h2>
<p><a href="https://www.vmware.com/products/workstation-pro.html">https://www.vmware.com/products/workstation-pro.html</a></p>
<p>选择试用 下载安装包 并安装</p>
<p>VMware Workstation Pro 17激活码：<br />
4A4RR-813DK-M81A9-4U35H-06KND<br />
NZ4RR-FTK5H-H81C1-Q30QH-1V2LA<br />
4C21U-2KK9Q-M8130-4V2QH-CF810<br />
MC60H-DWHD5-H80U9-6V85M-8280D<br />
JU090-6039P-08409-8J0QH-2YR7F<br />
4Y09U-AJK97-089Z0-A3054-83KLA</p>
<p>输入激活码激活</p>
<h2>unlocker</h2>
<p>利用unlocker工具 解锁VMWare中的Apple选项</p>
<p>首先关闭VMWare，尽可能的停用VMWare的相关的后台服务</p>
<p>以下unlocker有两种运行模式，选择一种即可。</p>
<p>1、<a href="https://github.com/paolo-projects/unlocker">https://github.com/paolo-projects/unlocker</a></p>
<p>下载完成后，解压缩，找到<code>win-install.cmd</code>，以管理员身份运行即可。</p>
<p>2、<a href="https://github.com/DrDonk/unlocker">https://github.com/DrDonk/unlocker</a></p>
<p>下载完成后，解压缩，找到<code>unlocker.exe</code>，双击运行即可</p>
<h2>获取macOS的官方恢复环境</h2>
<h3>下载</h3>
<p>进入以下仓库，在右侧点击进入[1]链接</p>
<p>[0] <a href="https://github.com/dortania/OpenCore-Install-Guide">https://github.com/dortania/OpenCore-Install-Guide</a></p>
<p>在以下链接选择<code>Making the installer in Windows</code>栏目，然后点击<code>macrecovery.py</code>，进入[2]链接仓库；在[1]号链接点击<code>This will require Python 3 installed</code>，进入[3]号链接</p>
<p>[1] <a href="https://dortania.github.io/OpenCore-Install-Guide/installer-guide/windows-install.html">https://dortania.github.io/OpenCore-Install-Guide/installer-guide/windows-install.html</a></p>
<p>点击<code>OpenCore-0.8.8-RELEASE.zip</code>下载最新的release版本压缩包即可下载</p>
<p>[2] <a href="https://github.com/acidanthera/OpenCorePkg/releases">https://github.com/acidanthera/OpenCorePkg/releases</a></p>
<p>以下链接选择<code>Download Windows embeddable package (640bit)</code>，下载Python下载</p>
<p>[3] <a href="https://www.python.org/downloads/windows/">https://www.python.org/downloads/windows/</a></p>
<p>进入QEMU官方 <a href="https://qemu.org">https://qemu.org</a> ，选择DOWNLOAD，选择Windows栏目，点击64-bit，下载QEMU下载</p>
<p>将下载好的三个文件全部解压缩，QEMU是exe文件，也当成压缩文件进行解压缩即可。<em>只是这里使用7z解压会有个报错，建议使用<code>Bandizip</code>进行解压</em></p>
<h3>步骤</h3>
<p>打开解压好的Python文件夹，空白处Shift + 右击 选择 Powershell 窗口</p>
<p>执行命令<code>.\python.exe [0] [1]</code></p>
<p>注：[0] opencore文件夹下的路径 <code>D:\Downloads\OpenCore-0.8.8-RELEASE\Utilities\macrecovery\macrecovery.py</code></p>
<p>[1] <a href="https://dortania.github.io/OpenCore-Install-Guide/installer-guide/windows-install.html#downloading-macos">https://dortania.github.io/OpenCore-Install-Guide/installer-guide/windows-install.html#downloading-macos</a> 这个网站复制</p>
<pre><code class="language-sh"># Latest version
# ie. Ventura (13)
python3 macrecovery.py -b Mac-4B682C642B45593E -m 00000000000000000 download

</code></pre>
<p>实际执行 指令</p>
<pre><code class="language-sh">.\python.exe D:\Downloads\OpenCore-0.8.8-RELEASE\Utilities\macrecovery\macrecovery.py -b Mac-4B682C642B45593E -m 00000000000000000 download

</code></pre>
<p>等待下载完成，会在Python文件夹生成<code>com.apple.recovery.boot</code>文件夹，在com.apple.recovery.boot文件夹下有一个<code>BaseSystem.dmg</code>文件，将此文件复制到，QEMU文件夹下。</p>
<p>然后在QEMU文件夹下，空白处Shift + 右击 选择 Powershell 窗口，执行命令</p>
<pre><code class="language-sh">.\qemu-img.exe convert -O vmdk -o compat6 BaseSystem.dmg BaseSystem.vmdk

</code></pre>
<p>等待执行完成后，会生成一个<code>BaseSystem.vmdk</code>虚拟磁盘文件</p>
<h2>创建虚拟机</h2>
<p>打开VMWare 点击 新建虚拟机</p>
<p>选择 自定义 点击 下一步</p>
<p>默认 17.x 点击 下一步</p>
<p>选择 稍后安装操作系统 点击 下一步</p>
<p>选择 Apple Mac OS X(M) - macOS 13 点击 下一步</p>
<p>虚拟机名称随意，位置为安装的虚拟机的位置，选择一个合适的位置即可 点击 下一步</p>
<p>处理器数量 1；每个处理器的内核数量 8 点击 下一步</p>
<p>内存 分配8G 点击 下一步</p>
<p>网路类型 默认 点击 下一步</p>
<p>选择I/O控制器类型 默认 点击 下一步</p>
<p>选择磁盘类型 默认 点击 下一步</p>
<p>选择磁盘 默认 点击 下一步</p>
<p>指定磁盘容量 100G；将虚拟磁盘存储为单个文件 点击 下一步</p>
<p>指定磁盘文件 默认 点击 下一步 接着 点击 完成</p>
<p>关闭VMWare</p>
<p>找到虚拟机安装到的磁盘位置，找到<code>macOS 13.vmx</code>文件，使用文本编辑器打开，搜索<code>e1000e</code>，将e1000e替换成为<code>vmxnet3</code>，保存关闭。</p>
<p>打开VMWare，选择macOS 13 点击 编辑虚拟机设置，如果没有CD/DVD驱动器，将此选项中的 启动时连接 取消勾选。</p>
<p>然后在下方点击添加按钮 选择 磁盘-下一步 SATA(A)-下一步 选择 使用现有虚拟磁盘-下一步 浏览QEMU文件夹下生成的<code>BaseSystem.vmdk</code>虚拟磁盘文件，点击完成 点击 保持现有格式 确定即可。</p>
<p>然后开启虚拟机，先在磁盘工具中将<code>VMware Virtual SATA Hard Drive Media</code>抹掉，然后名称为macOS或其他自定义名称都可，格式默认APFS，方案默认GUID分区图，点击抹掉。</p>
<p>然后选择重新安装macOS Ventura，选择上一步抹掉的磁盘一直按提示操作即可。</p>
<p>然后macOS会自动恢复下载官方系统并安装，耐心等待安装完成即可。</p>
<p>进入桌面点击虚拟菜单中的重新安装VMware Tools，在macOS中安装VMware Tools即可恢复正常分辨率。</p>
<h1>电脑</h1>
<p>所需文件云盘地址：<a href="https://cloud.189.cn/t/iuYVZbQnuQ7b">https://cloud.189.cn/t/iuYVZbQnuQ7b</a> (访问码:qo2y)</p>
<h2>准备</h2>
<p>首先要准备好以下文件、软件、硬件：</p>
<ul>
<li>
<p>macOS Catalina 10.15.7 19H2.dmg</p>
</li>
<li>
<p>XiaoMi_Pro-KBL-Clover-v1.7.4.zip</p>
</li>
<li>
<p>DG521941_x64.zip</p>
</li>
<li>
<p>balenaEtcher-Setup-1.13.1.exe</p>
</li>
<li>
<p>一个8G以上的U盘</p>
</li>
</ul>
<p>以上最重要的就是EFI文件，EFI文件每台机器都不同，不可通用，需要自己寻找</p>
<h2>刻录U盘</h2>
<p>安装并打开balenaEtcher软件，选择macOS Catalina 10.15.7 19H2.dmg进行刻录</p>
<h2>EFI</h2>
<p>利用DiskGenius软件将EFI文件替换掉电脑硬盘中的EFI文件，不是替换U盘中的EFI文件。</p>
<p>如果硬盘没有EFI分区，请使用DG软件进行设置即可</p>
<h2>安装</h2>
<p>U盘插入电脑，使用U盘进行启动即可</p>
]]></content>
</entry>
<entry>
  <title>防抖函数debounce</title>
  <link href="https://ganto.me/post/20230220-4"/>
  <id>https://ganto.me/post/20230220-4</id>
  <updated>2023-02-20T00:00:00+08:00</updated>
  <published>2023-02-20T00:00:00+08:00</published>
  <author><name>干徒</name></author>
  <summary><![CDATA[防抖函数 防抖函数 封装 // 防抖函数的封装 export default function debounce(func, delay){ let timer = null return function () { if (timer) clearTimeout(timer) timer = setTimeout(() =&gt; { func.apply() }, delay) } } 使用 getHomeDataList = debounce(() =&gt; { getHomeData() .then(res =&gt; { console.log(res) }) .catch(err =&gt; { console.error(err) }) }, 500)]]></summary>
  <content type="html"><![CDATA[<h1>防抖函数</h1>
<p>防抖函数</p>
<h2>封装</h2>
<pre><code class="language-js">// 防抖函数的封装
export default function debounce(func, delay){
  let timer = null
  return function () {
    if (timer) clearTimeout(timer)
    timer = setTimeout(() =&gt; {
      func.apply()
    }, delay)
  }
}

</code></pre>
<h2>使用</h2>
<pre><code class="language-jsx">getHomeDataList = debounce(() =&gt; {
  getHomeData()
    .then(res =&gt; {
      console.log(res)
    })
    .catch(err =&gt; {
      console.error(err)
    })
}, 500)

</code></pre>
]]></content>
</entry>
<entry>
  <title>TypeScript学习笔记</title>
  <link href="https://ganto.me/post/20230220-6"/>
  <id>https://ganto.me/post/20230220-6</id>
  <updated>2023-02-20T00:00:00+08:00</updated>
  <published>2023-02-20T00:00:00+08:00</published>
  <author><name>干徒</name></author>
  <summary><![CDATA[TypeScript 准备 安装node.js 安装 npm install -g typescript 查看版本 tsc -v 在编写ts代码时，有时虽然没有写错，但是依然有报错信息 如：无法重新声明块范围变量，只需要执行tsc --init生成tsconfig.json文件即可解决 第一个TS程序 app.ts var message:string = &quot;Hello TypeScript!&quot; console.log(message) TypeScript指令 使用tsc命令，将app.ts文件编译成为app.js文件 tsc app.ts tsc指令可以同时编译多个ts文件 tsc app.ts app1.ts app2.ts --declaration会再生成一个.d.ts文件 tsc app.ts --declaration 利用node命令，执行app.js文件 node app.js Hello TypeScript! 自动热部署命令 首先生成tsconfig.json文件 tsc --init tsconfig.json { &quot;compile]]></summary>
  <content type="html"><![CDATA[<h1>TypeScript</h1>
<h2>准备</h2>
<p>安装node.js</p>
<h2>安装</h2>
<pre><code class="language-shell">npm install -g typescript

</code></pre>
<h2>查看版本</h2>
<pre><code class="language-shell">tsc -v

</code></pre>
<p>在编写ts代码时，有时虽然没有写错，但是依然有报错信息 如：<code>无法重新声明块范围变量</code>，只需要执行<code>tsc --init</code>生成tsconfig.json文件即可解决</p>
<h1>第一个TS程序</h1>
<p><em><strong>app.ts</strong></em></p>
<pre><code class="language-typescript">var message:string = &quot;Hello TypeScript!&quot;
console.log(message)

</code></pre>
<h1>TypeScript指令</h1>
<p>使用tsc命令，将app.ts文件编译成为app.js文件</p>
<p><img src="https://www.runoob.com/wp-content/uploads/2019/01/typescript_compiler.png" alt="" /></p>
<pre><code class="language-shell">tsc app.ts

</code></pre>
<p>tsc指令可以同时编译多个ts文件</p>
<pre><code class="language-shell">tsc app.ts app1.ts app2.ts

</code></pre>
<p>--declaration会再生成一个<code>.d.ts</code>文件</p>
<pre><code class="language-shell">tsc app.ts --declaration

</code></pre>
<p>利用node命令，执行app.js文件</p>
<pre><code class="language-shell">node app.js
Hello TypeScript!

</code></pre>
<p>自动热部署命令</p>
<p>首先生成tsconfig.json文件</p>
<pre><code class="language-sh">tsc --init

</code></pre>
<p>tsconfig.json</p>
<pre><code class="language-json">{
  &quot;compilerOptions&quot;: {
    &quot;module&quot;: &quot;ES2015&quot;,
    &quot;target&quot;: &quot;ES2015&quot;,
    &quot;strict&quot;: true, // 严格模式
    &quot;outDir&quot;: &quot;./dist&quot;, // 打包的位置
    &quot;noEmitOnError&quot;: true // 有错误语法将不进行编译
  },
  &quot;include&quot;: [
    &quot;./src/**/*&quot; // 编译哪里的ts文件
  ],
  &quot;exclude&quot;: [
    &quot;node_modules&quot; // 忽略的文件
  ]
}

</code></pre>
<p>然后执行命令，就会自动热部署，不用每次修改代码都要手动部署</p>
<pre><code class="language-sh">tsc -w

</code></pre>
<h1>tsc 常用编译参数如下表所示：</h1>
<table>
<thead>
<tr>
<th>序号</th>
<th>编译参数说明</th>
</tr>
</thead>
<tbody>
<tr>
<td>1.</td>
<td><strong>--help</strong>显示帮助信息</td>
</tr>
<tr>
<td>2.</td>
<td><strong>--module</strong>载入扩展模块</td>
</tr>
<tr>
<td>3.</td>
<td><strong>--target</strong>设置 ECMA 版本</td>
</tr>
<tr>
<td>4.</td>
<td><strong>--declaration</strong>额外生成一个 .d.ts 扩展名的文件。<code>tsc ts-hw.ts --declaration</code>以上命令会生成 ts-hw.d.ts、ts-hw.js 两个文件。</td>
</tr>
<tr>
<td>5.</td>
<td><strong>--removeComments</strong>删除文件的注释</td>
</tr>
<tr>
<td>6.</td>
<td><strong>--out</strong>编译多个文件并合并到一个输出的文件</td>
</tr>
<tr>
<td>7.</td>
<td><strong>--sourcemap</strong>生成一个 sourcemap (.map) 文件。sourcemap 是一个存储源代码与编译代码对应位置映射的信息文件。</td>
</tr>
<tr>
<td>8.</td>
<td><strong>--module noImplicitAny</strong>在表达式和声明上有隐含的 any 类型时报错</td>
</tr>
<tr>
<td>9.</td>
<td><strong>--watch</strong>在监视模式下运行编译器。会监视输出文件，在它们改变时重新编译。</td>
</tr>
</tbody>
</table>
<h1>TypeScript 保留关键字</h1>
<p>TypeScript 保留关键字如下表所示：</p>
<table>
<thead>
<tr>
<th>break</th>
<th>as</th>
<th>catch</th>
<th>switch</th>
</tr>
</thead>
<tbody>
<tr>
<td>case</td>
<td>if</td>
<td>throw</td>
<td>else</td>
</tr>
<tr>
<td>var</td>
<td>number</td>
<td>string</td>
<td>get</td>
</tr>
<tr>
<td>module</td>
<td>type</td>
<td>instanceof</td>
<td>typeof</td>
</tr>
<tr>
<td>public</td>
<td>private</td>
<td>enum</td>
<td>export</td>
</tr>
<tr>
<td>finally</td>
<td>for</td>
<td>while</td>
<td>void</td>
</tr>
<tr>
<td>null</td>
<td>super</td>
<td>this</td>
<td>new</td>
</tr>
<tr>
<td>in</td>
<td>return</td>
<td>true</td>
<td>false</td>
</tr>
<tr>
<td>any</td>
<td>extends</td>
<td>static</td>
<td>let</td>
</tr>
<tr>
<td>package</td>
<td>implements</td>
<td>interface</td>
<td>function</td>
</tr>
<tr>
<td>do</td>
<td>try</td>
<td>yield</td>
<td>const</td>
</tr>
<tr>
<td>continue</td>
<td></td>
<td></td>
<td></td>
</tr>
</tbody>
</table>
<h2>空白和换行</h2>
<p>TypeScript 会忽略程序中出现的空格、制表符和换行符。</p>
<p>空格、制表符通常用来缩进代码，使代码易于阅读和理解。</p>
<h2>TypeScript 区分大小写</h2>
<p>TypeScript 区分大写和小写字符。</p>
<h2>分号是可选的</h2>
<p>每行指令都是一段语句，你可以使用分号或不使用， 分号在 TypeScript 中是可选的，建议使用。</p>
<p>以下代码都是合法的：</p>
<pre><code class="language-typescript">console.log(&quot;Runoob&quot;)
console.log(&quot;Google&quot;);

</code></pre>
<p>如果语句写在同一行则一定需要使用分号来分隔，否则会报错，如：</p>
<pre><code class="language-typescript">console.log(&quot;Runoob&quot;);console.log(&quot;Google&quot;);

</code></pre>
<h2>TypeScript 注释</h2>
<p>和JavaScript一样</p>
<pre><code class="language-typescript">// 单行注释

/* 
多行注释
多行注释
多行注释
*/

</code></pre>
<h1>TypeScript面向对象</h1>
<p>TypeScript 面向对象编程实例：</p>
<pre><code class="language-typescript">class Site {
  name():void {
    console.log(&quot;Runoob&quot;)
  }
}
var obj = new Site();
obj.name();

</code></pre>
<p>以上实例定义了一个类 Site，该类有一个方法 name()，该方法在终端上输出字符串 Runoob。</p>
<p>new 关键字创建类的对象，该对象调用方法 name()。</p>
<p>编译后生成的 JavaScript 代码如下：</p>
<pre><code class="language-typescript">var Site = /** @class */ (function () {
  function Site() {
  }
  Site.prototype.name = function () {
    console.log(&quot;Runoob&quot;);
  };
  return Site;
}());
var obj = new Site();
obj.name();

</code></pre>
<p>执行以上 JavaScript 代码，输出结果如下:</p>
<pre><code class="language-undefined">Runoob

</code></pre>
<h2>定义类</h2>
<pre><code class="language-typescript">// 定义一个Person类
class Person {
  // 实例属性，必须实例化访问
  myName:string = &quot;ganto&quot;
  // 静态属性，可以直接访问
  static myAge:number = 19
  // 定义只读的属性
  readonly mySex:string = &quot;男&quot;
  // 定义静态只读的属性
  static readonly mySchool:string = &quot;B站&quot;
  // 实例方法
  sayMe():void{
    console.log(this.myName, Person.myAge)
  }
  // 静态方法
  static lookMe():void{
    console.log(this.myAge)
  }
}

const obj = new Person() // 实例化对象
console.log(obj.myName) // 访问实例属性
obj.sayMe(); // 访问实例方法

console.log(Person.myAge) // 访问静态属性
Person.lookMe() // 访问静态方法

</code></pre>
<h2>构造方法</h2>
<pre><code class="language-typescript">class Person {
  myName:string 
  myAge:number
  constructor(myName:string, myAge:number) {
    console.log(this)
    this.myName = myName
    this.myAge = myAge
  }
  bark():void{
    console.log(this.myName, &quot;，&quot;,this.myAge,&quot;岁了，汪汪汪！&quot;)
  }
}

const person = new Person(&quot;旺财&quot;, 2)
person.bark()
const person1 = new Person(&quot;小明&quot;, 5)
person1.bark()

</code></pre>
<h2>封装</h2>
<p>封装的好处就是，类中的属性定义成私有的，通过特有的getter、setter方法进行暴露和操作，可以在setter方法中控制属性</p>
<pre><code class="language-typescript">class Person {
  private name:string
  private age:number
  constructor(name:string, age:number) {
    this.name = name
    this.age = age
  }
  getName() {
    return this.name
  }
  setName(name:string) {
    if(name.length == 2 || name.length == 3) {
      this.name = name
    }else{
      console.log(&quot;name不合法&quot;)
    }
  }
  getAge() {
    return this.age
  }
  setAge(age:number) {
    if(age &gt; 0 &amp;&amp; age &lt; 150) {
      this.age = age
    }else{
      console.log(&quot;age不合法&quot;)
    }
  }
}

const person = new Person(&quot;猪八戒&quot;,19)
console.log(person)

// person.name = &quot;孙悟空&quot; // 属性“name”为私有属性，只能在类“Person”中访问。
// person.age = -18 // 属性“age”为私有属性，只能在类“Person”中访问。

person.setName(&quot;孙悟空1&quot;)
person.setAge(-18)

console.log(person.getName(), person.getAge())

</code></pre>
<h2>继承</h2>
<pre><code class="language-typescript">class Person {
  myName:string 
  myAge:number
  constructor(myName:string, myAge:number) {
    this.myName = myName
    this.myAge = myAge
  }
  say():void{
    console.log(this.myName, &quot;&quot;,this.myAge,)
  }
}

class XiaoHua extends Person {

}

class XiaoMing extends Person {
  mySex:string
  constructor(myName:string,myAge:number,mySex:string) {
    super(myName,myAge)
    this.mySex = mySex
  }
  say(): void {
    console.log(this.myName, &quot;&quot;, this.myAge, &quot;&quot;, this.mySex)
  }
}

const xiaohua = new XiaoHua(&quot;小花&quot;, 18)
xiaohua.say()

const xiaoming = new XiaoMing(&quot;小明&quot;, 20, &quot;女&quot;)
xiaoming.say()

</code></pre>
<p>super(myName, myAge)意思就是将值传递给父类，super.say()就是调用父类中的say方法</p>
<h2>抽象类</h2>
<p>抽象类只能被子类继承，不可以实例化</p>
<pre><code class="language-typescript">// 抽象类
abstract class Animal {
  name:string 
  constructor(name:string){
    this.name = name
  }
  sayHello():void {
    console.log(&quot;动物在叫&quot;)
  }
}

class Dog extends Animal{
  sayHello(): void {
    console.log(&quot;汪汪汪汪&quot;)
  }
}
const dog = new Dog(&quot;旺财&quot;)
dog.sayHello()

// const she = new Animal(&quot;蛇&quot;) // 抽象类只能被继承，不可以实例化

</code></pre>
<p>抽象类中可以有普通方法，也可以有抽象方法，抽象方法必须被子类实现</p>
<pre><code class="language-typescript">// 抽象类
abstract class Animal {
  name:string 
  constructor(name:string){
    this.name = name
  }
  sayHello():void {
    console.log(&quot;动物在叫&quot;)
  }
  // 抽象方法
  abstract look():void 
}

class Dog extends Animal{
  sayHello(): void {
    console.log(&quot;汪汪汪汪&quot;)
  }
  look(): void {
    console.log(&quot;狗子在看&quot;)
  }
}
const dog = new Dog(&quot;旺财&quot;)
dog.sayHello()
dog.look()

// const she = new Animal(&quot;蛇&quot;) // 抽象类只能被继承，不可以实例化

</code></pre>
<h2>接口</h2>
<p>接口可以当成类型声明去使用，类型声明不可重复，但接口可以重复，重复的接口会进行合并</p>
<pre><code class="language-typescript">// 描述一个对象的类型
type myType = {
  name: string,
  age: number,
  [propname:string]:any
}
const obj: myType = {
  name: 'sss',
  age: 11
}

// 接口和上方 定义一个对象的类型 很像，接口用来 定义一个类的结构（用来包含哪些属性和方法）
interface myInterface {
  name: string,
  age: number
}
interface myInterface {
  gender: string
}
const obj1: myInterface = {
  name: 'sss',
  age: 11,
  gender: &quot;男&quot;,
}

</code></pre>
<p>接口中定义的属性，不能有实际值</p>
<pre><code class="language-typescript">interface myInterface {
  name: string,
  age: number
}
interface myInterface {
  gender: string
}
const obj1: myInterface = {
  name: 'sss',
  age: 11,
  gender: &quot;男&quot;,
}

</code></pre>
<p>接口中只能有抽象方法，不能有普通方法，在接口中定义抽象方法一般省略<code>abstract</code>关键字，没有方法体</p>
<pre><code class="language-typescript">interface myInterface {
  sayHello():void
}
const obj1: myInterface = {
  sayHello() {
    
  }
}

</code></pre>
<h3>类实现接口</h3>
<pre><code class="language-typescript">interface myInterface {
  name: string,
  sayHello():void
}

class MyClass implements myInterface {
  name:string
  constructor(name:string) {
    this.name = name
  }
  sayHello():void{
    console.log(&quot;sayHello&quot;)
  }
}

</code></pre>
<h3>接口可以继承接口</h3>
<pre><code class="language-typescript">interface baseInter {
  sex:string
}

interface myInterface extends baseInter {
  name: string,
  sayHello():void
}

class MyClass implements myInterface {
  name:string
  sex:string
  constructor(name:string, sex:string) {
    this.name = name
    this.sex = sex
  }
  sayHello():void{
    console.log(&quot;sayHello&quot;)
  }
}

</code></pre>
<h1>TypeScript 基础类型</h1>
<h2>基础类型</h2>
<table>
<thead>
<tr>
<th>数据类型</th>
<th>关键字</th>
<th>描述</th>
</tr>
</thead>
<tbody>
<tr>
<td>任意类型</td>
<td>any</td>
<td>声明为any的变量可以赋予任意类型的值。</td>
</tr>
<tr>
<td>字符串</td>
<td>string</td>
<td>一个字符系列，使用单引号（<strong>'</strong>）或双引号（<strong>&quot;</strong>）来表示字符串类型。反引号（<strong>`</strong>）来定义多行文本和内嵌表达式。</td>
</tr>
<tr>
<td>数字</td>
<td>number</td>
<td>双精度 64 位浮点值。它可以用来表示整数和分数。</td>
</tr>
<tr>
<td>布尔</td>
<td>boolean</td>
<td>表示逻辑值：true 和 false。</td>
</tr>
<tr>
<td>数组</td>
<td></td>
<td>声明变量为数组。</td>
</tr>
<tr>
<td>元组Tuple</td>
<td></td>
<td>元组类型用来表示已知元素数量和类型的数组，各元素的类型不必相同，对应位置的类型需要相同。</td>
</tr>
<tr>
<td>枚举</td>
<td>enum</td>
<td>枚举类型用于定义数值集合。</td>
</tr>
<tr>
<td>void</td>
<td>void</td>
<td>用于标识方法返回值的类型，表示该方法没有返回值。</td>
</tr>
<tr>
<td>null</td>
<td>null</td>
<td>表示对象值缺失。</td>
</tr>
<tr>
<td>undefined</td>
<td>undefined</td>
<td>用于初始化变量为一个未定义的值</td>
</tr>
<tr>
<td>never</td>
<td>never</td>
<td>never 是其它类型（包括 null 和 undefined）的子类型，代表从不会出现的值。</td>
</tr>
</tbody>
</table>
<p>**注意：**TypeScript 和 JavaScript 没有整数类型。</p>
<hr />
<p>注意：在js中 如果声明变量同时赋值，变量的类型会直接被设置为所赋值的类型。如下代码是报错的。</p>
<pre><code class="language-typescript">/* this is a typescript code */
let a = 1 // ts中声明变量直接赋值会直接锁定变量类型
a = '2' // 这里会报错

</code></pre>
<h2>Any</h2>
<p>任意值是 TypeScript 针对编程时类型不明确的变量使用的一种数据类型，它常用于以下三种情况。</p>
<p>1、变量的值会动态改变时，比如来自用户的输入，任意值类型可以让这些变量跳过编译阶段的类型检查，示例代码如下：</p>
<pre><code class="language-typescript">let x: any = 1;    // 数字类型
x = 'I am who I am';    // 字符串类型
x = false;    // 布尔类型

</code></pre>
<p>改写现有代码时，任意值允许在编译时可选择地包含或移除类型检查，示例代码如下：</p>
<pre><code class="language-typescript">let x: any = 4;
x.ifItExists();    // 正确，ifItExists方法在运行时可能存在，但这里并不会检查
x.toFixed();    // 正确

</code></pre>
<p>定义存储各种类型数据的数组时，示例代码如下：</p>
<pre><code class="language-typescript">let arrayList: any[] = [1, false, 'fine'];
arrayList[1] = 100;
console.log(arrayList)

</code></pre>
<p>任意类型的数组，有点像元组，但是元组声明了固定类型后就无法修改类型，任意类型的数组要比元组更加随意。</p>
<h2>unknown</h2>
<p>下方的代码都不会报错，那么这么看unknown和any一样？但其实有区别</p>
<pre><code class="language-typescript">let e: unknown
e = 10
e = 'hello'
e = true

</code></pre>
<p>unknown和any的区别：</p>
<pre><code class="language-typescript">let a:any
a = true
let b: string
b = 'hello'
b = a // 这时b的类型将会被设置为boolean

</code></pre>
<pre><code class="language-typescript">let a: unknown
a = 'string'
let b: string 
b = 'hello'
b = a // 这里将会报错，因为a的类型为unknown，无法赋值给其他类型

</code></pre>
<ul>
<li>any类型可以给任意类型赋值，赋值过后的变量也会被改为any所属的类型 （真就any霍霍所有类型）</li>
<li>unknown类型不可以给其他类型赋值</li>
<li>unknown和any之间可以相互赋值</li>
<li>其他类型可以给unknown和any赋值</li>
</ul>
<h2>字符串</h2>
<pre><code class="language-typescript">let myName: string = 'xiaoming'

</code></pre>
<h2>数字</h2>
<pre><code class="language-typescript">let age: number = 12

let binaryLiteral: number = 0b1010; // 二进制
let octalLiteral: number = 0o744;    // 八进制
let decLiteral: number = 6;    // 十进制
let hexLiteral: number = 0xf00d;    // 十六进制

</code></pre>
<h3>字面量赋值</h3>
<p>赋值过后无法修改，类似于常量</p>
<pre><code class="language-typescript">let a: 10
a = 10
a = 11 // 这里的代码会报错，字面量a为10常量，a将无法修改为11

</code></pre>
<h3>联合类型</h3>
<pre><code class="language-typescript">let b: &quot;male&quot; | &quot;female&quot;
b = &quot;male&quot;
b = &quot;female&quot;
b = &quot;hello&quot; // 这里的代码会报错，因为b只能为male或者female

let c: boolean | string
c = true
c = 'hello'
c = 1 // 这里的代码会报错，因为c的类型只能为boolean或者string

</code></pre>
<h2>布尔</h2>
<pre><code class="language-typescript">let flag: boolean = true
let unflag: boolean = false

</code></pre>
<h2>数组</h2>
<pre><code class="language-typescript">// 在元素类型后面加上[]
let arr: number[] = [1, 2];

// 或者使用数组泛型
let arr: Array&lt;number&gt; = [1, 2];

</code></pre>
<h2>元组</h2>
<p>固定长度，单独固定每项类型的数组</p>
<pre><code class="language-typescript">let x: [string, number];
x = ['Runoob', 1];    // 运行正常
x = [1, 'Runoob'];    // 报错
console.log(x[0]);    // 输出 Runoob

</code></pre>
<h2>枚举</h2>
<pre><code class="language-typescript">enum Color {Red, Green, Blue};
let c: Color = Color.Blue;
console.log(c);    // 输出 2

</code></pre>
<pre><code class="language-typescript">enum Gender{
  Male,
  Female
}
let i: {name: string, gender: Gender}

i = {
  name: '孙悟空',
  gender: Gender.Male
}

console.log(i.gender === 1) // true
console.log(i.gender === Gender.Male) // true

</code></pre>
<h2>void</h2>
<p>void 用来表示空，以函数为例，就表示没有返回值的函数</p>
<pre><code class="language-typescript">function hello(): void {
  alert(&quot;Hello Runoob&quot;);
}

</code></pre>
<h2>never 类型</h2>
<p>never 是其它类型（包括 null 和 undefined）的子类型，代表从不会出现的值。这意味着声明为 never 类型的变量只能被 never 类型所赋值，在函数中它通常表现为抛出异常或无法执行到终止点（例如无限循环），示例代码如下：</p>
<pre><code class="language-typescript">let x: never;
let y: number;

// 编译错误，数字类型不能转为 never 类型
x = 123;

// 运行正确，never 类型可以赋值给 never类型
x = (()=&gt;{ throw new Error('exception')})();

// 运行正确，never 类型可以赋值给 数字类型
y = (()=&gt;{ throw new Error('exception')})();

// 返回值为 never 的函数可以是抛出异常的情况
function error(message: string): never {
  throw new Error(message);
}

// 返回值为 never 的函数可以是无法被执行到的终止点的情况
function loop(): never {
  while (true) {}
}

</code></pre>
<h2>类型断言</h2>
<p>类型断言有两种形式。 其一是“尖括号”语法：</p>
<pre><code class="language-typescript">let someValue: any = &quot;this is a string&quot;;
let strLength: number = (&lt;string&gt;someValue).length;

</code></pre>
<p>另一个为<code>as</code>语法：</p>
<pre><code class="language-typescript">let someValue: any = &quot;this is a string&quot;;
let strLength: number = (someValue as string).length;

</code></pre>
<p>两种形式是等价的。 至于使用哪个大多数情况下是凭个人喜好；然而，当你在TypeScript里使用JSX时，只有<code>as</code>语法断言是被允许的。</p>
<p>例子：</p>
<pre><code class="language-typescript">let a:unknown
a = 'hello'
let b: string
b = 'b'
b = a as string // 这里使用类型断言后，不再报错
console.log(b, typeof b);

</code></pre>
<p>如下代码，使用类型断言可以欺骗编译器，可以将b的类型修改成为number</p>
<pre><code class="language-typescript">let a:unknown
a = 1
let b: string
b = 'b'
b = a as string
console.log(b, typeof b); // 1 number

</code></pre>
<h2>对象Object</h2>
<pre><code class="language-typescript">let a: object;
a = {}
a = function() {}

let b: {name: string};
b = {name: '喜喜'}

</code></pre>
<p>因为在js中很多东西都是对象，直接声明<code>let a: object</code>，会有一些不好。可以用第二种方式声明，明确那种object</p>
<p>如果一个对象必须转递一个name属性，其他属性可以随意增删，属性类型也任意，可以如下例子：</p>
<pre><code class="language-typescript">let a: {name: string, [propName: string]: any}
a = {name: '哈哈', age: 10, sex: '女'}

</code></pre>
<p>其中<code>[propName: string]: any</code>中的前边部分<code>[propName: string]</code>表示属性名为字符串，<code>any</code>表示属性的值为任意值。</p>
<pre><code class="language-typescript">let d: (a: number, b: number) =&gt; number;
d = function(n1, n2): number{
	return n1+n2
}

</code></pre>
<h2>与&amp; 或|</h2>
<pre><code class="language-typescript">let j: {name: string} &amp; {age: number}

let x: string | number

let k: 1 | 2 | 3 | 4 | 5

</code></pre>
<h2>类型别名</h2>
<pre><code class="language-typescript">type myType = string;
let a: myType;

</code></pre>
<pre><code class="language-typescript">type myType1 = 1 | 2 | 3 | 4 | 5;
let b: myType1

</code></pre>
<pre><code class="language-typescript">type Cls = {
  a: boolean,
  b: boolean
}
const cls: Cls = {
  a: true,
  b: true
}

</code></pre>
<h1>TypeScript条件语句</h1>
<ul>
<li><strong>if 语句</strong> - 只有当指定条件为 true 时，使用该语句来执行代码</li>
<li><strong>if...else 语句</strong> - 当条件为 true 时执行代码，当条件为 false 时执行其他代码</li>
<li><strong>if...else if....else 语句</strong>- 使用该语句来选择多个代码块之一来执行</li>
<li><strong>switch 语句</strong> - 使用该语句来选择多个代码块之一来执行</li>
</ul>
<h2>if</h2>
<h2>if...else</h2>
<h2>if...else if...else</h2>
<h2>switch…case</h2>
<h1>TypeScript循环</h1>
<h2>for</h2>
<h2>for...in</h2>
<h2>for...of</h2>
<h2>forEach</h2>
<h2>every</h2>
<h2>while</h2>
<h2>do...while</h2>
<h1>TypeScript函数</h1>
<h2>函数返回值</h2>
<pre><code class="language-typescript">function function_name():return_type { 
  // 语句
  return value; 
}

</code></pre>
<ul>
<li>return_type 是返回值的类型。</li>
<li>return 关键词后跟着要返回的结果。</li>
<li>一般情况下，一个函数只有一个 return 语句。</li>
<li>返回值的类型需要与函数定义的返回类型(return_type)一致。</li>
</ul>
<h3>案例</h3>
<pre><code class="language-typescript">// 函数定义
function greet():string { // 返回一个字符串
  return &quot;Hello World&quot; 
} 
 
function caller() { 
  var msg = greet() // 调用 greet() 函数 
  console.log(msg) 
} 
 
// 调用函数
caller()

</code></pre>
<ul>
<li>实例中定义了函数 <em>greet()</em>，返回值的类型为 string。</li>
<li><em>greet()</em> 函数通过 return 语句返回给调用它的地方，即变量 msg，之后输出该返回值。</li>
</ul>
<h2>带参数函数</h2>
<p>在调用函数时，您可以向其传递值，这些值被称为参数。</p>
<p>这些参数可以在函数中使用。</p>
<p>您可以向函数发送多个参数，每个参数使用逗号 <strong>,</strong> 分隔：</p>
<p>语法格式如下所示：</p>
<pre><code class="language-typescript">function func_name( param1 [:datatype], param2 [:datatype]) {   
}

</code></pre>
<ul>
<li>param1、param2 为参数名。</li>
<li>datatype 为参数类型。</li>
</ul>
<h3>实例</h3>
<pre><code class="language-typescript">function add(x: number, y: number): number {
  return x + y;
}
console.log(add(1,2))

</code></pre>
<ul>
<li>实例中定义了函数 <em>add()</em>，返回值的类型为 number。</li>
<li><em>add()</em> 函数中定义了两个 number 类型的参数，函数内将两个参数相加并返回。</li>
</ul>
<h2>可选参数和默认参数</h2>
<h3>可选参数</h3>
<p>在 TypeScript 函数里，如果我们定义了参数，则我们必须传入这些参数，除非将这些参数设置为可选，可选参数使用问号标识 ？。</p>
<p><strong>实例</strong></p>
<pre><code class="language-typescript">function buildName(firstName: string, lastName: string) {
  return firstName + &quot; &quot; + lastName;
}
 
let result1 = buildName(&quot;Bob&quot;);                  // 错误，缺少参数
let result2 = buildName(&quot;Bob&quot;, &quot;Adams&quot;, &quot;Sr.&quot;);  // 错误，参数太多了
let result3 = buildName(&quot;Bob&quot;, &quot;Adams&quot;);         // 正确

</code></pre>
<p>以下实例，我们将 lastName 设置为可选参数：</p>
<pre><code class="language-typescript">function buildName(firstName: string, lastName?: string) {
  if (lastName)
    return firstName + &quot; &quot; + lastName;
  else
    return firstName;
}
 
let result1 = buildName(&quot;Bob&quot;);  // 正确
let result2 = buildName(&quot;Bob&quot;, &quot;Adams&quot;, &quot;Sr.&quot;);  // 错误，参数太多了
let result3 = buildName(&quot;Bob&quot;, &quot;Adams&quot;);  // 正确

</code></pre>
<p>可选参数必须跟在必需参数后面。 如果上例我们想让 firstName 是可选的，lastName 必选，那么就要调整它们的位置，把 firstName 放在后面。</p>
<p>如果都是可选参数就没关系。</p>
<h3>默认参数</h3>
<p>我们也可以设置参数的默认值，这样在调用函数的时候，如果不传入该参数的值，则使用默认参数，语法格式为：</p>
<pre><code class="language-delphi">function function_name(param1[:type],param2[:type] = default_value) { 
}

</code></pre>
<p>注意：参数不能同时设置为可选和默认。</p>
<p><strong>实例</strong></p>
<p>以下实例函数的参数 rate 设置了默认值为 0.50，调用该函数时如果未传入参数则使用该默认值：</p>
<pre><code class="language-typescript">function calculate_discount(price:number,rate:number = 0.50) { 
  var discount = price * rate; 
  console.log(&quot;计算结果: &quot;,discount); 
} 
calculate_discount(1000) // 500
calculate_discount(1000,0.30) // 300

</code></pre>
<p>输出结果为：</p>
<pre><code class="language-makefile">计算结果:  500
计算结果:  300

</code></pre>
<h2>剩余参数</h2>
<p>有一种情况，我们不知道要向函数传入多少个参数，这时候我们就可以使用剩余参数来定义。</p>
<p>剩余参数语法允许我们将一个不确定数量的参数作为一个数组传入。</p>
<pre><code class="language-typescript">function buildName(firstName: string, ...restOfName: string[]) {
  return firstName + &quot; &quot; + restOfName.join(&quot; &quot;);
}
  
let employeeName = buildName(&quot;Joseph&quot;, &quot;Samuel&quot;, &quot;Lucas&quot;, &quot;MacKinzie&quot;);

</code></pre>
<p>函数的最后一个命名参数 restOfName 以 ... 为前缀，它将成为一个由剩余参数组成的数组，索引值从0（包括）到 restOfName.length（不包括）。</p>
<pre><code class="language-typescript">function addNumbers(...nums:number[]) {  
  var i;   
  var sum:number = 0; 

  for(i = 0;i&lt;nums.length;i++) { 
    sum = sum + nums[i]; 
  } 
  console.log(&quot;和为：&quot;,sum) 
 } 
 addNumbers(1,2,3) 
 addNumbers(10,10,10,10,10)

</code></pre>
<p>输出结果为：</p>
<pre><code class="language-undefined">和为： 6
和为： 50

</code></pre>
<h1>new Map()</h1>
<pre><code class="language-typescript">let nameSiteMapping = new Map();

// 设置 Map 对象
nameSiteMapping.set(&quot;Google&quot;, 1);
nameSiteMapping.set(&quot;Runoob&quot;, 2);
nameSiteMapping.set(&quot;Taobao&quot;, 3);

// 获取键对应的值
console.log(nameSiteMapping.get(&quot;Runoob&quot;));     // 2

// 判断 Map 中是否包含键对应的值
console.log(nameSiteMapping.has(&quot;Taobao&quot;));       // true
console.log(nameSiteMapping.has(&quot;Zhihu&quot;));        // false

// 返回 Map 对象键/值对的数量
console.log(nameSiteMapping.size);                // 3

// 删除 Runoob
console.log(nameSiteMapping.delete(&quot;Runoob&quot;));    // true
console.log(nameSiteMapping);
// 移除 Map 对象的所有键/值对
nameSiteMapping.clear();             // 清除 Map
console.log(nameSiteMapping);

/**
 * new Map() // 实例化对象
 * set() // 设置键值对
 * get() // 获取键对应的值
 * has() // 获取是否有键
 * delete() // 删除该键值对
 * clear() // 清空
 * size // 返回长度
 */

</code></pre>
<h1>接口</h1>
<p>例子</p>
<pre><code class="language-typescript">function printLabel(labelledObj: { label: string }) {
  console.log(labelledObj.label);
}

let myObj = { size: 10, label: &quot;Size 10 Object&quot; };
printLabel(myObj);

</code></pre>
<p>利用接口重写</p>
<pre><code class="language-typescript">interface LabelledValue {
  label: string;
}

function printLabel(labelledObj: LabelledValue) {
  console.log(labelledObj.label);
}

let myObj = {size: 10, label: &quot;Size 10 Object&quot;};
printLabel(myObj);

</code></pre>
<p>哈哈，暂时没get到接口这样写的意义</p>
<h2>可选属性</h2>
<pre><code class="language-typescript">interface SquareConfig {
  color?: string;
  width?: number;
}

function createSquare(config: SquareConfig): {color: string; area: number} {
  let newSquare = {color: &quot;white&quot;, area: 100};
  if (config.color) {
    newSquare.color = config.color;
  }
  if (config.width) {
    newSquare.area = config.width * config.width;
  }
  return newSquare;
}

let mySquare = createSquare({});
console.log(mySquare)

</code></pre>
<p>带有可选属性的接口与普通的接口定义差不多，只是在可选属性名字定义的后面加一个<code>?</code>符号。</p>
<p>接口里的属性添加了<code>?</code>符号后，在调用函数的时候，就可以不用传递该属性。如上方代码，是完全正确的。</p>
<h2>只读属性</h2>
<p>一些对象属性只能在对象刚刚创建的时候修改其值。 你可以在属性名前用 <code>readonly</code>来指定只读属性:</p>
<pre><code class="language-typescript">interface Point {
  readonly x: number;
  readonly y: number;
}

</code></pre>
<p>你可以通过赋值一个对象字面量来构造一个<code>Point</code>。 赋值后， <code>x</code>和<code>y</code>再也不能被改变了。</p>
<pre><code class="language-typescript">let p1: Point = { x: 10, y: 20 };
p1.x = 5; // error!

</code></pre>
<p>TypeScript具有<code>ReadonlyArray&lt;T&gt;</code>类型，它与<code>Array&lt;T&gt;</code>相似，只是把所有可变方法去掉了，因此可以确保数组创建后再也不能被修改：</p>
<pre><code class="language-typescript">let a: number[] = [1, 2, 3, 4];
let ro: ReadonlyArray&lt;number&gt; = a;
ro[0] = 12; // error!
ro.push(5); // error!
ro.length = 100; // error!
a = ro; // error!

</code></pre>
<p>上面代码的最后一行，可以看到就算把整个<code>ReadonlyArray</code>赋值到一个普通数组也是不可以的。 但是你可以用类型断言重写：</p>
<pre><code class="language-typescript">a = ro as number[];

</code></pre>
<h2><code>readonly</code> vs <code>const</code></h2>
<p>最简单判断该用<code>readonly</code>还是<code>const</code>的方法是看要把它做为变量使用还是做为一个属性。 做为变量使用的话用<code>const</code>，若做为属性则使用<code>readonly</code>。</p>
<p><code>const</code>一般用在变量声明：<code>const num = 1</code></p>
<p><code>readonly</code>一般用在属性中：<code>{ readonly num1: number }</code></p>
<h1>JSX</h1>
<p>非官网教程，写的还可以：<a href="https://www.w3cschool.cn/typescript/typescript-jsx.html">https://www.w3cschool.cn/typescript/typescript-jsx.html</a></p>
<h1>三斜线指令</h1>
<pre><code class="language-typescript">/// &lt;reference path=&quot;react.d.ts&quot; /&gt;

</code></pre>
<h1>编译选项tsconfig.json</h1>
<p>通过以下命令监听app.ts的变化，一旦变化则会重新编译。-w 即 watch</p>
<pre><code class="language-sh">tsc app.ts -w

</code></pre>
<p>通过tsc --init生成tsconfig.json文件，然后执行tsc命令会将项目中的ts文件全部编译成js文件，必须要生成tsconfig.json文件，只有tsconfig.json文件存在后，<code>tsc</code>和<code>tsc -w</code>命令才可以生效。</p>
<pre><code class="language-sh">tsc --init

tsc # 编译全部ts文件

tsc -w # 监听全部ts文件的变化

</code></pre>
<h2>tsconfig.json</h2>
<ul>
<li>
<p>include: 用来指定哪些ts文件需要被编译</p>
<ul>
<li>** 表示任意目录</li>
<li>* 表示任意文件</li>
</ul>
<pre><code class="language-json">{
  &quot;include&quot;: [
    &quot;./src/**/*&quot; /* src目录下的任意目录下的任意文件 */
  ]
}

</code></pre>
</li>
<li>
<p>exclude: 用来指定不需要被编译的路径</p>
<ul>
<li>默认值：[&quot;node_modules&quot;, &quot;bower_components&quot;, &quot;jspm_packages&quot;]</li>
</ul>
<pre><code class="language-json">{
  &quot;exclude&quot;: [
    &quot;./src/hello/**/*&quot;
  ]
}

</code></pre>
</li>
<li>
<p>extends: 定义被继承的配置文件</p>
<pre><code class="language-json">{
  &quot;extends&quot;: &quot;./configs/base&quot;
}

</code></pre>
</li>
<li>
<p>files: 指定被编译文件的列表，只有需要编译的文件少时才会用到</p>
<pre><code class="language-json">{
  &quot;files&quot;: [
    &quot;core.ts&quot;,
    &quot;sys.ts&quot;,
    ...
  ]
}

</code></pre>
</li>
<li>
<p>compilerOptions: 编译选项是配置文件中非常重要也比较复杂的配置选项</p>
<ul>
<li>
<p>target: 用来指定ts被编译成的ES版本</p>
<pre><code class="language-json">{
  &quot;compilerOptions&quot;: {
    &quot;target&quot;: &quot;ES6&quot;
  }
}

</code></pre>
</li>
<li>
<p>module: 指定要使用的模块化的规范</p>
<pre><code class="language-json">{
  &quot;compilerOptions&quot;: {
    &quot;module&quot;: &quot;ES6&quot;
  }
}

</code></pre>
</li>
<li>
<p>lib: 用来指定项目中要使用的库</p>
<pre><code class="language-json">{
  &quot;compilerOptions&quot;: {
    &quot;lib&quot;: [
      &quot;dom&quot;
    ]
  }
}

</code></pre>
<p>如上，dom为需要使用获取dom的包，如document.getElementById('box')</p>
</li>
<li>
<p>outDir: 指定编译后文件所在的目录</p>
<pre><code class="language-json">{
  &quot;compilerOptions&quot;: {
    &quot;outDir&quot;: &quot;./dist&quot;
  }
}

</code></pre>
</li>
<li>
<p>outFile: 将多个ts编译成的js文件合并成一个文件</p>
<pre><code class="language-json">{
  &quot;compilerOptions&quot;: {
&quot;outFile&quot;: &quot;./dist/app.js&quot;
  }
}

</code></pre>
<p>设置outFile后，所有的全局作用域中的代码会合并到同一个文件中</p>
</li>
<li>
<p>allowJs: 是否对js文件进行编译，默认是false</p>
<pre><code class="language-json">{
  &quot;compilerOptions&quot;: {
    &quot;allowJs&quot;: true
  }
}

</code></pre>
</li>
<li>
<p>checkJs: 是否检查js代码是否符合语法规范，默认是false</p>
<pre><code class="language-json">{
  &quot;compilerOptions&quot;: {
    &quot;checkJs&quot;: true
  }
}

</code></pre>
</li>
<li>
<p>removeComments: 是否移除注释，默认是false</p>
<pre><code class="language-json">{
  &quot;compilerOptions&quot;: {
    &quot;removeComments&quot;: true
  }
}

</code></pre>
</li>
<li>
<p>noEmit: 不生成编译后的js文件，默认值false</p>
<pre><code class="language-json">{
  &quot;compilerOptions&quot;: {
    &quot;noEmit&quot;: true
  }
}

</code></pre>
</li>
<li>
<p>noEmitOnError: 当有错误时，不生成就编译后的js文件，默认值false</p>
<pre><code class="language-json">{
  &quot;compilerOptions&quot;: {
    &quot;noEmitOnError&quot;: true
  }
}

</code></pre>
</li>
</ul>
<p>语法检查相关的配置</p>
<ul>
<li>
<p>alwaysStrict: 开始严格模式，默认值false</p>
<pre><code class="language-json">{
  &quot;compilerOptions&quot;: {
    &quot;alwaysStrict&quot;: true
  }
}

</code></pre>
</li>
<li>
<p>noImplicitAny: 不允许隐式any类型，默认值false</p>
<pre><code class="language-json">{
  &quot;compilerOptions&quot;: {
    &quot;noImplicitAny&quot;: true
  }
}

</code></pre>
</li>
<li>
<p>noImplicitThis: 不允许不明确的类型的this，默认值false</p>
<pre><code class="language-json">{
  &quot;compilerOptions&quot;: {
    &quot;noImplicitThis&quot;: true
  }
}

</code></pre>
</li>
<li>
<p>strictNullChecks: 严格的检查空值，默认值false</p>
<pre><code class="language-json">{
  &quot;compilerOptions&quot;: {
    &quot;strictNullChecks&quot;: true
  }
}

</code></pre>
</li>
<li>
<p>strict: 所有严格模式的总开关，默认值false</p>
<pre><code class="language-json">{
  &quot;compilerOptions&quot;: {
    &quot;strict&quot;: true
  }
}

</code></pre>
<p>如果没有单独设置其他的属性，在设置strict后，会将其他语法检查配置也和strict一直，除非单独设置其他配置</p>
</li>
</ul>
</li>
</ul>
<h1>使用Webpack打包Ts代码</h1>
<h2>初始化package.json</h2>
<p>通过npm初始化，生成package.json文件，管理项目</p>
<pre><code class="language-sh">npm init -y

</code></pre>
<h2>安装依赖</h2>
<pre><code class="language-sh">npm i -D webpack webpack-cli typescript ts-loader

</code></pre>
<p>项目根目录创建webpack.config.js配置文件，跟package.json同级</p>
<h2>webpack.config.js</h2>
<pre><code class="language-js">// 引入一个包
const path = require('path')
// webpack中的所有的配置信息都应该写在module.exports中
module.exports = {
  // 指定入口文件
  entry: './src/index.ts',
  
  // 指定打包文件所在的目录
  output: {
  	// 指定打包文件的目录
    path: path.resolve(__dirname, 'dist'),
    // 打包后文件的名字
    filename: 'bundle.js'
  },
  
  // 指定webpack打包时要使用的模块
  module: {
    // 指定要加载的规则
    rules: [
      {
        // test指定的是规则生效的文件
        test: /\.ts$/,
        // 要使用的loader
        use: 'ts-loader',
        // 要排除的文件
        exclude: /node-modules/
      }
    ]
  }
}

</code></pre>
<h2>tsconfig.json</h2>
<p>使用指令创建tsconfig.json文件</p>
<pre><code class="language-sh">tsc --init

</code></pre>
<pre><code class="language-json">/* tsconfig.json */
{
  &quot;compilerOptions&quot;: {
    &quot;module&quot;: &quot;ES2015&quot;,
    &quot;target&quot;: &quot;ES2015&quot;,
    &quot;strict&quot;: true
  }
}

</code></pre>
<h2>package.json</h2>
<p>在package.json中添加这样的配置</p>
<pre><code class="language-json">/* package.json */
{
  &quot;scripts&quot;: {
    &quot;build&quot;: &quot;webpack&quot;
  }
}

</code></pre>
<h2>npm run build</h2>
<p>上面配置完成后，通过<code>npm run build</code>进行打包</p>
<h2>安装html-webpack-plugin</h2>
<p>该插件在执行npm run build打包时，会在/dist/文件夹下创建index.html文件，并且可以自动引入js文件和配置一些内容。</p>
<pre><code class="language-sh">npm i -D html-webpack-plugin

</code></pre>
<pre><code class="language-js">/* webpack.config.js */

// 在webpack中引入插件
const HTMLWebpackPlugin = require('html-webpack-plugin')

// 配置Webpack插件
plugins: [
  new HTMLWebpackPlugin({
    // index.html中的title
    title: '自定义title',
    // 会将src下的index.html打包到dist文件夹下
    template: './src/index.html'
  }),
]

</code></pre>
<h2>Webpack开发服务器webpack-dev-server</h2>
<p>webpack-dev-server支持热重载</p>
<p>安装</p>
<pre><code class="language-sh">cnpm i -D webpack-dev-server
cnpm i -D clean-webpack-plugin

</code></pre>
<p>clean-webpack-plugin 是在打包前将旧的打包生成的文件先删除。</p>
<pre><code class="language-js">/* webpack.config.js */

// 在webpack中引入插件
const {CleanWebpackPlugin} = require('clean-webpack-plugin');

// 配置Webpack插件
plugins: [
  new HTMLWebpackPlugin({
    // index.html中的title
    title: '自定义title',
    // 会将src下的index.html打包到dist文件夹下
    template: './src/index.html'
  }),
  new CleanWebpackPlugin(),
]

</code></pre>
<p>在package.json中进行配置</p>
<pre><code class="language-json">/* package.json */
{
  &quot;scripts&quot;: {
    &quot;build&quot;: &quot;webpack&quot;,
    &quot;start&quot;: &quot;webpack serve --open chrome.exe&quot;
  }
}

</code></pre>
<p>配置webpack.config.js使其支持ts和js扩展名模块的导入</p>
<pre><code class="language-js">{
  resolve: {
		extensions: ['.ts', '.js']
  }
}

</code></pre>
<p>安装babel</p>
<pre><code class="language-sh">cnpm i -D @babel/core @babel/preset-env babel-loader core-js

</code></pre>
<p>webpack.config.js</p>
<pre><code class="language-js">// 引入一个包
const path = require('path')
// webpack中的所有的配置信息都应该写在module.exports中
module.exports = {
  // 指定入口文件
  entry: './src/index.ts',
  
  // 指定打包文件所在的目录
  output: {
  	// 指定打包文件的目录
    path: path.resolve(__dirname, 'dist'),
    // 打包后文件的名字
    filename: 'bundle.js',
    // 告诉webpack不使用箭头函数
    environment: {
      arrowFunction: false
    }
  },
  
  // 指定webpack打包时要使用的模块
  module: {
    // 指定要加载的规则
    rules: [
      {
        // test指定的是规则生效的文件
        test: /\.ts$/,
        // 要使用的loader
        use: [
          // 配置babel
          {
            // 指定加载器
            loader: &quot;babel-loader&quot;,
          	// 设置babel
            options: {
              // 设置预定义的环境
              presets:[
                [
                  // 指定环境的插件
                  &quot;@babel/preset-env&quot;,
                  {
                    // 要兼容的目标浏览器
                    targets: {
                      &quot;chrome&quot;:&quot;58&quot;,
                      &quot;ie&quot;:&quot;11&quot;
                    },
                    // 指定corejs的版本
                    &quot;corejs&quot;: &quot;3&quot;,
                    // 使用corejs的方法 &quot;usage&quot;:表示按需加载
                    &quot;useBuiltIns&quot;: &quot;usage&quot;
                  }
                ]
              ]
            }
          },
          'ts-loader'
        ],
        // 要排除的文件
        exclude: /node-modules/
      }
    ]
  }
}

</code></pre>
<h1>面向对象</h1>
<h2>类</h2>
<p>语法</p>
<pre><code class="language-typescript">class 类名{
	属性名: 类型;
  constructor(参数: 类型) {
    this.属性名 = 参数;
  }
  方法名() {
    ...
  }
}

</code></pre>
<p>实例</p>
<pre><code class="language-typescript">class Person{
  // 实例属性 通过实例化对象访问
  name: String;
  readonly age: number;

  // 静态属性 可以直接通过类名访问
  static sex: String = &quot;男&quot;;

  // 构造器
  constructor(name: String, age: number) {
    this.name = name;
    this.age = age;
  }

  // 定义奔跑方法
  run (): String {
    console.log(this.name, this.age);
    return &quot;奔跑中&quot;;
  }
}

const per = new Person(&quot;张三&quot;, 18);
// per.age = 20; // 只读属性 无法修改
console.log(per.run(), Person.sex);

</code></pre>
<h2>继承</h2>
<p>继承后可以将父类中的方法和属性完全继承过来，也可以重写父类中的方法</p>
<pre><code class="language-typescript">class Animal{
  name: String;
  age: number;


  constructor(name: String, age: number) {
    this.name = name;
    this.age = age;
  }

  run(): void {
    console.log(&quot;动物在运动&quot;);
  }
}

class Dog extends Animal{
  run(): void {
    console.log(this.name + &quot;&quot; + this.age + &quot;岁，在运动&quot;);
  }
}

const dog = new Dog(&quot;小黑&quot;, 5);
dog.run();

</code></pre>
<p>如果需要在子类中添加新的属性，然后需要在子类中写构造器的话，需要手动调用父类中的构造器。</p>
<pre><code class="language-js">class Animal{
  name: String;
  age: number;

  constructor(name: String, age: number) {
    this.name = name;
    this.age = age;
  }

  run(): void {
    console.log(&quot;动物在运动&quot;);
  }
}

class Dog extends Animal{
  sex: String;

  constructor(name: String, age: number, sex: String) {
    super(name, age);
    this.sex = sex;
  }

  run(): void {
    console.log(this.name + &quot;&quot; + this.age + &quot;岁，&quot; + this.sex + &quot;，在运动&quot;);
  }
}

const dog = new Dog(&quot;小黑&quot;, 5, '公');
dog.run();

</code></pre>
<p>子类中的构造器需要也把父类中的属性也传入，因为子类的构造器相当于一个中转，将参数中传给父类中的构造器。</p>
<h2>抽象类</h2>
<p>通过<code>abstract</code>关键字定义的类，就是抽象类，抽象类不能实例化对象，只能被子类继承。</p>
<p>抽象类中存在抽象方法，抽象方法也是通过<code>abstract</code>关键字定义的，并且抽象方法只能定义在抽象类中，子类必须对父类中的抽象方法进行重写。抽象方法没有方法体。，基本上和java中的抽象方法保持一致。</p>
<pre><code class="language-typescript">abstract class Animal{
  name: String;

  constructor(name: String) {
    this.name = name;
  }

  abstract run(): void;
}

class Dog extends Animal{
  age: number;
  
  constructor(name: String, age: number) {
    super(name);
    this.age = age;
  }

  run(): void {
    console.log(this.name + &quot;&quot; + this.age + &quot;岁，在运动&quot;);
  }
}

const dog = new Dog(&quot;小黑&quot;, 5);
dog.run();

</code></pre>
<h2>接口</h2>
<p>例子</p>
<pre><code class="language-typescript">type myType = {
  name: String,
  age: number
}

const obj: myType = {
  name: 'sss',
  age: 10
}

</code></pre>
<p>使用接口实现</p>
<pre><code class="language-typescript">interface myInterface {
  name: String;
  age: number;
}

const obj: myInterface = {
  name: 'sss',
  age: 10
}

</code></pre>
<p>接口是用来定义一个类的结构，用来定义一个类中应该包含哪些属性和方法，同时接口也可以当成类型声明去使用。</p>
<h3>多接口同名合并</h3>
<p>type不允许定义同名的类型声明，而接口可以定义多个同名的接口，只是定义多个相同的接口，会将多个同名接口融合一起。</p>
<pre><code class="language-typescript">interface myInterface {
  name: String;
  age: number;
}

interface myInterface {
  sex: String;
}

const obj: myInterface = {
  name: &quot;小户&quot;,
  age: 10,
  sex: &quot;男&quot;
}

</code></pre>
<h3>接口中的属性和方法</h3>
<p>接口中的属性和方法都是只定义，方法只能为抽象方法，属性只定义不赋值。</p>
<pre><code class="language-typescript">interface myInterface {
  name: String;
  sayHello(): void;
}

</code></pre>
<h3>实现接口</h3>
<p>类实现接口，需要将接口中的抽象方法全部重写，然后将接口中的参数利用构造方法进行赋值操作。</p>
<pre><code class="language-typescript">interface myInterface {
  name: String;
  sayHello(): void;
}

class MyClass implements myInterface {
  name: String;
  constructor(name: string) {
    this.name = name;
  }
  sayHello(): void {
    console.log(&quot;注意看，这个男人他叫&quot; + this.name)
  }
}

const myClass = new MyClass(&quot;小帅&quot;);
myClass.sayHello();

</code></pre>
<h2>属性的封装</h2>
<blockquote>
<p>public 公共</p>
<p>private 私有</p>
<p>protected 受保护</p>
</blockquote>
<p>TS中的属性和方法关键字和Java中有所不同，TS中没有省略的，只有public、private、protected，这三个修饰符的作用和java中的一模一样。</p>
<p>如果省略则表示public公共的。</p>
<p>私有变量依然可以定义getter、setter方法。</p>
<pre><code class="language-typescript">;(function(){
  // 定义一个表示人的类
  class Person{
    private name: String;
    private age: number;
    constructor(name: String, age: number) {
      this.name = name;
      this.age = age;
    }
    public setName(name: String): void {
      this.name = name;
    }
    public getName(): String {
      return this.name;
    }
    public setAge(age: number): void {
      this.age = age;
    }
    public getAge(): number {
      return this.age;
    }
  }

  const per = new Person(&quot;孙悟空&quot;, 18);
  per.setName(&quot;猪八戒&quot;);
  per.setAge(-100);
  console.log(per.getName(), per.getAge());
})();

</code></pre>
<p>getter、setter方法的好处就是，让本类中的变量不会被随意修改，可以在setter方法中进行控制。</p>
<pre><code class="language-typescript">;(function(){
  // 定义一个表示人的类
  class Person{
    private name: String;
    private age: number;
    constructor(name: String, age: number) {
      this.name = name;
      this.age = age;
    }
    public setName(name: String): void {
      this.name = name;
    }
    public getName(): String {
      return this.name;
    }
    public setAge(age: number): void {
      if(age &gt;= 0) {
        this.age = age;
      }
    }
    public getAge(): number {
      return this.age;
    }
  }

  const per = new Person(&quot;孙悟空&quot;, 18);
  per.setName(&quot;猪八戒&quot;);
  per.setAge(-100);
  console.log(per.getName(), per.getAge());
})();

</code></pre>
<p>TtypScript中的get、set方法的另一种写法</p>
<pre><code class="language-typescript">// 定义一个表示人的类
class Person{
  private _name: String;
  private _age: number;
  constructor(name: String, age: number) {
    this._name = name;
    this._age = age;
  }
  get name() {
    return this._name;
  }
  set name(name: String) {
    this._name = name;
  }
  get age() {
    return this._age;
  }
  set age(age: number) {
    if(age &gt;= 0) {
      this._age = age;
    }
  }
}

const per = new Person(&quot;孙悟空&quot;, 18);
per.name = &quot;猪八戒&quot;;
per.age = -100;
console.log(per.name, per.age);

</code></pre>
<h2>构造器和属性结合</h2>
<p>以下两种写法完全一样。</p>
<pre><code class="language-typescript">// 定义一个表示人的类
class Person{
  public name: String;
  constructor(name: String) {
    this.name = name;
  }
}

const per = new Person(&quot;红孩儿&quot;);
console.log(per.name);


</code></pre>
<pre><code class="language-typescript">// 定义一个表示人的类
class Person{
  constructor(public name: String) {}
}

const per = new Person(&quot;红孩儿&quot;);
console.log(per.name);

</code></pre>
<h1>泛型</h1>
<p>在定义函数或者类时，如果遇到类型不明确就可以使用泛型。</p>
<pre><code class="language-typescript">// function fn(num: ?): ? {
// 	return num;
// }

function fn&lt;T&gt;(num: T): T{
  return num;
}

console.log(fn(&quot;你好，泛型。&quot;)); // 不指定泛型类型，TS可以自动对类型进行推断
console.log(fn&lt;String&gt;(&quot;你好，泛型。&quot;)); // 指定泛型类型
console.log(fn&lt;number&gt;(24)); // 指定泛型类型

</code></pre>
<p>泛型可以指定多个</p>
<pre><code class="language-typescript">function fn&lt;T, K&gt;(num: T, num1: K): T{
  console.log(num1);
  return num;
}

console.log(fn('123', 123));
console.log(fn&lt;String, Number&gt;('123', 123));

</code></pre>
<p>限制泛型的类型</p>
<pre><code class="language-typescript">interface Inter{
	length: number;
}

function fn&lt;T extends Inter&gt;(a: T): number{
  return a.length;
}

fn(&quot;123&quot;); // 字符串有.length属性
fn(123); // 报错，因为数字没有.length属性
fn({length: 1}); // 自定义对象内有.length属性，所以不会报错

</code></pre>
<p>以上泛型<code>T</code>是实现了接口<code>Inter</code>，但是这里使用的是<code>extends</code>关键字，而不是<code>implements</code>，需要特别注意。</p>
<p>类中的泛型</p>
<pre><code class="language-typescript">class MyClass&lt;T&gt; {
	name: T;
  constructor(name: T) {
    this.name = name;
  }
}

const mc = new MyClass&lt;String&gt;(&quot;孙悟空&quot;);
const mc1 = new MyClass&lt;Number&gt;(123);
console.log(mc,mc1);

</code></pre>
]]></content>
</entry>
<entry>
  <title>ES6 标准入门 - 阮一峰</title>
  <link href="https://ganto.me/post/20230220-2"/>
  <id>https://ganto.me/post/20230220-2</id>
  <updated>2023-02-20T00:00:00+08:00</updated>
  <published>2023-02-20T00:00:00+08:00</published>
  <author><name>干徒</name></author>
  <summary><![CDATA[Object.assign() const a = {name: '小华', age: 19, sex: '女'} const b = {name: '小华', age: 20} const c = Object.assign(a, b) console.log(a) console.log(b) console.log(c) // {name: '小华', age: 20, sex: '女'} // {name: '小华', age: 20} // {name: '小华', age: 20, sex: '女'} 通过上方代码可以看出，通过Object.assign()方法，会修改原对象a，并且返回的c对象和a对象一样，b对象不会修改被对象，Object.assign()第一个对象为目标对象，后边的无论多少都是源对象，目标对象是合并后，要返回的对象，在时机使用过程中一般第一个对象写成一个空对象，这样才不会对其他对象造成影响。 const a = {name: '小华', age: 19, sex: '女'} const b = {name: '小华', age: 20} Object.]]></summary>
  <content type="html"><![CDATA[<h1>Object.assign()</h1>
<pre><code class="language-js">const a = {name: '小华', age: 19, sex: '女'}
const b = {name: '小华', age: 20}
const c = Object.assign(a, b)
console.log(a)
console.log(b)
console.log(c)
// {name: '小华', age: 20, sex: '女'}
// {name: '小华', age: 20}
// {name: '小华', age: 20, sex: '女'}

</code></pre>
<p>通过上方代码可以看出，通过<code>Object.assign()</code>方法，会修改原对象a，并且返回的c对象和a对象一样，b对象不会修改被对象，<code>Object.assign()</code>第一个对象为目标对象，后边的无论多少都是源对象，目标对象是合并后，要返回的对象，在时机使用过程中一般第一个对象写成一个空对象，这样才不会对其他对象造成影响。</p>
<pre><code class="language-js">const a = {name: '小华', age: 19, sex: '女'}
const b = {name: '小华', age: 20}
Object.assign({}, a, b);

</code></pre>
<h1>new set()</h1>
<h2>去重</h2>
<p>这里用到了Rest参数</p>
<pre><code class="language-js">let arr = [1,1,2,2,2,2,2,3,3,3,4,4,4]
let item = [...new Set(arr)] // 这里放在数组里面使用Rest参数将去重后的数值一个一个存放到item数组中
console.log(item)
// [1,2,3,4]

</code></pre>
<h1>新增方法</h1>
<h2>Array.from()</h2>
<p>将伪数组转化为真正的数组</p>
<ul>
<li>转化后数组会根据伪数组中的<code>length: 2</code>属性进行，也就是如果length的值为2，只会转化伪数组的前两个值</li>
</ul>
<pre><code class="language-js">let likeArr  = {
  0:'React',
  1:'Vue',
  2:'Angular',
  3:'Node',
  4:'Vant',
  'length':2
}
let arr = Array.from(likeArr);
console.log(arr); // (2) ['React', 'Vue']

</code></pre>
<h2>Object.freeze()</h2>
<pre><code class="language-js">const foo = {name: '小明'}
foo.name = '小华'
console.log(foo); // {name: '小华'}

</code></pre>
<p>如上代码，虽然const声明的为常量，其foo指向的内存地址不可改变，但其内部的属性可以改变，也就是上述代码可以正确执行。</p>
<p>如果使用<code>Object.freeze()</code>方法，则会把对象冻结，则表示不仅foo指向的内存地址不可改变，其内部的属性也不会被改变。如下代码，在使用了<code>Object.freeze()</code>方法之后，更改foo的属性将不起作用。</p>
<pre><code class="language-js">const foo = {name: '小明'}
Object.freeze(foo)
foo.name = '小华'
console.log(foo); // {name: '小明'}

</code></pre>
<p>如果在使用了<code>Object.freeze()</code>方法后，再开启严格模式<code>'use strict'</code>，代码更会报错。</p>
<pre><code class="language-js">'use strict'
const foo = {name: '小明'}
Object.freeze(foo)
foo.name = '小华'
console.log(foo); // （报错）

</code></pre>
<h2>Object.keys()</h2>
<h3>冷知识</h3>
<p>对象可以通过以下两种方式获取值。</p>
<pre><code class="language-js">let obj = {name1: '小强', name2: '小虎', name3: '小华', name4: '小明'}
console.log(obj['name1'], obj.name1); // 小强 小强

</code></pre>
<pre><code class="language-js">let obj = {name1: '小强', name2: '小虎', name3: '小华', name4: '小明'}
const objKeys = Object.keys(obj)
console.log(objKeys) // (4)['name1', 'name2', 'name3', 'name4']

</code></pre>
<p>如上代码所示，<code>Object.keys</code>的主要作用就是将对象中的所有<code>key</code>打包成数组进行返回。然后可以通过<code>forEach()</code>对对象的值进行遍历，如下代码所示。</p>
<pre><code class="language-js">let obj = {name1: '小强', name2: '小虎', name3: '小华', name4: '小明'}
Object.keys(obj).forEach((key, index) =&gt; {
  console.log(obj[key]) // 小强 小虎 小华 小明
})

</code></pre>
<p><strong>注意</strong>：这里的取值采用<code>obj[key]</code>的方式，因为<code>Object.keys(obj)</code>返回的对象<code>key</code>为字符串，如果取值用<code>obj.'name1'</code>显然不对。</p>
<h1>ES6 声明变量的六种方法</h1>
<ol>
<li>var <strong>[ES5]</strong></li>
<li>function <strong>[ES5]</strong></li>
<li>let <strong>[ES6]</strong></li>
<li>const <strong>[ES6]</strong></li>
<li>import <strong>[ES6]</strong></li>
<li>class <strong>[ES6]</strong></li>
</ol>
<h1>Generator</h1>
<p><code>yield</code>表达式只能用在Generator函数内，用在其他地方将报错。</p>
<pre><code class="language-js">function* f() {
  let a = 0;
  while(true){
  	yield a
    a++
  }
}

const [a, b, c, d, e, ff, g] = f()
console.log(a, b, c, d, e, ff, g)

</code></pre>
<h1>作用域</h1>
<p>因为在foo函数作用域中，新声明了一个x变量，而y()函数中的x其实是foo函数参数那里新声明的x，x=2也是改变的foo函数参数那里新声明的x，foo函数内到的打印x，遵循就近原则，先找自己作用域下的x，也就是x=3。在下面代码中声明了三个x变量，根据不同的作用域，改变不同的x变量</p>
<pre><code class="language-js">var x = 1;
function foo(x, y = function() { x = 2; }) {
  let x = 3;
  console.log('1',x); // 3
  y();
  console.log('2',x); // 3
}
console.log('3',x); // 1
foo()
console.log('4',x); // 1

</code></pre>
]]></content>
</entry>
<entry>
  <title>css常用场景</title>
  <link href="https://ganto.me/post/20230220-5"/>
  <id>https://ganto.me/post/20230220-5</id>
  <updated>2023-02-20T00:00:00+08:00</updated>
  <published>2023-02-20T00:00:00+08:00</published>
  <author><name>干徒</name></author>
  <summary><![CDATA[初始化样式 body, html, div, p, span, i, b, ul, ol li, input, img, video { padding: 0; margin: 0; box-sizing: border-box; } img { vertical-align: bottom; object-fit: cover; } ul, ol { list-style: none; } i { font-style: normal; } .container { width: 1200px; margin: auto; position: relative; } ._row { white-space: nowrap; text-overflow: ellipsis; overflow: hidden; } Github仓库 清除浮动 0、给父元素内部最后一个没有浮动的子标签设置clear:both &lt;style&gt; .box{ width: 500px; background-color: red; } .child1{ width: 100px; height: 1]]></summary>
  <content type="html"><![CDATA[<h1>初始化样式</h1>
<pre><code class="language-css">body,
html,
div,
p,
span,
i,
b,
ul,
ol
li,
input,
img,
video {
  padding: 0;
  margin: 0;
  box-sizing: border-box;
}

img {
 vertical-align: bottom;
 object-fit: cover;
}

ul,
ol {
  list-style: none;
}

i {
  font-style: normal;
}

.container {
  width: 1200px;
  margin: auto;
  position: relative;
}

._row {
  white-space: nowrap;
  text-overflow: ellipsis;
  overflow: hidden;
}

</code></pre>
<p><a href="https://gitee.com/ganto/css">Github仓库</a></p>
<h1>清除浮动</h1>
<p><strong>0、给父元素内部最后一个没有浮动的子标签设置clear:both</strong></p>
<pre><code class="language-html">&lt;style&gt;
  .box{
    width: 500px;
    background-color: red;
  }
  .child1{
    width: 100px;
    height: 100px;
    background-color: green;
    float: right;
  }
  .child2{
    width: 100px;
    height: 100px;
    background-color: pink;
    float: right;
  }
  .child3{
    clear: both;
  }
&lt;/style&gt;

&lt;div class=&quot;box&quot;&gt;
  &lt;div class=&quot;child1&quot;&amp;gt;盒子1&lt;/div&gt;
  &lt;div class=&quot;child2&quot;&amp;gt;盒子2&lt;/div&gt;
  &lt;div class=&quot;child3&quot;&amp;gt;你好呀&lt;/div&gt;
&lt;/div&gt;

</code></pre>
<p><strong>1、给父元素内部添加一个空的子标签</strong></p>
<pre><code class="language-html">&lt;style&gt;
  .box{
    width: 500px;
    background-color: red;
  }
  .child1{
    width: 100px;
    height: 100px;
    background-color: green;
    float: right;
  }
  .child2{
    width: 100px;
    height: 100px;
    background-color: pink;
    float: right;
  }

  .clear{
    clear: both;
  }
&lt;/style&gt;

&lt;div class=&quot;box&quot;&gt;
  &lt;div class=&quot;child1&quot;&amp;gt;盒子1&lt;/div&gt;
  &lt;div class=&quot;child2&quot;&amp;gt;盒子2&lt;/div&gt;
  &lt;div class=&quot;clear&quot;&gt;&lt;/div&gt;
&lt;/div&gt;

</code></pre>
<p><strong>2、给父元素设置一个after伪类来代替空标签</strong></p>
<pre><code class="language-html">&lt;style&gt;
  .box{
    width: 500px;
    background-color: red;
  }
  .child1{
    width: 100px;
    height: 100px;
    background-color: green;
    float: right;
  }
  .child2{
    width: 100px;
    height: 100px;
    background-color: pink;
    float: right;
  }

  .clearfix::after{
    content: &quot;&quot;;
    display: block;
    clear: both;
  }
&lt;/style&gt;

&lt;div class=&quot;box&quot; class=&quot;clearfix&quot;&gt;
  &lt;div class=&quot;child1&quot;&amp;gt;盒子1&lt;/div&gt;
  &lt;div class=&quot;child2&quot;&amp;gt;盒子2&lt;/div&gt;
&lt;/div&gt;

</code></pre>
<p><strong>3、给父元素设置overflow:hidden</strong></p>
<pre><code class="language-html">&lt;style&gt;
  .box{
    width: 500px;
    background-color: red;
    overflow: hidden;
  }
  .child1{
    width: 100px;
    height: 100px;
    background-color: green;
    float: right;
  }
  .child2{
    width: 100px;
    height: 100px;
    background-color: pink;
    float: right;
  }
&lt;/style&gt;

&lt;div class=&quot;box&quot;&gt;
  &lt;div class=&quot;child1&quot;&amp;gt;盒子1&lt;/div&gt;
  &lt;div class=&quot;child2&quot;&amp;gt;盒子2&lt;/div&gt;
&lt;/div&gt;

</code></pre>
<p>BFC块级格式话上下文</p>
<p>overflow:hidden;属性就可以触发BFC规则去渲染页面</p>
<p>BFC规则有：浮动的元素也参与运算高度</p>
<h1>图片不变形</h1>
<pre><code class="language-css">object-fit: contain;

</code></pre>
<h1>固定背景图片</h1>
<p>将背景图片在视口内固定。</p>
<pre><code class="language-css">background-attachment: fixed;

</code></pre>
<h1>提高权限</h1>
<p>通过添加<code>!important</code>的方式提高权限</p>
<pre><code class="language-css">box{
  background-color: '#ff0000 !important';
}

</code></pre>
<h1>flex布局对调</h1>
<p>见名知意，就是flex布局左右对调。</p>
<pre><code class="language-css">display: flex;
flex-flow: row-reverse;

</code></pre>
<h1>:last-child::after</h1>
<pre><code class="language-css">.item::after {
  content: '';
  display: inline-block;
  width: 1px;
  height: 24px;
  background-color: #fff;
  position: absolute;
  right: 0;
  top: 50%;
  margin-top: -12px;
}
.item:last-child::after{
  background-color: transparent;
}

</code></pre>
<h1>文字省略</h1>
<pre><code class="language-css">.omit {
  white-space: nowrap;
  text-overflow: ellipsis;
  overflow: hidden;
}

</code></pre>
<h1>white-space: pre;</h1>
<p>保留原始格式</p>
<pre><code class="language-css">div	{
  white-space: pre;
}

</code></pre>
<h1>BFC</h1>
<h2>BFC简介</h2>
<ul>
<li>BFC是Block Formatting Context(块级格式上下文)，可以理解成元素的一个“特异功能”。</li>
<li>该“特异功能”，在默认的情况下处于关闭状态；当元素满足了某些条件后，该“特异功能”被激活。</li>
<li>所谓“特异功能”，专业点说就是：该元素创建了BFC（又称：开启了BFC）</li>
</ul>
<h2>开启BFC能解决什么问题</h2>
<ul>
<li>元素开启BFC后，其子元素不会再产生margin塌陷问题</li>
<li>元素开启BFC后，自己不会被其他浮动元素所覆盖</li>
<li>元素开启BFC后，就算其子元素浮动，元素自身高度也不会塌陷</li>
</ul>
<h2>如何开启BFC</h2>
<ul>
<li>根元素（html元素天生就开启了BFC）</li>
<li>浮动的元素（设置float属性）</li>
<li>绝对定位、固定定位的元素（position属性，属性值需要是absolute、fixed）</li>
<li>行内块元素（display: inline-block）</li>
<li>表格单元格：<code>table</code>、<code>thead</code>、<code>tbody</code>、<code>tfoot</code>、<code>th</code>、<code>td</code>、<code>tr</code>、<code>caption</code>（display: table）</li>
<li><code>overflow</code>的值不为<code>visible</code>的块元素（overflow: auto）</li>
<li>伸缩项目 （给其需要开启BFC的父元素设置，display: flex）</li>
<li>多列容器（设置column-count: 1）</li>
<li><code>column-span</code>为<code>all</code>的元素（即使该元素没有包裹在多列容器中）</li>
<li><code>display</code>的值，设置为<code>flow-root</code>(设置display: flow-root)</li>
</ul>
<p>**注意：**强调为常用</p>
<p>子元素浮动问题，导致父元素高度坍塌，依然可以使用BFC来解决，另一种方式就是<a href="#%E6%B8%85%E9%99%A4%E6%B5%AE%E5%8A%A8">清除浮动</a></p>
<h1>CSS权重</h1>
<blockquote>
<p>权重计算规则<br />
第一等：代表内联样式，如: <code>style=&quot;&quot;</code>，权值为<strong>1000</strong>。<br />
第二等：代表ID选择器，如：<code>#content</code>，权值为<strong>0100</strong>。<br />
第三等：代表类，伪类和属性选择器，如<code>.content</code>，权值为<strong>0010</strong>。<br />
第四等：代表类型选择器和伪元素选择器，如<code>div p</code>，权值为<strong>0001</strong>。<br />
通配符、子选择器、相邻选择器等的。如<code>*、&amp;gt;、+</code>,权值为<strong>0000</strong>。<br />
继承的样式没有权值。</p>
</blockquote>
<h1>选择父元素</h1>
<p>语法：<code>body:has(.a) .item { color: #FF0000; }</code></p>
<pre><code class="language-html">&lt;body&gt;
  &lt;div class=&quot;items&quot;&gt;
  	&lt;div class=&quot;item&quot;&gt;
	  &lt;span class=&quot;is_has&quot;&gt;isHas&lt;/span&gt;
	  &lt;p&amp;gt;文字&lt;/p&gt;
	&lt;/div&gt;
	&lt;div class=&quot;item&quot;&gt;
	  &lt;span class=&quot;not_has&quot;&gt;notHas&lt;/span&gt;
	  &lt;p&amp;gt;文字&lt;/p&gt;
	&lt;/div&gt;
  &lt;/div&gt;
&lt;/body&gt;

</code></pre>
<pre><code class="language-css">.items&gt;.item:has(.is_has)&gt;p{
  color: #FF0000;
}

</code></pre>
<h1>相邻兄弟选择器</h1>
<pre><code class="language-html">&lt;body&gt;
  &lt;span&gt;Java&lt;/span&gt;
  &lt;span&gt;JavaScript&lt;/span&gt;
  &lt;span&gt;Golang&lt;/span&gt;
  &lt;span&gt;C&lt;/span&gt;
&lt;/body&gt;

</code></pre>
<pre><code class="language-css">span+span::before{
	content: &quot;、&quot;;
}

</code></pre>
<p>以上写法的意思是选择每个 <code>span</code> 后边相邻的第一个<code>span</code> ，给其添加伪类 <code>before</code></p>
<h1>黑白</h1>
<pre><code class="language-css">filter: grayscale(1);

</code></pre>
<h1>文字内背景</h1>
<pre><code class="language-html">&lt;!DOCTYPE html&gt;
&lt;html lang=&quot;en&quot;&gt;
&lt;head&gt;
    &lt;meta charset=&quot;UTF-8&quot;&gt;
    &lt;meta http-equiv=&quot;X-UA-Compatible&quot; content=&quot;IE=edge&quot;&gt;
    &lt;meta name=&quot;viewport&quot; content=&quot;width=device-width, initial-scale=1.0&quot;&gt;
    &lt;title&gt;Document&lt;/title&gt;
    &lt;style&gt;
        div{
            font-weight: 900;
            font-size: 100px;
            background-image: url(./1.png);
            background-clip: text;
            -webkit-background-clip: text;
            -webkit-text-fill-color: transparent;
        }
    &lt;/style&gt;
&lt;/head&gt;
&lt;body&gt;
    &lt;div&gt;20%&lt;/div&gt;
&lt;/body&gt;
&lt;/html&gt;

</code></pre>
<h1>字体显示两行省略</h1>
<pre><code class="language-css">p{
  overflow: hidden;
  text-overflow: ellipsis;
  display: -webkit-box;
  -webkit-line-clamp: 2;
  -webkit-box-orient: vertical;
}

</code></pre>
<h1>字体背景图内嵌</h1>
<pre><code class="language-css">h1{
  	background-image: url(https://baidu.com/favicon.ico);
    background-clip: text;
    -webkit-background-clip: text;
  	color: transparent;
    -webkit-text-fill-color: transparent;
}

</code></pre>
<h1>边框渐变</h1>
<pre><code class="language-css">div {
    width: 100px;
    height: 50px;
    border: 5px solid;
    border-image: linear-gradient(to right, red, #fff000) 2;
}

</code></pre>
<h1>等高</h1>
<p>给父类添加这个属性</p>
<pre><code class="language-css">display: grid;
grid-auto-flow: column;

</code></pre>
<h2>swiper row 等高</h2>
<p>只需要给子tiem添加<code>height: auto;</code>即可</p>
<p><code>display: flex;</code>布局，如果需要子元素等高，给子元素设置<code>height: auto;</code></p>
<p>确保<code>height</code>高度一致，请不要给父元素添加<code>align-items: flex-start;</code></p>
<h1>meta标签重定向</h1>
<pre><code class="language-html">&lt;meta http-equiv=&quot;refresh&quot; content=&quot;0; url=https://figmachina.com&quot;&gt;

</code></pre>
<h1>动态融合</h1>
<pre><code class="language-html">&lt;!DOCTYPE html&gt;
&lt;html&gt;
&lt;head&gt;
    &lt;style&gt;
        .contantBox {
            filter: contrast(50);
            background: black;
            padding: 100px 0 0;
            display: flex;
        }
        .item {
            width: 50px;
            height: 50px;
            filter: blur(10px);
            background: white;
            animation: item 5s linear infinite;
            margin-bottom: -25px;
        }
        @keyframes item {
            0%{
                transform: rotate(0deg);
            }
            100%{
                transform: rotate(360deg);
            }
        }
    &lt;/style&gt;
&lt;/head&gt;
&lt;body&gt;
  &lt;div class=&quot;contantBox&quot;&gt;
      &lt;div class=&quot;item&quot;&gt;&lt;/div&gt;
      &lt;div class=&quot;item&quot;&gt;&lt;/div&gt;
      &lt;div class=&quot;item&quot;&gt;&lt;/div&gt;
      &lt;div class=&quot;item&quot;&gt;&lt;/div&gt;
      &lt;div class=&quot;item&quot;&gt;&lt;/div&gt;
      &lt;div class=&quot;item&quot;&gt;&lt;/div&gt;
      &lt;div class=&quot;item&quot;&gt;&lt;/div&gt;
      &lt;div class=&quot;item&quot;&gt;&lt;/div&gt;
      &lt;div class=&quot;item&quot;&gt;&lt;/div&gt;
      &lt;div class=&quot;item&quot;&gt;&lt;/div&gt;
      &lt;div class=&quot;item&quot;&gt;&lt;/div&gt;
      &lt;div class=&quot;item&quot;&gt;&lt;/div&gt;
      &lt;div class=&quot;item&quot;&gt;&lt;/div&gt;
      &lt;div class=&quot;item&quot;&gt;&lt;/div&gt;
      &lt;div class=&quot;item&quot;&gt;&lt;/div&gt;
      &lt;div class=&quot;item&quot;&gt;&lt;/div&gt;
      &lt;div class=&quot;item&quot;&gt;&lt;/div&gt;
      &lt;div class=&quot;item&quot;&gt;&lt;/div&gt;
      &lt;div class=&quot;item&quot;&gt;&lt;/div&gt;
      &lt;div class=&quot;item&quot;&gt;&lt;/div&gt;
  &lt;/div&gt;
&lt;/body&gt;
&lt;/html&gt;

</code></pre>
<p>这里的背景颜色不能为白色，盒子不能为黑色，否则将失效</p>
<h1>将a标签设置为不可点击</h1>
<pre><code class="language-css">pointer-events: none;

</code></pre>
<h1>单词连接符</h1>
<pre><code class="language-css">.text{
    word-break: break-word;
    -webkit-hyphens: auto;
    -moz-hyphens: auto;
    hyphens:auto;
}

</code></pre>
<p>连接符要配合html属性lang一起使用，英文单词就必须设置lang为英文属性，德语单词就必须设置lang为德语的属性，否则单词连接符会有问题。</p>
<h1>锚点滚动</h1>
<pre><code class="language-html">&lt;!DOCTYPE html&gt;
&lt;html lang=&quot;en&quot;&gt;
&lt;head&gt;
  &lt;meta charset=&quot;UTF-8&quot;&gt;
  &lt;meta http-equiv=&quot;X-UA-Compatible&quot; content=&quot;IE=edge&quot;&gt;
  &lt;meta name=&quot;viewport&quot; content=&quot;width=device-width, initial-scale=1.0&quot;&gt;
  &lt;title&gt;Document&lt;/title&gt;
  &lt;style&gt;
    .box{
      border: 1px solid red;
      height: 100vh;
      overflow:scroll;
      scroll-behavior: smooth;
    }
    header{
      width: 100%;
      height: 500px;
    }
    main{
      width: 100%;
      height: 900px; 
    }
    footer{
      width: 100%;
      height: 500px;
    }
  &lt;/style&gt;
&lt;/head&gt;
&lt;body&gt;
  &lt;div class=&quot;box&quot;&gt;
    &lt;header&gt;&lt;/header&gt;
    &lt;main&gt;
      &lt;h1 id=&quot;h1&quot;&gt;fjeiafjieoafjoeaf &lt;a href=&quot;#h1&quot;&gt;#h1&lt;/a&gt;&lt;/h1&gt;
    &lt;/main&gt;
    &lt;footer&gt;&lt;/footer&gt;
  &lt;/div&gt;
&lt;/body&gt;
&lt;/html&gt;

</code></pre>
<h1>滚动吸附</h1>
<p>容器</p>
<pre><code class="language-css">.container{
    scroll-snap-type: x mandatory; /* 滚动方向，吸附方式 mandatory 强制吸附 */
}
.container .item{
    scroll-snap-align: start; /* 吸附方式 */
    scroll-snap-stop: always; /* 一项一项的滚动，不能跳过中间的项 */
}

</code></pre>
<h1>遮罩层</h1>
<p>将图片透明部分挖空</p>
<pre><code class="language-html">&lt;div class=&quot;container&quot;&gt;
    &lt;p&gt;
        福建人道具佛饿啊哇建瓯放假哦饿啊我发金额就哦给人家而搜集哦感觉肉色机构金融二十感觉热分解二篇金佛破傲剑法静安分局
    &lt;/p&gt;
&lt;/div&gt;

</code></pre>
<pre><code class="language-css">.container{
    -webkit-mask: url(https://jp.puprime.com/wp-content/themes/puprime_new/images/home_awards_item3.webp?v=4) repeat;
    -webkit-mask-image: linear-gradient(top, right, #000, #000 13%, transparent 13%, transparent 82%, #000 82%), url(./mask.svg);
    -webkit-mask-position: center;
    -webkit-mask-repeat: no-repeat;
}

</code></pre>
<h1>css变量</h1>
<pre><code class="language-css">:root{
    --background-color: red;
}
body{
    background-color: var(--background-color, #fff)
}

</code></pre>
<p>以上定义了一个css变量<code>--background-color: red;</code>，在<code>body</code>上通过<code>var(--background-color, #fff)</code>，var的第二个参数是默认值，如果<code>--background-color: red;</code>变量没有值，则会启动默认值。</p>
<h1>反色</h1>
<pre><code class="language-css">mix-blend-mode: difference;

</code></pre>
<h1>暗黑模式</h1>
<p>根据系统颜色自动设置网页颜色</p>
<pre><code class="language-css">html {
    color-scheme: light dark;
}

</code></pre>
<p>系统颜色媒体查询</p>
<pre><code class="language-css">@media (prefers-color-scheme: dark) {
    body {
        background: #000000;
        color: #ffffff;
    }
}
@media (prefers-color-scheme: light) {
    body {
        background: #ffffff;
        color: #000000;
    }
}

</code></pre>
<pre><code class="language-css">@media (prefers-color-scheme: dark) {
    :root {
        --background: #000000;
        --color: #ffffff;
    }
}
@media (prefers-color-scheme: light) {
    :root {
        --background: #ffffff;
        --color: #000000;
    }
}
body {
    background-color: var(--background);
    color: var(--color);
}

</code></pre>
<p>css可以有媒体查询检测系统颜色，那么js当然也有检测系统颜色的方式</p>
<pre><code class="language-js">const themeMedia = window.matchMedia(&quot;(prefers-color-scheme: light)&quot;);
if (themeMedia.matches) {
    console.log(&quot;light&quot;)
} else {
    console.log(&quot;dark&quot;)
}

</code></pre>
<p>js不仅可以检测系统颜色，还可以检测系统颜色的变化</p>
<pre><code class="language-js">const themeMedia = window.matchMedia(&quot;(prefers-color-scheme: light)&quot;);
themeMedia.addListener(e =&gt; {
    if (e.matches) {
        console.log(&quot;light&quot;);
    } else {
        console.log(&quot;dark&quot;);
    }
});

</code></pre>
<p>应用</p>
<pre><code class="language-html">&lt;!DOCTYPE html&gt;
&lt;html lang=&quot;en&quot; data-theme=&quot;auto&quot;&gt;
&lt;head&gt;
    &lt;meta charset=&quot;UTF-8&quot;&gt;
    &lt;meta name=&quot;viewport&quot; content=&quot;width=device-width, initial-scale=1.0&quot;&gt;
    &lt;title&gt;Document&lt;/title&gt;
    &lt;style&gt;
        [data-theme=light] {
            --background: #ffffff;
            --color: #000000;
        }
        [data-theme=dark] {
            --background: #000000;
            --color: #ffffff;
        }
        body {
            background-color: var(--background);
            color: var(--color);
        }
    &lt;/style&gt;
&lt;/head&gt;
&lt;body&gt;
    &lt;p&gt;ABCabc123你好&lt;/p&gt;
    &lt;script&gt;
        const initThemeMedia = window.matchMedia(&quot;(prefers-color-scheme: light)&quot;);
        if (initThemeMedia.matches) {
            console.log(&quot;light&quot;)
            document.querySelector(&quot;html&quot;).setAttribute(&quot;data-theme&quot;, &quot;light&quot;)
        } else {
            console.log(&quot;dark&quot;)
            document.querySelector(&quot;html&quot;).setAttribute(&quot;data-theme&quot;, &quot;dark&quot;)
        }
        const themeMedia = window.matchMedia(&quot;(prefers-color-scheme: light)&quot;);
        themeMedia.addListener(e =&gt; {
            if (e.matches) {
                console.log(&quot;light&quot;);
                document.querySelector(&quot;html&quot;).setAttribute(&quot;data-theme&quot;, &quot;light&quot;)
            } else {
                console.log(&quot;dark&quot;);
                document.querySelector(&quot;html&quot;).setAttribute(&quot;data-theme&quot;, &quot;dark&quot;)
            }
        });
    &lt;/script&gt;
&lt;/body&gt;
&lt;/html&gt;

</code></pre>
<h1>字体渐变</h1>
<pre><code class="language-css">p {
	background: -webkit-linear-gradient(left,#D008FF 2.56%,#05F3F3 100%);
    background: -moz-linear-gradient(left,#D008FF 2.56%,#05F3F3 100%);
    background: linear-gradient(90deg,#D008FF 2.56%,#05F3F3 100%);
    -webkit-background-clip: text;
    background-clip: text;    
    color: transparent;
    -webkit-text-fill-color: transparent;
}

</code></pre>
<h1>字体背景图</h1>
<pre><code class="language-css">p {
    background-image: url(https://baidu.com/favicon.ico);
    background-clip: text;
    -webkit-background-clip: text;
    color: transparent;
    -webkit-text-fill-color: transparent;
}

</code></pre>
<h1>css透明图片阴影效果</h1>
<pre><code class="language-css">filter: drop-shadow(0 0 10px #000);

</code></pre>
<p><code>filter: drop-shadow(0 0 10px #000);</code>属性是只给图片的可视区域（像素点）添加阴影效果，透明部分不添加</p>
<p>而<code>box-shadow</code>，会给整个盒子做阴影</p>
<h1>去除移动端点击蓝色背景</h1>
<pre><code class="language-css">body{ -webkit-tap-highlight-color: transparent; }

</code></pre>
<h1>去除safari浏览器 输入框右侧的icon</h1>
<pre><code class="language-css">input::-webkit-credentials-auto-fill-button{ display: none !important; visibility: hidden; pointer-events: none; position: absolute; right: 0; } /* 去除密码icon */
input::-webkit-contacts-auto-fill-button{ display: none !important; visibility: hidden; pointer-events: none; position: absolute; right: 0; } /* 去除用户名icon */

</code></pre>
<h1>CSS边界，碰撞检测</h1>
<p>利用css动画的反转进行实现</p>
<p>唯一的缺点就是，在不同大小的窗口，无法控制速度保持一致</p>
<pre><code class="language-css">.box {
  width: 50px;
  height: 50px;
  border-radius: 50%;
  background-color: red;
  position: absolute;
  left: 0;
  top: 0;
  animation: hor 1.6s infinite linear alternate, ver 0.5s infinite linear alternate;
}
@keyframes hor {
  to {
    left: calc(100vw - 50px);
  }
}
@keyframes ver {
  to {
    top: calc(100vh - 50px);
  }
  
}

</code></pre>
<h1>行盒换行边框/背景被截断问题</h1>
<p><img src="images/css%E5%B8%B8%E7%94%A8%E5%9C%BA%E6%99%AF_images/image-20231202151605893.png" alt="image-20231202151605893" /></p>
<pre><code class="language-css">span {
    box-decoration-break: clone;
    -webkit-box-decoration-break: clone;
}

</code></pre>
<p><img src="images/css%E5%B8%B8%E7%94%A8%E5%9C%BA%E6%99%AF_images/image-20231202151548317.png" alt="image-20231202151548317" /></p>
<h1>容器查询</h1>
<p>区别于媒体查询，媒体查询是相对于浏览器视口进行工作的</p>
<p>而容器查询是相对于元素进行工作，区别于媒体查询，可以直接设置，而容器查询需要设置父元素的container属性，以配合@container进行使用，只有设置了container属性的子元素才能有效果。</p>
<p>container是整合写法，可以分开写container-type、container-name等</p>
<p><code>container: layout / inline-size;</code>等同于<code>container-name: layout; container-type: inline-size;</code></p>
<pre><code class="language-html">&lt;!DOCTYPE html&gt;
&lt;html lang=&quot;en&quot;&gt;
&lt;head&gt;
  &lt;meta charset=&quot;UTF-8&quot;&gt;
  &lt;meta name=&quot;viewport&quot; content=&quot;width=device-width, initial-scale=1.0&quot;&gt;
  &lt;title&gt;Document&lt;/title&gt;
  &lt;style&gt;
    .box {
      display: flex;
      &amp; .item {
        flex: 1;
        container: layout / inline-size;
        &amp;:nth-child(odd) {
          background-color: #c9c9c9;
        }
      }
    }
    @media (max-width: 768px) {
      .box {
        &amp; .item {
          &amp;:nth-child(odd) {
            background-color: transparent;
          }
          &amp;:nth-child(even) {
            background-color: #c9c9c9;
          }
        }
      }
    }
    @container (max-width: 100px) {
      .box {
        border: 1px solid rgb(0, 255, 94);
        &amp; .item {
          border: 1px solid rgb(0, 55, 255);
          &amp; span {
            border: 1px solid red;
            color: red;
            box-decoration-break: clone;
            -webkit-box-decoration-break: clone;
          }
        }
      }
    }
  &lt;/style&gt;
&lt;/head&gt;
&lt;body&gt;
  &lt;div class=&quot;box&quot;&gt;
    &lt;div class=&quot;item&quot;&gt;&lt;span&gt;This is an example text. No.1&lt;/span&gt;&lt;/div&gt;
    &lt;div class=&quot;item&quot;&gt;&lt;span&gt;This is an example text. No.2&lt;/span&gt;&lt;/div&gt;
    &lt;div class=&quot;item&quot;&gt;&lt;span&gt;This is an example text. No.3&lt;/span&gt;&lt;/div&gt;
    &lt;div class=&quot;item&quot;&gt;&lt;span&gt;This is an example text. No.4&lt;/span&gt;&lt;/div&gt;
    &lt;div class=&quot;item&quot;&gt;&lt;span&gt;This is an example text. No.5&lt;/span&gt;&lt;/div&gt;
  &lt;/div&gt;
&lt;/body&gt;
&lt;/html&gt;

</code></pre>
<p><code>container-type</code>是定义查询模式</p>
<p><code>container-name</code>定义容器名，有多个容器查询时，可以用于区分</p>
<pre><code class="language-css">div.layout_box { container-name: layout; }
div.xxx_box { container-name: xxx; }
@container layout (max-width: 100px) {...}
@container xxx (max-width: 200px) {...}

</code></pre>
<h2>字体大小根据容器变化</h2>
<pre><code class="language-html">&lt;!DOCTYPE html&gt;
&lt;html lang=&quot;en&quot;&gt;

&lt;head&gt;
  &lt;meta charset=&quot;UTF-8&quot;&gt;
  &lt;title&gt;Hello React&lt;/title&gt;
  &lt;style&gt;
    div {
      width: 500px;
      height: 300px;
      resize: both;
      overflow: hidden;
      background-color: rebeccapurple;
      container: xxx / inline-size;
    }
    div p {
      font-size: 5cqw;
    }
  &lt;/style&gt;
&lt;/head&gt;

&lt;body&gt;
  &lt;div&gt;
    &lt;p&gt;
      道可道，非常道。名可名，非常名。无名天地之始，有名万物之母。故常无欲以观其妙，以观其徼。此两者，同出而异名，同谓之玄。玄之又玄，众妙之门。
    &lt;/p&gt;
  &lt;/div&gt;
&lt;/body&gt;

&lt;/html&gt;

</code></pre>
<h1>容器适应内容</h1>
<pre><code class="language-css">p {
    width: fit-content;
}

</code></pre>
<h1>css实现进度条</h1>
<pre><code class="language-html">&lt;!DOCTYPE html&gt;
&lt;html lang=&quot;en&quot;&gt;

&lt;head&gt;
  &lt;meta charset=&quot;UTF-8&quot;&gt;
  &lt;title&gt;Hello&lt;/title&gt;
  &lt;style&gt;
    * {
      margin: 0;
      padding: 0;
      box-sizing: border-box;
    }
    body {
      position: relative;
      background-image: linear-gradient(
        to right top,
        #409eff 50%,
        #0003 50%
      );
      background-size: 100% calc(100% - 100vh + 5px);
      background-repeat: no-repeat;
      z-index: 1;
    }
    body::after {
      content: &quot;&quot;;
      position: fixed;
      top: 5px;
      left: 0;
      right: 0;
      bottom: 0;
      background-color: #ff0000;
      z-index: -1;
    }
    .ball {
      width: 100%;
      height: 2000px;

    }
  &lt;/style&gt;
&lt;/head&gt;

&lt;body&gt;
  &lt;div class=&quot;ball&quot;&gt;
    123123
  &lt;/div&gt;
&lt;/body&gt;

&lt;/html&gt;

</code></pre>
<h1>背景颜色混合模式</h1>
<p>默认css中，多背景颜色或者多背景图，只能显示一个，有个属性可以进行多个背景颜色或者背景图片混合显示</p>
<pre><code class="language-css">div {
  background-color: #ff0000;
  background-image: url(&quot;https://files.cevno.cn/files/Sunlight_Cloud_Beach_Coast_Seashore_Hills_Iceland_5K_1920x1080.jpg&quot;);
  background-size: cover;
  background-position: center;
  background-blend-mode: darken;
}

</code></pre>
<h1>页面滚动阻尼效果</h1>
<pre><code class="language-html">&lt;!DOCTYPE html&gt;
&lt;html lang=&quot;en&quot;&gt;

&lt;head&gt;
  &lt;meta charset=&quot;UTF-8&quot;&gt;
  &lt;title&gt;Hello React&lt;/title&gt;
  &lt;style&gt;
    body {
      display: flex;
      flex-direction: column;
      align-items: center;
      background-color: #171717;
    }
    img {
      width: 40rem;
      margin-bottom: 5rem;
      pointer-events: none;
      user-select: none;
    }
    .scrollbox {
      position: relative;
      display: flex;
      flex-direction: column;
      align-items: center;
      width: 100%;
      flex-shrink: 0;
      transition: 1.15s ease;
    }
    .viewbox {
      position: fixed;
      top: 0;
      display: flex;
      align-items: flex-start;
      width: 100vw;
      height: 100vh;
    }
  &lt;/style&gt;
&lt;/head&gt;

&lt;body&gt;
  &lt;div class=&quot;viewbox&quot;&gt;
    &lt;div class=&quot;scrollbox&quot;&gt;
      &lt;img src=&quot;http://files.cevno.cn/files/骰子游戏黑黄点-微距摄影壁纸壁纸_1920x1080[10wallpaper.com].jpg&quot; alt=&quot;&quot;&gt;
      &lt;img src=&quot;http://files.cevno.cn/files/窗口，可爱，宠物，猫，特写，照片壁纸_1920x1080[10wallpaper.com].jpg&quot; alt=&quot;&quot;&gt;
      &lt;img src=&quot;http://files.cevno.cn/files/小米，Mix_3，抽象，多彩，黑暗，桌面壁纸_1920x1080[10wallpaper.com].jpg&quot; alt=&quot;&quot;&gt;
      &lt;img src=&quot;http://files.cevno.cn/files/Cheetah_Maasai_Mara_National_Reserve_Kenya_Bing_4K_1920x1080.jpg&quot; alt=&quot;&quot;&gt;
      &lt;img src=&quot;http://files.cevno.cn/files/54.jpg&quot; alt=&quot;&quot;&gt;
      &lt;img src=&quot;http://files.cevno.cn/files/43.jpg&quot; alt=&quot;&quot;&gt;
      &lt;img src=&quot;http://files.cevno.cn/files/5.jpg&quot; alt=&quot;&quot;&gt;
      &lt;img src=&quot;http://files.cevno.cn/files/12.jpg&quot; alt=&quot;&quot;&gt;
      &lt;img src=&quot;http://files.cevno.cn/files/34.jpg&quot; alt=&quot;&quot;&gt;
      &lt;img src=&quot;http://files.cevno.cn/files/41.jpg&quot; alt=&quot;&quot;&gt;
      &lt;img src=&quot;http://files.cevno.cn/files/54.jpg&quot; alt=&quot;&quot;&gt;
      &lt;img src=&quot;http://files.cevno.cn/files/64.jpg&quot; alt=&quot;&quot;&gt;
      &lt;img src=&quot;http://files.cevno.cn/files/48.jpg&quot; alt=&quot;&quot;&gt;
      &lt;img src=&quot;http://files.cevno.cn/files/49.jpg&quot; alt=&quot;&quot;&gt;
    &lt;/div&gt;
  &lt;/div&gt;

  &lt;script&gt;
    let scrollbox = document.querySelector('.scrollbox');
    function resize_body() {
      let height = scrollbox.offsetHeight;
      console.log(height)
      document.body.style.height = height + 'px';
    }
    function scroll() {
      console.log(scrollY)
      scrollbox.style.transform = 'translateY(' + -scrollY + 'px)';
    }
    window.addEventListener(&quot;scroll&quot;, scroll);
    window.addEventListener(&quot;resize&quot;, resize_body);
    window.addEventListener(&quot;load&quot;, resize_body);
  &lt;/script&gt;
&lt;/body&gt;

&lt;/html&gt;

</code></pre>
<h1>字体根据背景颜色融合</h1>
<pre><code class="language-js">p {
    mix-blend-mode: difference;
}

</code></pre>
<p><code>mix-blend-mode</code>属性的值有很多</p>
]]></content>
  <category term="前端"/>
</entry>
<entry>
  <title>JavaScript中的事件冒泡与事件捕获</title>
  <link href="https://ganto.me/post/20230119"/>
  <id>https://ganto.me/post/20230119</id>
  <updated>2023-01-19T00:00:00+08:00</updated>
  <published>2023-01-19T00:00:00+08:00</published>
  <author><name>干徒</name></author>
  <summary><![CDATA[前言 Capture：事件捕获 Bubble：事件冒泡 如图所示，大致展示了事件冒泡和事件捕获的流程 可能还有点迷惑，无妨，继续往下看 事件冒泡展示 我们先创建一个嵌套的HTML结构 &lt;div class=&quot;div1&quot;&gt; &lt;p&gt;div1&lt;/p&gt; &lt;div class=&quot;div2&quot;&gt; &lt;p&gt;div2&lt;/p&gt; &lt;button&gt;CLICK ME!&lt;/button&gt; &lt;/div&gt; &lt;/div&gt; 并且为他们各自添加点击事件，并给window和document也添加上点击事件 window.addEventListener(&quot;click&quot;, () =&gt; { console.log('Window'); }); document.addEventListener(&quot;click&quot;, () =&gt; { console.log('Document'); }); document.querySelec]]></summary>
  <content type="html"><![CDATA[<h2>前言</h2>
<p>Capture：事件捕获
Bubble：事件冒泡</p>
<p><img src="/static/blog-images/JavaScript%E4%B8%AD%E7%9A%84%E4%BA%8B%E4%BB%B6%E5%86%92%E6%B3%A1%E4%B8%8E%E4%BA%8B%E4%BB%B6%E6%8D%95%E8%8E%B7_images/2229842-20241220165118171-411205481.png" alt="" />
如图所示，大致展示了事件冒泡和事件捕获的流程</p>
<p>可能还有点迷惑，无妨，继续往下看</p>
<h2>事件冒泡展示</h2>
<p>我们先创建一个嵌套的HTML结构</p>
<pre><code class="language-html">&lt;div class=&quot;div1&quot;&gt;
    &lt;p&gt;div1&lt;/p&gt;
    &lt;div class=&quot;div2&quot;&gt;
        &lt;p&gt;div2&lt;/p&gt;
        &lt;button&gt;CLICK ME!&lt;/button&gt;
    &lt;/div&gt;
&lt;/div&gt;
</code></pre>
<p>并且为他们各自添加点击事件，并给window和document也添加上点击事件</p>
<pre><code class="language-js">window.addEventListener(&quot;click&quot;, () =&gt; {
  console.log('Window');
});
document.addEventListener(&quot;click&quot;, () =&gt; {
  console.log('Document');
});
document.querySelector(&quot;.div1&quot;).addEventListener(&quot;click&quot;, () =&gt; {
  console.log('DIV 1');
});
document.querySelector(&quot;.div2&quot;).addEventListener(&quot;click&quot;, () =&gt; { 
  console.log('DIV 2');
});
document.querySelector(&quot;button&quot;).addEventListener(&quot;click&quot;, () =&gt; {
  console.log('CLICK ME!');
});
</code></pre>
<p>完整代码</p>
<pre><code class="language-html">&lt;!DOCTYPE html&gt;
&lt;html lang=&quot;en&quot;&gt;
&lt;head&gt;
  &lt;meta charset=&quot;UTF-8&quot;&gt;
  &lt;meta name=&quot;viewport&quot; content=&quot;width=device-width, initial-scale=1.0&quot;&gt;
  &lt;title&gt;Document&lt;/title&gt;
&lt;/head&gt;
&lt;body&gt;
  &lt;div class=&quot;div1&quot;&gt;
    &lt;p&gt;div1&lt;/p&gt;
    &lt;div class=&quot;div2&quot;&gt;
        &lt;p&gt;div2&lt;/p&gt;
        &lt;button&gt;CLICK ME!&lt;/button&gt;
    &lt;/div&gt;
  &lt;/div&gt;
  &lt;script&gt;
    window.addEventListener(&quot;click&quot;, () =&gt; {
      console.log('Window');
    });
    document.addEventListener(&quot;click&quot;, () =&gt; {
      console.log('Document');
    });
    document.querySelector(&quot;.div1&quot;).addEventListener(&quot;click&quot;, () =&gt; {
      console.log('DIV 1');
    });
    document.querySelector(&quot;.div2&quot;).addEventListener(&quot;click&quot;, () =&gt; { 
      console.log('DIV 2');
    });
    document.querySelector(&quot;button&quot;).addEventListener(&quot;click&quot;, () =&gt; {
      console.log('CLICK ME!');
    });
  &lt;/script&gt;
&lt;/body&gt;
&lt;/html&gt;
</code></pre>
<p>在点击<code>CLICK ME!</code>按钮的时候，可以在控制台看到打印结果</p>
<pre><code>CLICK ME!
DIV 2
DIV 1
Document
Window
</code></pre>
<p>以上代码所绑定的所有点击事件，默认都是事件冒泡，所以事件触发会由内往外扩展</p>
<h2>事件捕获展示</h2>
<p>如上代码可知，默认绑定的事件会默认开始事件冒泡，如果想要开始事件捕获，可以通过事件绑定的第三个参数进行设置</p>
<pre><code class="language-js">document.querySelector(&quot;button&quot;).addEventListener(&quot;click&quot;, () =&gt; {
  console.log('CLICK ME!');
}, true);
</code></pre>
<p>因为第三个参数如果不进行传入，则默认为false，也就是事件冒泡模式</p>
<p>现在我们重新修改代码</p>
<pre><code class="language-js">window.addEventListener(&quot;click&quot;, () =&gt; {
  console.log('Window');
}, true);
document.addEventListener(&quot;click&quot;, () =&gt; {
  console.log('Document');
}, true);
document.querySelector(&quot;.div1&quot;).addEventListener(&quot;click&quot;, () =&gt; {
  console.log('DIV 1');
}, true);
document.querySelector(&quot;.div2&quot;).addEventListener(&quot;click&quot;, () =&gt; { 
  console.log('DIV 2');
}, true);
document.querySelector(&quot;button&quot;).addEventListener(&quot;click&quot;, () =&gt; {
  console.log('CLICK ME!');
}, true);
</code></pre>
<p>完整代码</p>
<pre><code class="language-html">&lt;!DOCTYPE html&gt;
&lt;html lang=&quot;en&quot;&gt;
&lt;head&gt;
  &lt;meta charset=&quot;UTF-8&quot;&gt;
  &lt;meta name=&quot;viewport&quot; content=&quot;width=device-width, initial-scale=1.0&quot;&gt;
  &lt;title&gt;Document&lt;/title&gt;
&lt;/head&gt;
&lt;body&gt;
  &lt;div class=&quot;div1&quot;&gt;
    &lt;p&gt;div1&lt;/p&gt;
    &lt;div class=&quot;div2&quot;&gt;
        &lt;p&gt;div2&lt;/p&gt;
        &lt;button&gt;CLICK ME!&lt;/button&gt;
    &lt;/div&gt;
  &lt;/div&gt;
  &lt;script&gt;
    window.addEventListener(&quot;click&quot;, () =&gt; {
      console.log('Window');
    }, true);
    document.addEventListener(&quot;click&quot;, () =&gt; {
      console.log('Document');
    }, true);
    document.querySelector(&quot;.div1&quot;).addEventListener(&quot;click&quot;, () =&gt; {
      console.log('DIV 1');
    }, true);
    document.querySelector(&quot;.div2&quot;).addEventListener(&quot;click&quot;, () =&gt; { 
      console.log('DIV 2');
    }, true);
    document.querySelector(&quot;button&quot;).addEventListener(&quot;click&quot;, () =&gt; {
      console.log('CLICK ME!');
    }, true);
  &lt;/script&gt;
&lt;/body&gt;
&lt;/html&gt;
</code></pre>
<p>打印结果</p>
<pre><code>Window
Document
DIV 1
DIV 2
CLICK ME!
</code></pre>
<p>这时再次触发<code>CLICK ME!</code>按钮的点击事件，发现打印结果反过来了</p>
<p>因为这时已经是通过事件捕获进行了依次触发</p>
<h2>事件冒泡和事件捕获混用</h2>
<p>如果将两者混用会发生什么？
依然会遵循两者的执行顺序</p>
<pre><code class="language-js">window.addEventListener(&quot;click&quot;, () =&gt; {
  console.log('Window');
}, true);
document.addEventListener(&quot;click&quot;, () =&gt; {
  console.log('Document');
}, true);
document.querySelector(&quot;.div1&quot;).addEventListener(&quot;click&quot;, () =&gt; {
  console.log('DIV 1');
}, false);
document.querySelector(&quot;.div2&quot;).addEventListener(&quot;click&quot;, () =&gt; { 
  console.log('DIV 2');
}, false);
document.querySelector(&quot;button&quot;).addEventListener(&quot;click&quot;, () =&gt; {
  console.log('CLICK ME!');
}, true);
</code></pre>
<p>完整代码</p>
<pre><code class="language-html">&lt;!DOCTYPE html&gt;
&lt;html lang=&quot;en&quot;&gt;
&lt;head&gt;
  &lt;meta charset=&quot;UTF-8&quot;&gt;
  &lt;meta name=&quot;viewport&quot; content=&quot;width=device-width, initial-scale=1.0&quot;&gt;
  &lt;title&gt;Document&lt;/title&gt;
&lt;/head&gt;
&lt;body&gt;
  &lt;div class=&quot;div1&quot;&gt;
    &lt;p&gt;div1&lt;/p&gt;
    &lt;div class=&quot;div2&quot;&gt;
        &lt;p&gt;div2&lt;/p&gt;
        &lt;button&gt;CLICK ME!&lt;/button&gt;
    &lt;/div&gt;
  &lt;/div&gt;
  &lt;script&gt;
    window.addEventListener(&quot;click&quot;, () =&gt; {
      console.log('Window');
    }, true);
    document.addEventListener(&quot;click&quot;, () =&gt; {
      console.log('Document');
    }, true);
    document.querySelector(&quot;.div1&quot;).addEventListener(&quot;click&quot;, () =&gt; {
      console.log('DIV 1');
    }, false);
    document.querySelector(&quot;.div2&quot;).addEventListener(&quot;click&quot;, () =&gt; { 
      console.log('DIV 2');
    }, false);
    document.querySelector(&quot;button&quot;).addEventListener(&quot;click&quot;, () =&gt; {
      console.log('CLICK ME!');
    }, true);
  &lt;/script&gt;
&lt;/body&gt;
&lt;/html&gt;
</code></pre>
<p>打印结果</p>
<pre><code>Window
Document
CLICK ME!
DIV 2
DIV 1
</code></pre>
<p>优先依次执行事件捕获，再从最内部开始依次事件冒泡</p>
]]></content>
  <category term="JavaScript"/>
</entry>
<entry>
  <title>React组件ref</title>
  <link href="https://ganto.me/post/20230117"/>
  <id>https://ganto.me/post/20230117</id>
  <updated>2023-01-17T00:00:00+08:00</updated>
  <published>2023-01-17T00:00:00+08:00</published>
  <author><name>干徒</name></author>
  <summary><![CDATA[React中forwardRef的用法 官网文档：https://zh-hans.react.dev/reference/react/forwardRef 今天我们就一起学习一下React中的ref怎么获取组件实例，只讨论函数式组件中的ref 如下代码，我们直接在App根组件中，意图只使用ref就获取Footer组件实例 细心的同学可能已经发现控制台报错了，提示我们应该使用forwardRef，并且编辑器也提示ref={footRef}类型不对 这是因为React不会默认暴露组件中的东西，如果开发者想要从组件中暴露出来东西，需要手动挡进行操作，这也是为了组件数据安全的考量 App.tsx import { useRef } from 'react' import { Footer } from '@/components/footer' const App = () =&gt; { const footRef = useRef(null) const getFootRef = () =&gt; { console.log(footRef.current) } return ( &lt;]]></summary>
  <content type="html"><![CDATA[<h1>React中forwardRef的用法</h1>
<blockquote>
<p>官网文档：<a href="https://zh-hans.react.dev/reference/react/forwardRef">https://zh-hans.react.dev/reference/react/forwardRef</a></p>
</blockquote>
<p>今天我们就一起学习一下React中的ref怎么获取组件实例，只讨论函数式组件中的ref</p>
<p>如下代码，我们直接在App根组件中，意图只使用ref就获取Footer组件实例</p>
<p>细心的同学可能已经发现控制台报错了，提示我们应该使用forwardRef，并且编辑器也提示<code>ref={footRef}</code>类型不对</p>
<p>这是因为React不会默认暴露组件中的东西，如果开发者想要从组件中暴露出来东西，需要手动挡进行操作，这也是为了组件数据安全的考量</p>
<p>App.tsx</p>
<pre><code class="language-tsx">import { useRef } from 'react'
import { Footer } from '@/components/footer'

const App = () =&gt; {
  const footRef = useRef(null)
  const getFootRef = () =&gt; {
    console.log(footRef.current)
  }
  return (
    &lt;div className='app'&gt;
      &lt;h1&gt;App&lt;/h1&gt;
      &lt;button onClick={getFootRef}&gt;Show footRef&lt;/button&gt;
      &lt;Footer ref={footRef}&gt;&lt;/Footer&gt;
    &lt;/div&gt;
  )
}

export default App
</code></pre>
<p>components/Footer/index.tsx</p>
<pre><code class="language-tsx">import { useState } from 'react'

export const Footer = () =&gt; {
  const [count, setCount] = useState(0)
  return (
    &lt;div className=&quot;footer&quot;&gt;
      &lt;h1&gt;Footer&lt;/h1&gt;
      &lt;p&gt;{ count }&lt;/p&gt;
      &lt;button onClick={() =&gt; setCount(count + 1)}&gt;Click Me&lt;/button&gt;
    &lt;/div&gt;
  )
}
</code></pre>
<p>那么我们如何获取组件实例呢</p>
<p>直接请出forwardRef来对Footer组件进行改造</p>
<p>App.tsx 不变</p>
<p>Footer组件改造如下</p>
<p>components/Footer/index.tsx</p>
<pre><code class="language-tsx">import { useState, forwardRef } from 'react'

export const Footer = forwardRef&lt;HTMLDivElement&gt;((props, ref) =&gt; {
  console.log(props)
  const [count, setCount] = useState(0)
  return (
    &lt;div className=&quot;footer&quot;&gt;
      &lt;h1&gt;Footer&lt;/h1&gt;
      &lt;p ref={ref}&gt;{ count }&lt;/p&gt;
      &lt;button onClick={() =&gt; setCount(count + 1)}&gt;Click Me&lt;/button&gt;
    &lt;/div&gt;
  )
})
</code></pre>
<p>可以看出已经能打印出来p标签了，等等...为什么ref绑定在了p标签上，是的没错，想将哪个标签暴露给父组件，就绑定给谁身上</p>
<p>forwardRef的用法就是直接套在组件函数外部，此时组件函数入参的第一个参数依然是props，第二个参数就是ref</p>
<p>此时更应该注意的是，forwardRef需要编写泛型，该泛型就是需要暴露出去的东东的类型，如上代码，我们将p标签暴露出去了</p>
<p>如想将组件状态数据暴露出去，需要使用一个Hook，那就是<code>useImperativeHandle</code></p>
<p>使用方法见以下代码</p>
<p>App.tsx不变</p>
<p>Footer组件改造为以下</p>
<p>components/Footer/index.tsx</p>
<pre><code class="language-tsx">import { useState, useRef, forwardRef, useImperativeHandle } from 'react'

export const Footer = forwardRef&lt;object&gt;((props, ref) =&gt; {
  console.log(props)
  const [count, setCount] = useState(0)
  const pRef = useRef&lt;HTMLParagraphElement&gt;(null)

  useImperativeHandle(ref, () =&gt; {
    return {
      count,
      pRef
    }
  })

  return (
    &lt;div className=&quot;footer&quot;&gt;
      &lt;h1&gt;Footer&lt;/h1&gt;
      &lt;p ref={pRef}&gt;{ count }&lt;/p&gt;
      &lt;button onClick={() =&gt; setCount(count + 1)}&gt;Click Me&lt;/button&gt;
    &lt;/div&gt;
  )
})
</code></pre>
<p>很明显的问题，p标签如要一同暴露，不能直接使用<code>ref={ref}</code>进行暴露，需要将p标签设置一个useRef，然后将其他同其他状态数据一起暴露</p>
]]></content>
  <category term="JavaScript"/>
  <category term="React"/>
</entry>
<entry>
  <title>JavaScript 高阶函数之 reduce</title>
  <link href="https://ganto.me/post/20230116"/>
  <id>https://ganto.me/post/20230116</id>
  <updated>2023-01-16T00:00:00+08:00</updated>
  <published>2023-01-16T00:00:00+08:00</published>
  <author><name>干徒</name></author>
  <summary><![CDATA[MDN：https://developer.mozilla.org/zh-CN/docs/Web/JavaScript/Reference/Global_Objects/Array/reduce 关于reduce函数，我们再熟悉不过了，我们通常用他对数据进行求和，也被称为累加器 reduce常见用例如下： let goods = [ { name: &quot;T恤&quot;, price: 99, count: 2 }, { name: &quot;polo衫&quot;, price: 120, count: 1 }, { name: &quot;牛仔裤&quot;, price: 197, count: 11 } ] const goodsSum = goods.reduce((sum, item) =&gt; { return sum + item.price * item.count; }, initSum = 0) console.log(goodsSum) // 2485 以上代码，我相信对于你那真实信手捏来... 但是还是需要解释一下，reduce就是对goods数组]]></summary>
  <content type="html"><![CDATA[<blockquote>
<p>MDN：<a href="https://developer.mozilla.org/zh-CN/docs/Web/JavaScript/Reference/Global_Objects/Array/reduce">https://developer.mozilla.org/zh-CN/docs/Web/JavaScript/Reference/Global_Objects/Array/reduce</a></p>
</blockquote>
<p>关于reduce函数，我们再熟悉不过了，我们通常用他对数据进行求和，也被称为<strong>累加器</strong></p>
<p>reduce常见用例如下：</p>
<pre><code class="language-js">let goods = [
  { name: &quot;T恤&quot;, price: 99, count: 2 },
  { name: &quot;polo衫&quot;, price: 120, count: 1 },
  { name: &quot;牛仔裤&quot;, price: 197, count: 11 }
]

const goodsSum = goods.reduce((sum, item) =&gt; {
  return sum + item.price * item.count;
}, initSum = 0)

console.log(goodsSum) // 2485
</code></pre>
<p>以上代码，我相信对于你那真实信手捏来...</p>
<p>但是还是需要解释一下，reduce就是对goods数组中的每项的价格进行相加</p>
<p>reduce传递两个参数，第一个参数是一个回调函数，第二个参数是一个用于统计累加结果的初始值</p>
<p>reduce函数的第一个回调函数又有两个参数，第一个参数<code>sum</code>的初始状态等于reduce第二个参数<code>initSum</code>，在reduce执行完一次，第一个参数<code>sum</code>会变成reduce执行完返回的内容</p>
<p>reduce函数的第一个回调函数的第二个参数也就是goods数组中的每项</p>
<p>reduce执行次数与数组的长度有关</p>
<p>在阅读vue官方文档的时候，发现了一段有趣的代码</p>
<pre><code class="language-js">// plugins/i18n.js
export default {
  install: (app, options) =&gt; {
    // 注入一个全局可用的 $translate() 方法
    app.config.globalProperties.$translate = (key) =&gt; {
      // 获取 `options` 对象的深层属性
      // 使用 `key` 作为索引
      return key.split('.').reduce((o, i) =&gt; {
        if (o) return o[i]
      }, options)
    }
  }
}
</code></pre>
<p>以上代码是vue中定义一个插件的代码，有趣的是其中的reduce函数</p>
<p>我们将代码进行精简</p>
<pre><code class="language-js">let obj = {
  greetings: {
    hello: &quot;你好&quot;
  }
}

const ret = &quot;greetings.hello&quot;.split('.').reduce((o, i) =&gt; {
  if (o) {
    return o[i]
  }
}, obj)

console.log(ret)
</code></pre>
<p>以上代码是通过&quot;greetings.hello&quot;这段字符串，进而获取obj对象中的值</p>
<p>以上代码<code>&quot;greetings.hello&quot;.split('.')</code> 就是数组 <code>[&quot;greetings&quot;, &quot;hello&quot;]</code></p>
<p>reduce函数中的第一个回调函数中的第一个参数也就是<code>o</code>等于<code>obj</code>对象，第二个参数<code>i</code>变成了 <code>[&quot;greetings&quot;, &quot;hello&quot;]</code> 数组中的每项</p>
<p>第一次执行 <code>o 是 {greetings: {hello: &quot;你好&quot;}}</code> <code>i 是 &quot;greetings&quot;</code> ，返回 <code>o[i] 也就是 {hello: &quot;你好&quot;}</code> 此时 <code>o 变成 {hello: &quot;你好&quot;}</code></p>
<p>进入下一次reduce回调</p>
<p>第二次执行 <code>o 是 {hello: &quot;你好&quot;}</code> <code>i 是 &quot;hello&quot;</code> ，返回 <code>o[i] 也就是 &quot;你好&quot;</code></p>
<p>结束reduce</p>
<p>返回 <code>&quot;你好&quot;</code></p>
<p>啊？reduce函数还能这么用！</p>
]]></content>
  <category term="JavaScript"/>
</entry>
<entry>
  <title>Taro快速体验</title>
  <link href="https://ganto.me/post/20230112"/>
  <id>https://ganto.me/post/20230112</id>
  <updated>2023-01-12T00:00:00+08:00</updated>
  <published>2023-01-12T00:00:00+08:00</published>
  <author><name>干徒</name></author>
  <summary><![CDATA[5分钟快速入门Taro Taro介绍 Taro是由凹凸实验室开发的一个开放式跨端跨框架，支持使用 React/Vue/Nerv 等框架来开发 微信 / 京东 / 百度 / 支付宝 / 字节跳动 / QQ / 飞书 小程序 / H5 / RN 等应用 Taro类似于uniapp，都是跨端框架，一次开发多端部署 这是Taro官方文档，可以结合官方文档食用更佳 准备 你需要了解最基本的 HTML + CSS + JS ，俗称前端三件套 最好会使用Vue React node环境（&gt;=16.20.0） 安装Taro CLI工具 安装 npm install -g @tarojs/cli 查看是否安装成功 npm info @tarojs/cli 初始化项目 taro init myApp 进入到项目根目录，安装依赖 cd myApp pnpm i 启动项目 开发 pnpm dev:weapp 打包 pnpm build:weapp 项目启动之后，在微信开发者工具中打开该项目根目录，即可预览项目 这样Taro项目就启动起来了]]></summary>
  <content type="html"><![CDATA[<h1>5分钟快速入门Taro</h1>
<h2>Taro介绍</h2>
<p>Taro是由凹凸实验室开发的一个开放式跨端跨框架，支持使用 React/Vue/Nerv 等框架来开发 <a href="https://mp.weixin.qq.com/">微信</a> / <a href="https://mp.jd.com/?entrance=taro">京东</a> / <a href="https://smartprogram.baidu.com/">百度</a> / <a href="https://mini.open.alipay.com/">支付宝</a> / <a href="https://developer.open-douyin.com/">字节跳动</a> / <a href="https://q.qq.com/">QQ</a> / <a href="https://open.feishu.cn/document/uYjL24iN/ucDOzYjL3gzM24yN4MjN">飞书</a> 小程序 / H5 / RN 等应用</p>
<p>Taro类似于uniapp，都是跨端框架，一次开发多端部署</p>
<p>这是<a href="https://taro-docs.jd.com/">Taro官方文档</a>，可以结合官方文档食用更佳</p>
<h2>准备</h2>
<p>你需要了解最基本的 HTML + CSS + JS ，俗称前端三件套</p>
<p>最好会使用Vue React</p>
<p>node环境（&gt;=16.20.0）</p>
<h2>安装Taro CLI工具</h2>
<p>安装</p>
<pre><code class="language-sh">npm install -g @tarojs/cli
</code></pre>
<p>查看是否安装成功</p>
<pre><code class="language-sh">npm info @tarojs/cli
</code></pre>
<h2>初始化项目</h2>
<pre><code class="language-sh">taro init myApp
</code></pre>
<p><img src="/static/blog-images/Taro%E5%BF%AB%E9%80%9F%E5%85%A5%E9%97%A8.assets/ecb98df1436cd3d5.jpg" alt="taro init myApp command screenshot" /></p>
<p>进入到项目根目录，安装依赖</p>
<pre><code class="language-sh">cd myApp

pnpm i
</code></pre>
<h2>启动项目</h2>
<p>开发</p>
<pre><code class="language-sh">pnpm dev:weapp
</code></pre>
<p>打包</p>
<pre><code class="language-sh">pnpm build:weapp
</code></pre>
<p>项目启动之后，在微信开发者工具中打开该项目根目录，即可预览项目</p>
<p>这样Taro项目就启动起来了</p>
]]></content>
  <category term="Taro"/>
</entry>
<entry>
  <title>Rust中的所有权初体验</title>
  <link href="https://ganto.me/post/20230111"/>
  <id>https://ganto.me/post/20230111</id>
  <updated>2023-01-11T00:00:00+08:00</updated>
  <published>2023-01-11T00:00:00+08:00</published>
  <author><name>干徒</name></author>
  <summary><![CDATA[所有权系统是Rust中的一大特点 今日靓仔我啊，就来体验一番 我们先来看一段代码 fn main() { let s1 = String::from(&quot;hello&quot;); let s2 = s1; // s1 的所有权转移给了 s2 println!(&quot;s1: {}, s2: {}&quot;, s1, s2); // 报错，s1 已经被移动了 } 你可能不了解rust代码，那么按照你熟悉的语言去理解他，大同小异 代码中先定义了一个String字符串类型的变量 s1 然后紧接着定义了一个变量 s2，此时需要注意，s2 的值是由 s1 赋值所得（可以先简单理解为赋值） 然后打印出 s1，s2 发现报错了 问题就出现在 let s2 = s1; 这段代码，这里其实发生了所有权转移，也就是 s1 的所有权发生了向 s2 转移 那么 s1 变量在所有权发生转移后，再进行访问，那么在rust中将是不合法的访问 如果不需要所有权转移，而只是简单的拷贝，则可以使用clone函数 fn main() { let mut s1 = String::from(&quot;hel]]></summary>
  <content type="html"><![CDATA[<p>所有权系统是Rust中的一大特点
今日靓仔我啊，就来体验一番</p>
<p>我们先来看一段代码</p>
<pre><code class="language-rust">fn main() {
    let s1 = String::from(&quot;hello&quot;);
    let s2 = s1; // s1 的所有权转移给了 s2
    println!(&quot;s1: {}, s2: {}&quot;, s1, s2); // 报错，s1 已经被移动了
}
</code></pre>
<p><em><strong>你可能不了解rust代码，那么按照你熟悉的语言去理解他，大同小异</strong></em></p>
<p>代码中先定义了一个String字符串类型的变量 <code>s1</code></p>
<p>然后紧接着定义了一个变量 <code>s2</code>，此时需要注意，<code>s2</code> 的值是由 <code>s1</code> 赋值所得（可以先简单理解为赋值）
然后打印出 <code>s1</code>，<code>s2</code> 发现报错了</p>
<p>问题就出现在 <code>let s2 = s1;</code> 这段代码，这里其实发生了所有权转移，也就是 <code>s1</code> 的所有权发生了向 <code>s2</code> 转移</p>
<p>那么 <code>s1</code> 变量在所有权发生转移后，再进行访问，那么在rust中将是不合法的访问</p>
<p>如果不需要所有权转移，而只是简单的拷贝，则可以使用clone函数</p>
<pre><code class="language-rust">fn main() {
    let mut s1 = String::from(&quot;hello&quot;);
    let s2 = s1.clone(); // 深拷贝
    println!(&quot;s1: {}, s2: {}&quot;, s1, s2);
    s1.push_str(&quot; world&quot;); // 修改 s1
    println!(&quot;s1: {}, s2: {}&quot;, s1, s2); // s2 的值没有改变，说明是深拷贝
}
</code></pre>
<p>以上代码，通过对 <code>s1</code> 进行修改，会发现 <code>s2</code> 没有被一同修改，说明 <code>clone()</code> 函数是深拷贝</p>
<p>体验了rust中的所有权，很奇妙，像进了米奇妙妙屋...</p>
]]></content>
  <category term="Rust"/>
</entry>
<entry>
  <title>Gin中间件上下文的Set、Get用法</title>
  <link href="https://ganto.me/post/20230110"/>
  <id>https://ganto.me/post/20230110</id>
  <updated>2023-01-10T00:00:00+08:00</updated>
  <published>2023-01-10T00:00:00+08:00</published>
  <author><name>干徒</name></author>
  <summary><![CDATA[Code 如上代码所示，中间件middlewareA内部通过c.Set(&quot;middlewareA_key&quot;, str)将参数设置到上下文中 所以中间件middlewareB可以通过c.Get(&quot;middlewareA_key&quot;)获取到上下文中传递的值，并将值进行了修改，然后继续通过上下文进行了传递 然后在控制器函数中可以通过上下文c.Keys[&quot;middlewareB_key&quot;]的方式获取 package main import ( &quot;fmt&quot; &quot;github.com/gin-gonic/gin&quot; ) func main() { router := gin.Default() router.Use(middlewareA(&quot;中间件A传递的值&quot;), middlewareB()) router.GET(&quot;/&quot;, func(c *gin.Context) { valueA := c.Keys[&quot;middlewareA_key&quot;] va]]></summary>
  <content type="html"><![CDATA[<h2>Code</h2>
<p>如上代码所示，中间件<code>middlewareA</code>内部通过<code>c.Set(&quot;middlewareA_key&quot;, str)</code>将参数设置到上下文中
所以中间件<code>middlewareB</code>可以通过<code>c.Get(&quot;middlewareA_key&quot;)</code>获取到上下文中传递的值，并将值进行了修改，然后继续通过上下文进行了传递
然后在控制器函数中可以通过上下文<code>c.Keys[&quot;middlewareB_key&quot;]</code>的方式获取</p>
<pre><code class="language-go">package main

import (
	&quot;fmt&quot;
	&quot;github.com/gin-gonic/gin&quot;
)

func main() {
	router := gin.Default()

	router.Use(middlewareA(&quot;中间件A传递的值&quot;), middlewareB())
	router.GET(&quot;/&quot;, func(c *gin.Context) {
		valueA := c.Keys[&quot;middlewareA_key&quot;]
		valueB := c.Keys[&quot;middlewareB_key&quot;]
		c.JSON(200, gin.H{
			&quot;data&quot;: map[string]any{
				&quot;middlewareA&quot;: valueA,
				&quot;middlewareB&quot;: valueB,
			},
		})
	})

	if err := router.Run(&quot;:8090&quot;); err != nil {
		fmt.Printf(&quot;run server error: %v&quot;, err)
		panic(err)
	}
}

func middlewareA(str string) gin.HandlerFunc {
	return func(c *gin.Context) {
		c.Set(&quot;middlewareA_key&quot;, str)
		c.Next()
	}
}

func middlewareB() gin.HandlerFunc {
	return func(c *gin.Context) {
		middlewareAKey, _ := c.Get(&quot;middlewareA_key&quot;)
		c.Set(&quot;middlewareB_key&quot;, middlewareAKey.(string)+&quot; *** 我是中间件B&quot;)
		c.Next()
	}
}
</code></pre>
<p>需要注意的是，中间件设置的数据，会同时存在在控制器函数的上下文中，均可以获取</p>
<h2>Return</h2>
<p>请求：<a href="http://localhost:8090">http://localhost:8090</a></p>
<pre><code class="language-json">{
    &quot;data&quot;: {
        &quot;middlewareA&quot;: &quot;中间件A传递的值&quot;,
        &quot;middlewareB&quot;: &quot;中间件A传递的值 *** 我是中间件B&quot;
    }
}
</code></pre>
]]></content>
  <category term="Golang"/>
  <category term="Gin"/>
</entry>
<entry>
  <title>hexo-theme-heri主题开发简记</title>
  <link href="https://ganto.me/post/20210105"/>
  <id>https://ganto.me/post/20210105</id>
  <updated>2021-01-05T00:00:00+08:00</updated>
  <published>2021-01-05T00:00:00+08:00</published>
  <author><name>干徒</name></author>
  <summary><![CDATA[Heri介绍： 究极简洁的Hexo主题 展示站点 展示站点 下载Heri hexo-theme-heri 下载完整的Heri主题，拷贝到Hexo的主题文件夹下 引用Heri 在Hexo根配置文件中这样引用即可 theme: heri 根配置文件的其他必要配置 # Site title: Ganto # 网站名称 subtitle: '但愿可以成为有趣的人' # 网站小标题，可为座右铭 # URL url: https://www.baidu.cn # 网站链接 root: / # 如无特殊，设置&quot;/&quot;即可 主题配置文件的必要配置 # 网站icon favicon: /images/g.png # 网站的icon # 日期/时间格式 time_format: date_format: YYYY-MM-DD time_format: HH:mm:ss division: &quot;&quot; # 日期与时间中间的间隔，如：division: &quot;/&quot; ===&gt;&gt;&gt; 2020-20-20/20:20:20 # 网站声明 websit]]></summary>
  <content type="html"><![CDATA[<h1>Heri介绍：</h1>
<p>究极简洁的Hexo主题<br />
<img src="https://heri.ganto.cn/ArticleResources/Hexo-Theme-Heri/heri.png" alt="预览图" /></p>
<h2>展示站点</h2>
<p><a href="https://heri.ganto.cn">展示站点</a></p>
<h1>下载Heri</h1>
<p><a href="https://github.com/ganto-cn/hexo-theme-heri/releases">hexo-theme-heri</a></p>
<p>下载完整的Heri主题，拷贝到Hexo的主题文件夹下</p>
<h1>引用Heri</h1>
<p>在Hexo根配置文件中这样引用即可</p>
<pre><code class="language-makefile">theme: heri

</code></pre>
<h1>根配置文件的其他必要配置</h1>
<pre><code class="language-yaml"># Site
title: Ganto # 网站名称
subtitle: '但愿可以成为有趣的人' # 网站小标题，可为座右铭
# URL
url: https://www.baidu.cn # 网站链接
root: / # 如无特殊，设置&quot;/&quot;即可

</code></pre>
<h1>主题配置文件的必要配置</h1>
<pre><code class="language-yaml"># 网站icon
favicon: /images/g.png # 网站的icon

# 日期/时间格式
time_format:
  date_format: YYYY-MM-DD
  time_format: HH:mm:ss
  division: &quot;&quot; # 日期与时间中间的间隔，如：division: &quot;/&quot; ===&gt;&gt;&gt; 2020-20-20/20:20:20

# 网站声明
website_notice:
  txt: 如果你需要“转载”、“引用”小站的文章，可以不需要作者同意，请务必标明出处和文章链接。 # 文章末尾处的声明文字

</code></pre>
<h1>代码高亮</h1>
<p>如需代码高亮，请这样设置根配置文件</p>
<pre><code class="language-vbnet">hljs: true

</code></pre>
<h1>图片预览插件</h1>
<p><a href="https://fancyapps.com/">fancybox</a><br />
<img src="https://heri.ganto.cn/ArticleResources/Hexo-Theme-Heri/0.jpg" alt="预览图" /></p>
<h1>动效插件</h1>
<p><a href="https://animate.style/">Animate.css</a></p>
<h1>代码高亮</h1>
<p><a href="https://highlightjs.org/">highlight</a><br />
<img src="https://heri.ganto.cn/ArticleResources/Hexo-Theme-Heri/1.png" alt="预览图" /></p>
<p>目及所见，皆是全部；化繁为简，只为高效。</p>
<p>没错，这就是Heri的全部。</p>
]]></content>
</entry>
<entry>
  <title>测试文章</title>
  <link href="https://ganto.me/post/20201222"/>
  <id>https://ganto.me/post/20201222</id>
  <updated>2020-12-22T00:00:00+08:00</updated>
  <published>2020-12-22T00:00:00+08:00</published>
  <author><name>干徒</name></author>
  <summary><![CDATA[测试文章 测试文章 ```js nihao ```]]></summary>
  <content type="html"><![CDATA[<h1>测试文章</h1>
<p>测试文章</p>
<p>```js nihao ```</p>
]]></content>
</entry>
</feed>